Free Crochet Shawl Pattern- Iris Shawl
I am so excited to have another pattern designer on the blog to share a beautiful crochet shawl pattern with us!
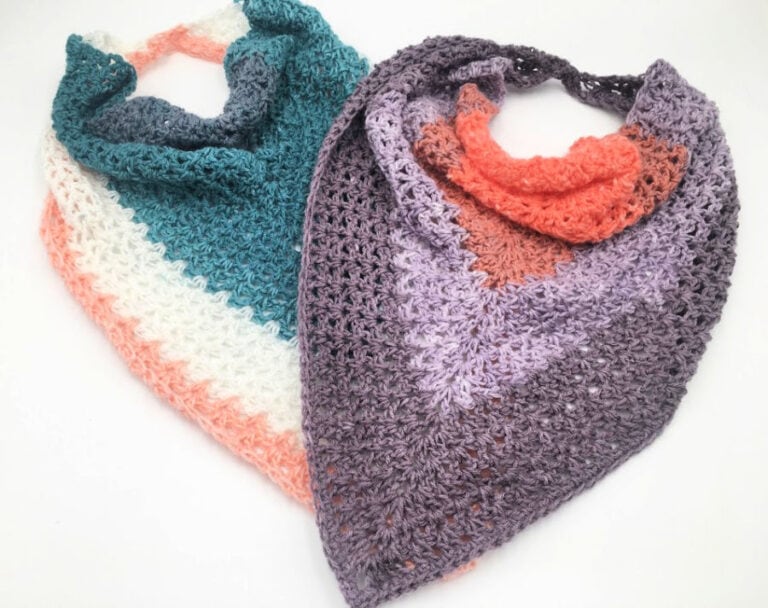
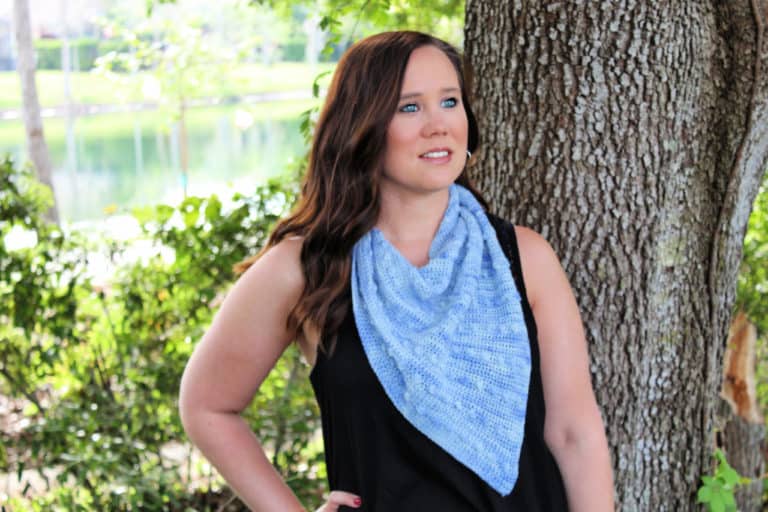
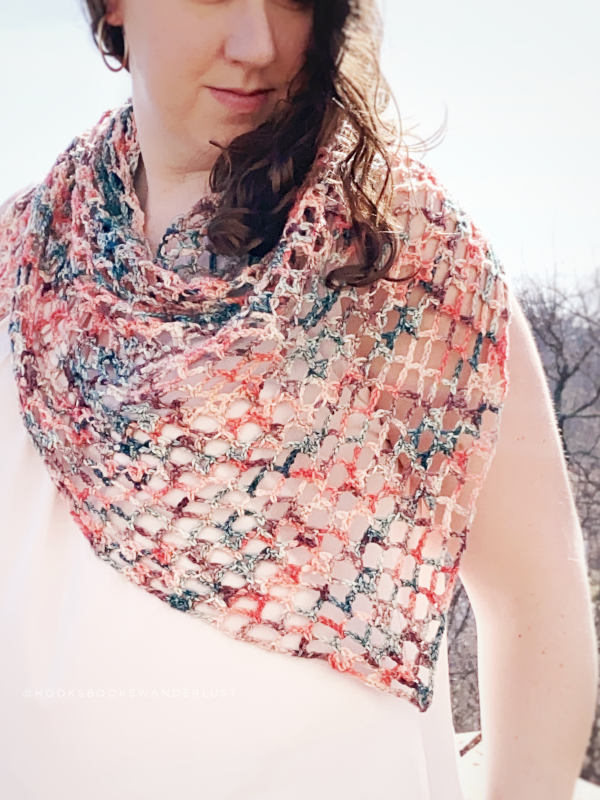
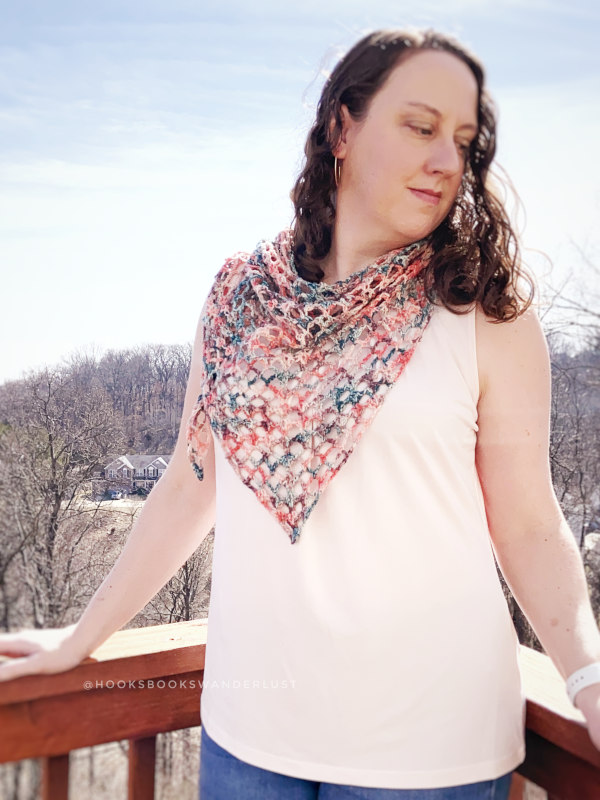
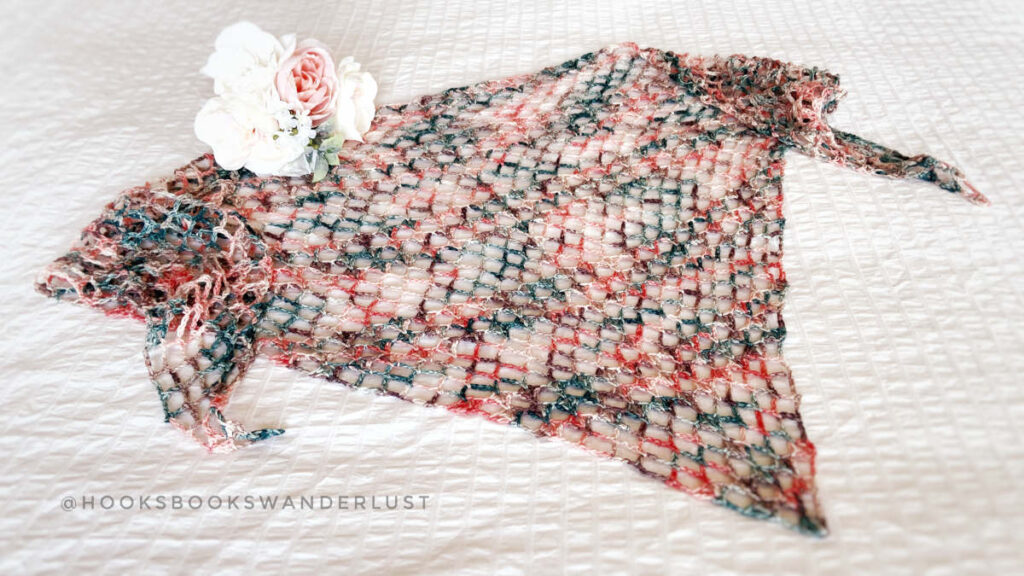
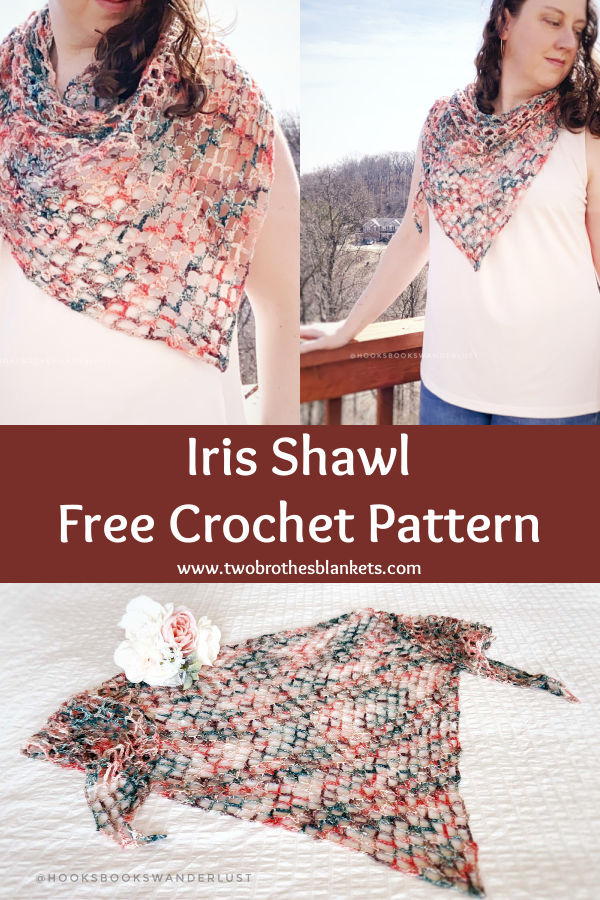
Kristen of Hooks, Books, and Wanderlust is sharing her Iris Shawl crochet pattern today! This beautiful crochet triangle shawl is made with sport weight yarn and is simple to make!
Kristen is a wife and a mom to two boys, and a breast cancer survivor. When she’s not busy thinking about yarn, playing with yarn or writing about yarn, she can usually be found with her nose in a book or out hiking or traveling and exploring the beautiful world around her.
On her blog, Hooks, Books, & Wanderlust, she shares crochet patterns and tutorials, book reviews and tales of her travel adventures, all the ways she lives la belle vie—the good life, because cancer has a way of putting things into perspective.
She hopes to inspire others to do the things that help them live la belle vie in their own lives. HB&W patterns are written with teaching in mind and cater to multiple ways of learning for experienced crocheters and beginners alike, leaving the maker with a sense of pride and accomplishment that puts a little more good into their life.
You can check out Kristen’s other crochet patterns on Ravelry and be sure to give her a follow on Instagram and Facebook!
She also has a YouTube channel with some really amazing tutorials!
Iris Shawl Crochet Pattern
You can purchase the printable pdf version, with a detailed photo tutorial, on Ravelry and Etsy!
Materials and Notes
MATERIALS
1 hank CYC 2 Sport Weight Yarn; “Purposeful” from A Purpose and a Stitch shown here
5.5 mm / I crochet hook
Stitch marker (recommended)
Tapestry needle
Scissors
STITCHES & ABBREVIATIONS (U.S. TERMS)
Chain (ch)
Chain Space (ch sp)
Slip Stitch (sl st)
Single Crochet (sc)
Double Crochet (dc)
Treble Crochet (tr)
Modified Iris Stitch (mod iris)
Place Stitch Marker (pm)
Size:
62″ x 28″
GAUGE:
2” / 5 cm square = 8 dc sts x 4 rows of dc
NOTES:
This pattern is written in US Standard terms and is classified as Intermediate.
This pattern is designed to be worked using only 1 hank of yarn, perfect for that pretty hand-dyed yarn you have been saving! Just work the pattern repeat until you run out of yarn! I was able to get almost 5 repeats out of a single hank, just two rows shy of completing the 5th repeat.
This pattern can be altered for size or tension by increasing/decreasing your hook size or by adding/subtracting rows or pattern repeats.
The use of such a large hook for such a thin yarn yields the beautiful drape of this shawl, so feel free to mix it up and use a larger weight yarn, but note that you will want to make sure to have a significantly larger hook size to achieve that drape.
Chain stitches at beginning of Rows DO count as a stitch unless otherwise noted.
Blocking is required to open up the stitches of your shawl and stretch it out to the final size.
Parentheses ( ) are used within the pattern to give extra information for that row.
Brackets [ ] are used to show a series of stitches to be worked into the indicated stitch or space.
Asterisks * are used to indicate a series of stitches to be repeated in succession across a row.
SPECIAL STITCHES
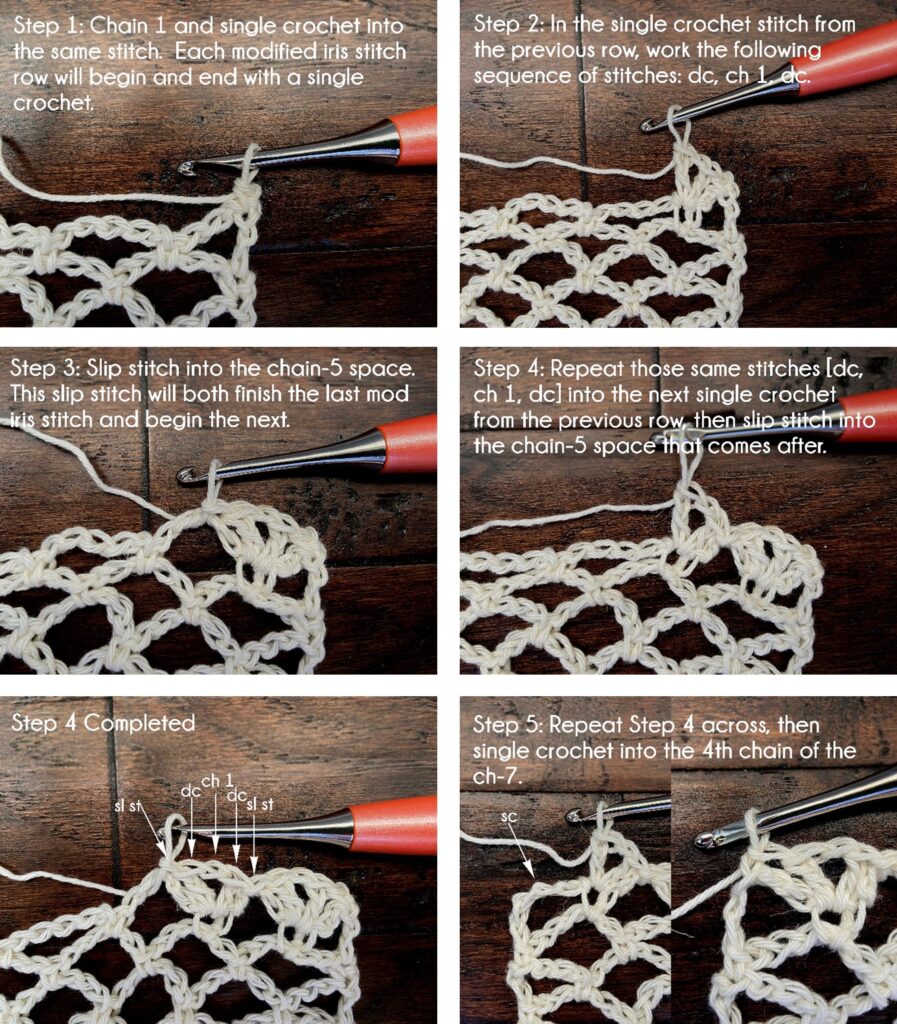
MODIFIED IRIS STITCH:
This variation on the Iris stitch will be used in this pattern to transition from a trellis section to an Iris stitch section. Working a slip stitch into each chain-5 space from the previous row will create the visual effect of the first and last double crochets of the Iris stitch, so instead of a full iris stitch, you will work (dc, ch 1, dc) into the single crochets between ch-5 spaces from the previous row.
If you would like to see this technique in action, I have recorded a video tutorial here.
This pattern will be worked in turned rows. The chain stitches at the beginning of rows count as stitches unless otherwise noted. The pattern is worked bottom up, growing larger with each subsequent row. I recommend placing a stitch marker in the center stitch of each row as you work. Stitch counts appear in ( ) at the end of each row. A row tracker with calculated stitch counts up to 6 full pattern repeats can be found here.
PART 1: SHAWL
R1: Ch 4 (counts as a foundation chain + dc), [dc, ch 1, 2 dc] in 4th chain from hook. (4 dc, 1 ch-1 sp)
NOTE: This creates our first iris stitch.
R2: Ch 4, turn, and sc in 2nd chain from hook (counts as a tr), ch 5, sc in ch-1 sp,, ch 5, tr in the top of the ch-3 from the previous row. (2 tr, 1 sc, 2 ch-5 sp)
R3: Ch 3 (counts as a dc), turn, [dc, ch 1, dc] in same st, mod iris at center sc, then [dc, ch 1, 2 dc] in last sc. (6 dc, 1 mod iris)
R4: Ch 4, turn, and sc in 2nd chain from hook (counts as a tr), *ch 5, sc in ch-1 sp, repeat from * across, then ch 5, tr in the top of the ch-3 from the previous row. (2 tr, 3 sc, 4 ch-5 sp)
R5: Ch 3 (counts as a dc), turn, [dc, ch 1, dc] in same, mod iris across until the last sc, then [dc, ch 1, 2 dc] in last sc. (6 dc, 3 mod iris)
R6: Ch 4, turn, and sc in 2nd chain from hook (counts as a tr), *ch 5, sc in ch-1 sp, repeat from * across, then ch 5, tr in the top of the ch-3 from the previous row. (2 tr, 5 sc, 6 ch-5 sp)
NOTE: I strongly recommend placing a stitch marker in the center single crochet of this row, as it will help you to work Row 7.
NOTE: This is the first row of the pattern repeat.
R7: Ch 4, turn, and sc in 2nd chain from hook (counts as a tr), *ch 5, sc in the ch-5 sp, repeat from * until the ch-5 space before stitch marker, ch 5, mod iris in marked sc, *ch 5, sc in the next ch-5 sp, repeat from * until the last sc from the previous row, then ch 5, tr in the top of the last sc from the previous row. (2 tr, 4 sc, 1 mod iris, 6 ch-5 sp)
NOTE: Move stitch marker to the ch-1 sp of the center mod iris of this row.
R8: Ch 4, turn, and sc in 2nd chain from hook (counts as a tr), *ch 5, sc in ch-5 sp, repeat from * to the ch-5 space just before stitch marker, then ch 5, sc in ch-1 sp, *ch 5, sc in ch-5 sp, repeat from * to the last sc of the previous row, then ch 5, tr in the last sc. (2 tr, 7 sc, 8 ch-5 sp)
NOTE: Move stitch marker to the center sc of this row.
R9: Ch 4, turn, and sc in 2nd chain from hook (counts as a tr), *ch 5, sc in the ch-5 sp, repeat from * until the ch-5 space before stitch marker, ch 5, mod iris in marked sc, *ch 5, sc in the next ch-5 sp, repeat from * until the last sc from the previous row, then ch 5, tr in the top of the last sc from the previous row. (2 tr, 6 sc, 1 mod iris, 8 ch-5 sp)
NOTE: Move stitch marker to the ch-1 sp of the center mod iris of this row.
R10: Ch 4, turn, and sc in 2nd chain from hook (counts as a tr), *ch 5, sc in ch-5 sp, repeat from * to the ch-5 space just before stitch marker, then ch 5, sc in ch-1 sp, *ch 5, sc in ch-5 sp, repeat from * to the last sc of the previous row, then ch 5, tr in the last sc. (2 tr, 9 sc, 10 ch-5 sp)
NOTE: Move stitch marker to the center sc of this row.
R11: Ch 3 (counts as a dc), turn, [dc, ch 1, dc] in same, mod iris across until the last sc, then [dc, ch 1, 2 dc] in last sc. (6 dc, 9 mod iris)
NOTE: Move stitch marker to the ch-1 sp of the center mod iris of this row.
R12: Repeat R6. (2 tr, 11 sc, 12 ch-5 sp)
NOTE: Move stitch marker to the center sc of this row.
R13: Repeat R11. (6 dc, 11 mod iris)
NOTE: Move stitch marker to the ch-1 sp of the center mod iris of this row.
R14: Repeat R6. (2 tr, 13 sc, 14 ch-5 sp)
NOTE: Move stitch marker to the center sc of this row.
R15: Repeat R11. (6 dc, 13 mod iris)
NOTE: Move stitch marker to the ch-1 sp of the center mod iris of this row.
NOTE: That’s the first pattern repeat!
R16 – ?: Continue repeating R6 – R15 until you run out of yarn! Weave in your ends!
PART 2: BLOCKING
Blocking is necessary for this pattern, as it will even out your edges and open up the stitches of your runner so beautifully and really show off the detail. If you haven’t blocked anything before, it sounds scarier than it is, trust me! This video is a great resource for beginner blockers.
For this project I prefer wet blocking (as opposed to spray or steam blocking), in which you give your project a cold bath, gently squeeze the water out (don’t wring it or pull, as it will affect the shape), then roll it up into a towel to soak up as much more water as you can.
When you’re done getting out the excess water, lay it out on some foam blocking boards like these. If you don’t have foam boards, laying it on top of carpet or rug with a towel under it will work too. Gently stretch it into shape and pin it to hold the shape. When it is dry, you’re all set!
Congratulations! Don on your new shawl and give yourself a pat on the back! Then snap a selfie! I would LOVE to see your new shawl! Should you choose to share, use the tag #IrisShawl and / or #LaBelleVieForMe to share your makes with me @HooksBooksWanderlust on Instagram and / or Facebook!
I hope you enjoyed this pattern and found it easy to follow! If not, or if you have any questions, don’t hesitate to ask! Email me at [email protected].
Enjoyed this pattern? Check out my ever growing list of Free Crochet Patterns!
Pin It!

Michelle has been crocheting since 2011 and has been designing crochet patterns since 2014! She specializes in modern garments and accessories for your handmade wardrobe. Michelle has been featured in Happily Hooked Magazine, thehooknooklife.com, wecrochet.com, ourmakerlife.com, and several other websites. She is committed to providing the highest quality crochet information and patterns that instill a true feeling of pride, enjoyment, and accomplishment when completing a project.