Free Crochet Crop Top Pattern- Tuesday Top
This post – Free Crochet Crop Top Pattern- Tuesday Top- contains affiliate links. This means that if you make a purchase from those links I receive a small commission at no additional cost to you. Thank you for your continued support!
Crochet Tops are a must make during the summer! The Tuesday Top is a beautiful open stitch crochet crop top, that you can pair with any pants, shorts, or skirt you would like!
I am so thrilled to have Abby from A Stitch Shy of Normal on the blog today sharing this beautiful crochet top pattern!

About the Designer
Abby has been crocheting for almost a decade and is still just as addicted as day 1! She is passionate about colors and textures, and loves a project that is as comfy as it is fun to make. She started with simple dishcloths for holiday presents, and would love to go back in time to tell herself she would one day design a sized garment. There is a hook in her hand 24/7 and she never wants to slow down. She now writes crochet pattern reviews on top of designing and constant making. It’s a wonderfully fulfilling and busy hobby, and she wouldn’t trade it for anything!
You can check out more of Abby’s patterns on Ravelry!

Tuesday Top Crochet Pattern
Items needed:
400-1300 yards DK/light worsted yarn (testers used Caron Cotton Cakes, LB Comfy Cotton Blend, etc)
4.5mm and 5.5mm hooks or size needed to meet gauge
Scissors/yarn needle
Blocking supplies (optional)
Abbreviations:
FSC: foundation single crochet (alternatively, you can chain one extra and then SC in second chain and across)
SC: single crochet
BLSC: single crochet back-loop only
DC: double crochet
HDC: half-double crochet
V-stitch: *DC, Ch 1, DC* all in same stitch
SlSt: slip stitch
Notes:
Written with a few inches of positive ease for a boxy fit. For a looser top, size up from your general size.
Ribbing will measure approximately half the bust size, body panel will add a couple of inches in width.
Written as a moderate crop, ending right around the belly-button. To make a longer or shorter top, add or subtract repeats of the body rows (rows 6-25+), just be sure to do the same for the front and back panels.
Stitch or row counts are written as follows: (XS, S, M, L, XL, 2X, 3X)
Stitch counts DO include chain spaces as stitches
Gauge:
Ribbing: 4”=16 rows, approximately 21.5 SC (ribbing of 12 SC should measure about 2.25” wide)
Body: 4”=15 stitches (HDC), 8 rows in pattern
Sizing:
These are written as “Size (actual bust measurement), approximate yardage in DK”
XS (28-30), 400-450
S (32-34), 500-550
M (36-38), 600-700
L (40-42), 650-750
XL (44-46), 800-900
2X (48-50), 1000-1100
3X (52-54), 1200-1300
Pattern:
Back Panel
Ribbing (use 4.5mm or your smaller hook):
1. FSC 12 (or chain 13, SC in second chain and across). Turn.
2. Ch 1. BLSC in each stitch across. Turn. (12)
3. Repeat row 2 for about (62, 71, 77, 86, 95, 104, 110) rows (multiple of 3 + 2)
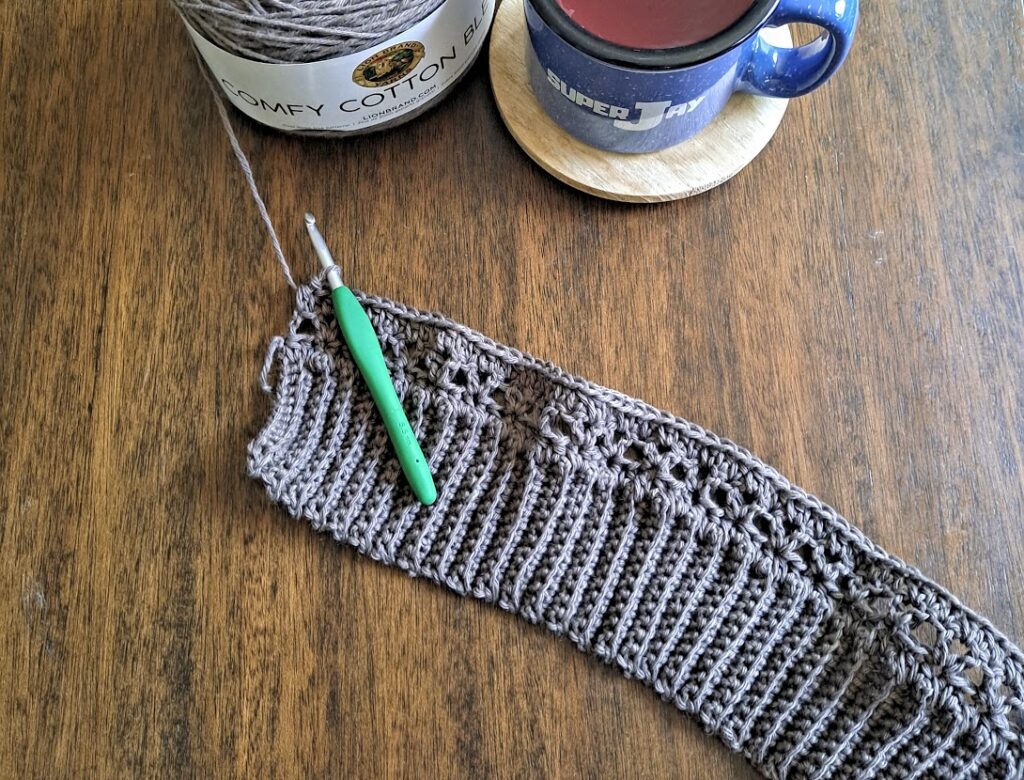
Do NOT cut yarn. Switch to 5.5mm or your larger hook and turn to work along top of ribbing rows.)
Body:
- (RS) Ch 1. HDC across ribbing rows, placing one HDC in the side of each row. Turn. (62, 71, 77, 86, 95, 104, 110)
- (WS) Ch 3 (counts as first DC), skip next stitch. *V-stitch in next stitch, skip next 2* across until final 2 stitches. Skip next stitch, DC in last stitch. Turn. (62, 71, 77, 86, 95, 104, 110)
- Ch 1, HDC across row placing 3 into each V-stitch (you will put one in the first DC, one in the space, one in the second DC) and one stitch in the first and last DC. Turn. (62, 71, 77, 86, 95, 104, 110)
- Repeat row 2.
- Repeat row 3.
6-(29, 29, 33, 37, 41, 43, 43) Repeat rows 2 and 3. You will end on a repeat of row 3. Fasten off, leaving a long tail for shoulder seaming.
Front Panel:
Work identical to back panel through row (24, 24, 26, 30, 34, 34, 34). Do NOT fasten off. Turn to begin first shoulder.
Shoulders:
- Ch 1, HDC (20, 20, 23, 26, 29, 35, 35) stitches. SC in next chain space, Sl St in next stitch (the second DC of the V-stitch). Turn.
- Skip the first stitch (the previous SlSt), Sl St next 2 stitches. Ch 3 in same stitch, skip next stitch. *V-stitch in next, skip 2* (5, 5, 6, 7, 8, 10, 10)) times. V-stitch, skip 1, DC in last stitch. Turn. (6, 6, 7, 8, 9, 11, 11 V stitches + 2 DC)
- Ch 1, HDC (17, 17, 20, 23, 26, 32, 32). SC in chain space, Sl St in last. Turn.
- Repeat row 2 but *V-stitch in next stitch, skip 2* (4, 4, 5, 6, 7, 9, 9) times. V-stitch, skip 1, DC in last. Turn. (5, 5, 6, 7, 8, 10, 10 V-stitches + 2 DC)
XS/S ONLY:
- CH 1, HDC across. (17, 17) Fasten off, leaving long tail to seam shoulders.
All other sizes:
5. Ch 1, HDC (17, 20, 23, 29, 29). SC in chain space, sl st in last. Turn.
6. Repeat row 2 but repeat * to * (4, 5, 6, 8, 8) times. V-stitch, skip 1, DC in last. (5, 6, 7, 9, 9 V-stitches + 2 DC)
7. Ch 1, HDC across (17, 20, 23, 29, 29)
M-XL: Fasten off here, leaving long tail to seam shoulders.
2X/3X:
- Repeat row 6 (9 V-stitches + 2 DC)
- Repeat row 7 (29 HDC)
Join on other outside edge and repeat rows 1-(5, 7, 9)
Assembly:
Weave in all ends (besides shoulder tails)
Lay panels WS out. Sew shoulders together.
Measure from top of shoulder seam down the width of your desired armhole size, often between 6.5 and 9 inches (depending on preference!). Place stitch markers from bottom of panel up to beginning of armhole to hold pieces together and repeat on other side. Seam sides up using desired method. (Optional—start seam an inch or two up from the bottom of the ribbing to leave a small slit). Repeat on other side, then flip to RS out.
Neckhole:
Join with 5.5mm hook at approximately center back of neckline (RS facing out).
- Ch 1, and HDC around an appropriate amount to avoid pulling or rippling, placing approximately one stitch into each stitch from the previous rows, ending with an even number (this could be between 60 and 100+ stitches, anything that fits appropriately on your neckline). Join with Sl St.
- Ch 1. SC, Ch 1, skip next stitch. Repeat around. (SC + chains total is your previous row’s stitch count) Fasten off.
Armholes:
Join with 5.5mm hook at bottom of armhole space.
- Ch 1. HDC around armhole, placing 2 stitches in the side of each DC and one in the side of each HDC. (This will depend on chosen armhole size, most samples were between 45 and 60 stitches.) Join.
- Ch 1, HDC around, join.
- Ch 1, HDC around, join.
- Ch 1. *SC, Ch 1/skip next stitch* around, join.
Repeat on other side with same stitch count.
Fasten off and weave in all remaining ends! Block if you wish. Some testers chose to block, I personally did not, and we all enjoyed our respective results.
You are finished!! I hope you enjoyed crocheting this top! Share your work with Abby!
Instagram: @astitchshyofnormal
Blog: Stitch Shy of Normal
If you enjoyed this pattern, check out my ever growing list of Free Crochet Patterns!
Pin it!

Michelle has been crocheting since 2011 and has been designing crochet patterns since 2014! She specializes in modern garments and accessories for your handmade wardrobe. Michelle has been featured in Happily Hooked Magazine, thehooknooklife.com, wecrochet.com, ourmakerlife.com, and several other websites. She is committed to providing the highest quality crochet information and patterns that instill a true feeling of pride, enjoyment, and accomplishment when completing a project.
