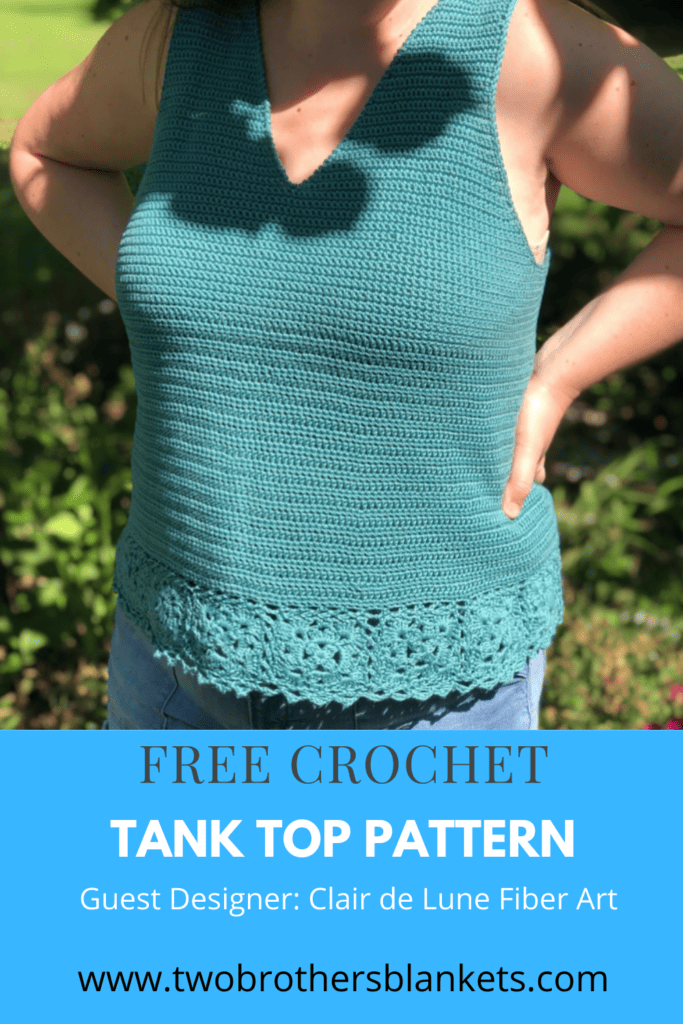
Crochet Tank Tops are always so fun to make and even more fun to wear!
I am thrilled to have Allison from Clair de Lune Fiber Art on the blog sharing her Tide Pool Tank pattern!
About the Designer
Allison Bostrom is the designer, creator, and very-much-still-learning photographer/social media manager behind Clair de Lune Fiber Art.
She designs stimulating crochet and knit patterns for everything from garments and accessories to homewares. Her goal in writing patterns is to encourage makers to learn new stitches and construction techniques, or to reconsider the ones they know.
Though working with yarn is always relaxing for her, she finds a real joy in pushing herself to do something new and different with yarn. When she isn’t busy crafting, Allison loves to cook, bake, garden, do puzzles, read, and make music (especially on piano and guitar). She is currently pursuing a Masters degree in International Development with the hope of working with refugees.
You can check out more of Allison’s patterns on Ravelry!
Social media:
www.instagram.com/clairdelunefiberart
www.facebook.com/clairdelunefiberart
www.pinterest.com/clairdelunefiberart

If you love crocheting as much as I do, or want to learn more, or just want to show off your work, please join our Crochet Garments community over on Facebook! I hope you’ll share your finished crochet project with us!
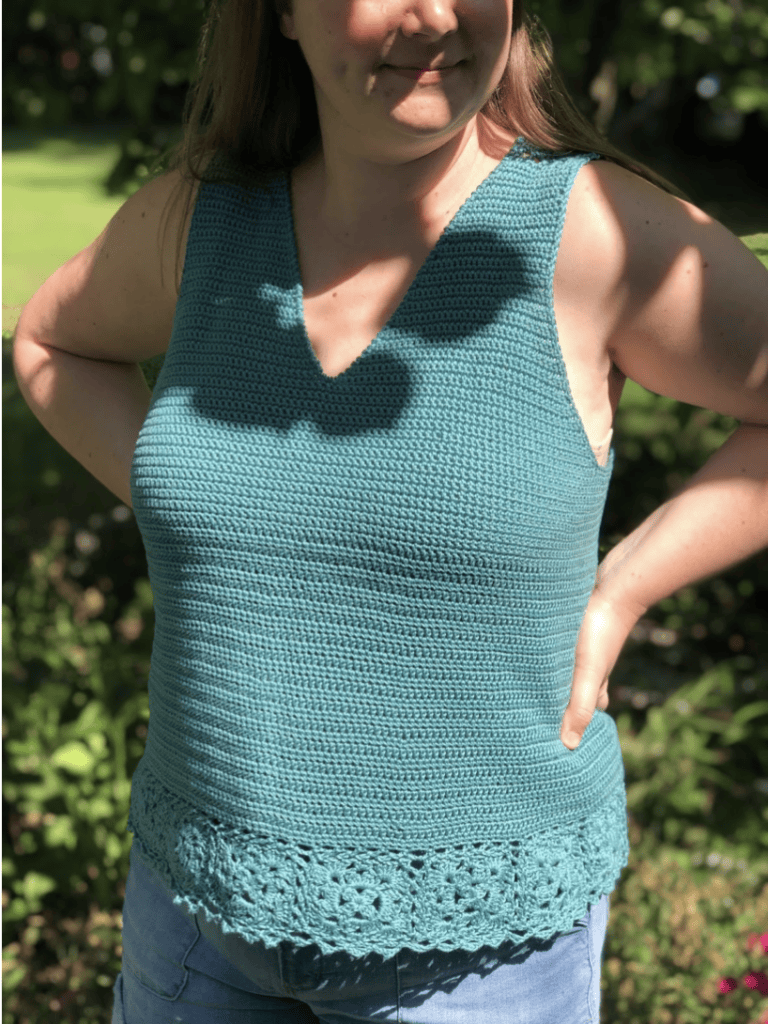
Tide Pool Tank Top Crochet Pattern
Items needed:
Sport weight cotton or other breathable natural fiber.
| Sample used: Cascade Yarns Ultra Pima Fine in Dark Sea Foam |
Yardage:
990 (1075, 1130, 1205) [1380, 1475, 1530, 1720] (1820, 1880, 1935)
F/3.75 mm Hook
Darning needle
Scissors
Tape measure
Abbreviations:
Ch – chain
St(s) – stitch(es)
yo- yarn over
sc- single crochet
hdc- half double crochet
dc- double crochet
CSDC- Chainless starting dc
sp(s)- space(s)
sl st – slip stitch
rep- repeat
FO- fasten off
Special Stitches:
Beg cl = beggining cluster
- Ch 2 (does not count as st), [yo, pull up a loop, yo, pull through 2 loops] twice (3 loops on hook), yo, pull through all loops.
Cl = cluster
- [Yo, pull up a loop, yo, pull through 2 loops] three times (4 loops on hook), yo, pull through all loops.
Pct = picot
- Ch 3, sl st to first ch made.
Crab st = crab stitch (reverse single crochet)
- Insert hook into stitch before current stitch (working backward across the round), pull up a loop, yarn over (yo), pull through both loops.
Notes:
- There is some introductory material before the pattern starts. Read through this to get a sense of the techniques involved, then start the actual pattern.
- This pattern uses US terms.
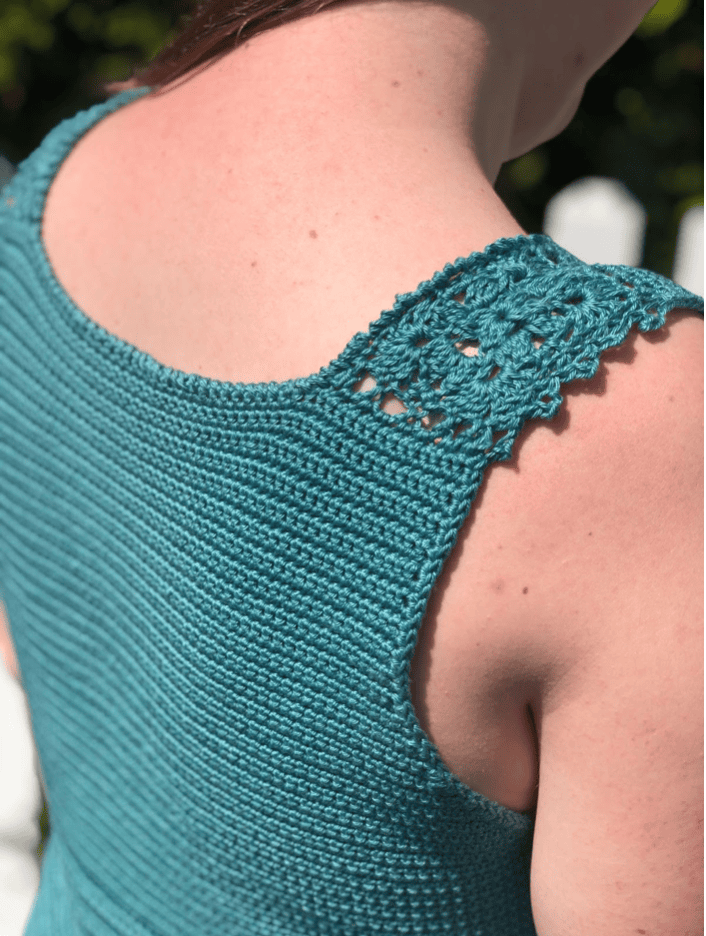
- This top is constructed top-down and seamlessly. It starts with saddles made of granny motifs. The fronts and back are worked downward from the saddles, then joined in the round for the rest of the body. A hem of granny motifs is made using a join-as-you-go method, and then finishing touches are added to the hem, armhole, and neckline.
- The Tide Pool Tank is designed to be fitted in the bust (-1 to +1 inches/-2.5 to +2.5 cm ease), flaring out 5”/13 cm to the hip. It has a fairly deep armhole to keep you cool and comfortable!
- Note that Sizes 8-11 have wider saddles made with two granny squares
- Use whatever hook size(s) necessary to achieve gauge for each component.
- “Sc 2” means “work one sc in each of the next two stitches”. “2 sc” means “work two sc in the next stitch”, i.e., increase.
- A ch-3 can be substituted for any CSDC (will count as first stitch).
- Where sizes differ, they will be written as 1 (2, 3, 4) [5, 6, 7, 8] (9, 10, 11). Stitch counts will sometimes be written in [] in this format after a row/round.
- As written, the lower body (not including the hem) hits roughly at hip length. Rounds can be added to increase the length of this section before adding the hem.
Gauge:
Sc gauge
20 sc x 23.5 rows = 4”/10 cm
Hdc gauge
20 hdc x 13 rows = 4”/10 cm
Motif gauge
1 Granny Motif = 3”/7.5 cm on a side
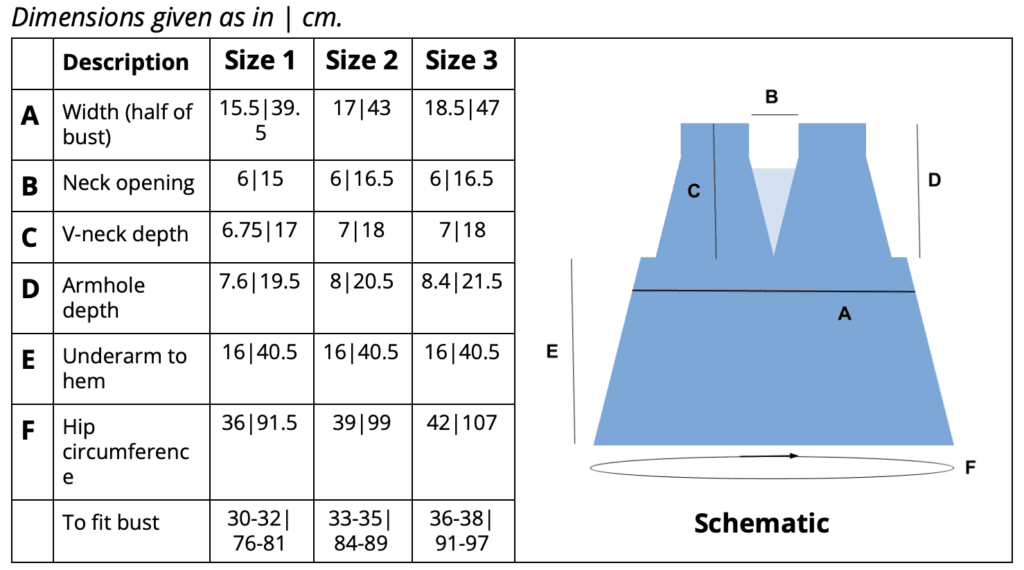
Sizing:
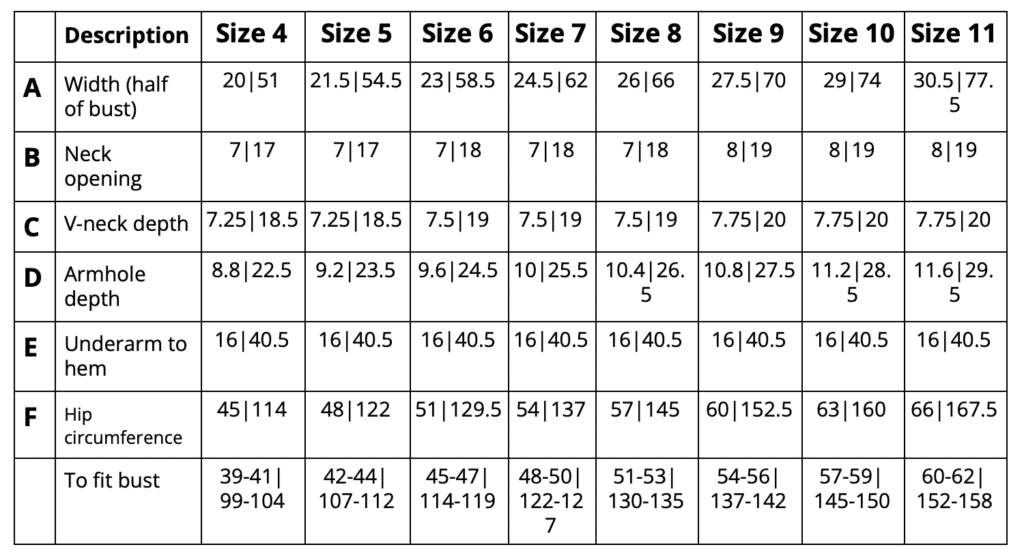
Special techniques:
Granny Motif
Ch 4. Sl st to first st to form a ring.
Round 1 [Right Side]: Beg cl, ch 4, [cl, ch 4] three times, sl st to first st to join. [3 clusters, 1 beg cluster, 4 ch-4 sps]
Round 2: (CSDC, ch 1, dc) in first cl, [ch 1, (cl, ch 3, cl) in next ch-4 sp, ch 1, (dc, ch 1, dc) in next cl] three times. Ch 1, (cl, ch 3, cl) in next ch-4 sp, ch 1, sl st to first st to join. [8 dc, 8 cl, 12 ch-1 sps, 4 ch-3 sps]
Round 3: Sl st into next ch-1 sp, (4 dc, ch 2, 4 dc) in same ch-1 sp, [(hdc, ch 1, hdc) in next ch-3 sp, (4 dc, ch 2, 4 dc) in next ch-1 sp] three times, (hdc, ch 1, hdc) in next ch-3 sp. Sl st to first st to join. [32 dc, 8 hdc, 4 corner ch-2 sps, 4 ch-1 sps]
Note: you will be skipping the ch-1 sps before and after each cluster.
Do not FO. Refer to pattern instructions for next round.
Join-as-you-go (JAYGO) Method
Photo tutorial at the end of the pattern!
These steps will be taken after completing a motif (choose the step specified in the pattern).
Saddle Squares Pattern:
First Square
Sl st to next st. Ch 3, sk 2 sts, sl st to corner ch-2 sp. [Ch 3, sl st to same corner sp, *ch 3, sk 2 sts, sl st to next st. Rep from * until 2 sts remain before corner. Ch 3, sk 2 sts, sl st to corner ch-2 sp] three times. Ch 3, sl st to same corner sp, [ch 3, sk 2 sts, sl st to next st] three times, making last sl st into first st of round.
Sizes 1-4 and 8-11 only: FO.
Sizes 5-7: Sl st to next ch-3 sp. Ch 3, sl st to corner ch-3 sp. [Ch 3, sl st to same corner sp, *ch 3, sl st to next ch-3 sp. Rep from * until sl st has been worked in corner ch-3 sp.] three times. Ch 3, sl st to same corner sp, [ch 3, sl st to next ch-3 sp] four times, making last sl st into first st of round. FO.
Second Square (for Sizes 8-11 only)
Step 1: Sl st to next st. Ch 3, sk 2 sts, sl st to corner ch-2 sp.
Step 2: Hold first square in front of second square so their right sides are facing. Ch 1, drop loop from hook, insert hook into corner ch-3 sp of first square and pick up dropped loop. Ch 1, sl st to same corner sp on second square.
Step 3: *Ch 1, drop loop from hook, insert hook into next ch-3 sp of first square and pick up dropped loop, ch 1. Sk 2 sts on second square and sl st to next st. Rep from * until 2 sts remain before corner. Ch 1, drop loop from hook, insert hook into next ch-3 sp of first square and pick up dropped loop, ch 1. Sk 2 sts on second square and sl st to corner sp.
Step 4: Ch 1, drop loop from hook, insert hook into corner ch-3 sp of first square and pick up dropped loop, ch 1, sl st to same corner sp on second square.
Remainder of round is worked on second square.
Step 5: [Ch 3, sk 2 sts, sl st to next st. Rep from * until 2 sts remain before corner. Ch 3, sk 2 sts, sl st to corner ch-2 sp, ch 3, sl st to same corner sp] two times. [Ch 3, sk 2 sts, sl st to next st] three times, making last sl st into first st of round. FO.
Hem Squares
First Square
Step 1: Sl st to next st. Ch 3, sk 2 sts, sl st to corner ch-2 sp.
Step 2: Hold bottom edge of Lower Body in front of first square so their right sides are facing. Ch 1, drop loop from hook, insert hook into last ch-3 sp of Lower Body and pick up dropped loop. Ch 1, sl st to same corner sp on square.
Step 3: *Ch 1, drop loop from hook, insert hook into next ch-3 sp of Lower Body and pick up dropped loop, ch 1. Sk 2 sts on square and sl st to next st. Rep from * until 2 sts remain before corner.
Step 4: Ch 1, drop loop from hook, insert hook into next ch-3 sp of Lower Body and pick up dropped loop, ch 1. Sk 2 sts on square and sl st to corner sp. Ch 1, drop loop from hook, insert hook into next ch-3 sp of Lower Body and pick up dropped loop, ch 1, sl st to same corner sp on square. Place marker in last ch-3 sp worked on Lower Body.
We are now working only on the square.
Step 5: *Ch 3, sk 2 sts on square, sl st to next st. Rep from * until 2 sts remain before corner. Ch 3, sk 2 sts, sl st to corner ch-3 sp. Ch 3, sl st to same corner sp.
Step 6: Rep Step 5.
Step 7: *Ch 3, sk 2 sts, sl st to next st. Rep from * twice more, making last sl st in first sl st of round. FO.
All other squares except last
Attach current square to previous square
Step 1: Sl st to next st. Ch 3, sk 2 sts, sl st to corner ch-2 sp.
Step 2: Hold last square attached in front of current square so their right sides are facing. Ch 1, drop loop from hook, insert hook into corner ch-3 sp of last square and pick up dropped loop. Ch 1, sl st to same corner sp on current square.
Step 3: *Ch 1, drop loop from hook, insert hook into next ch-3 sp of last square and pick up dropped loop, ch 1. Sk 2 sts on current square and sl st to next st. Rep from * until 2 sts remain before corner.
Step 4: Ch 1, drop loop from hook, insert hook into next ch-3 sp of last square and pick up dropped loop, ch 1. Sk 2 sts on current square and sl st to corner sp.
Attach current square to Lower Body
Step 5: Ch 1, drop loop from hook, insert hook into marked ch-3 sp on Lower Body and pick up dropped loop, ch 1. Sl st to same corner sp on current square.
Step 6: Rep Steps 3-4 of First Square instructions.
Finish working around square
Step 7: Rep Step 5 of First Square instructions.
Step 8: Rep Step 7 of First Square instructions. FO.
Last Square
Attach to previous square and Lower Body
Step 1: Rep Steps 1-6 of “All other squares except last” instructions, making last sl st on Lower Body into first ch-3 sp worked in hem.
Attach to first hem square to complete hem
Step 2: Hold first square of hem in front of current square so their right sides are facing. Ch 1, drop loop from hook, insert hook into first available ch-3 sp of first square and pick up dropped loop. Ch 1, sk 2 sts on current square, sl st to next st on current square.
Step 3: *Ch 1, drop loop from hook, insert hook into next ch-3 sp of first square and pick up dropped loop, ch 1. Sk 2 sts on current square and sl st to next st. Rep from * until 2 sts remain before corner.
Step 4: Ch 1, drop loop from hook, insert hook into next ch-3 sp of first square and pick up dropped loop, ch 1. Sk 2 sts on current square and sl st to corner sp.
Step 5: Ch 1, drop loop from hook, insert hook into corner ch-3 sp of first square and pick up dropped loop, ch 1, sl st to same corner sp on current square.
Finish working around square
Step 6: *Ch 3, sk 2 sts, sl st to next st. Rep from * twice more. Ch 3, sk 2 sts, sl st to first sl st to join. Do not FO.
Pattern
Saddles (make two)
Work one Granny Motif, finishing with Saddle Squares First Square JAYGO instructions.
Sizes 1, 2, 3, 4, 5, 6, 7: continue on to First Front.
Note: Sizes 5, 6, 7 will work an extra round as specified in the JAYGO instructions.
Sizes 8, 9, 10, 11: work a second Granny Motif, finishing with Saddle Squares Second Square JAYGO instructions.
First Front
Note: this will be the Right Front for lefties and the Left Front for righties.
Row 1 [Right Side]: Join yarn in a corner ch-3 space of one Saddle with Right Side facing. (Sizes 8-11: you will be working along the long edge of the saddle). [Sc, ch 1] 7 (7, 7, 7) [10, 10, 10, 15] (15, 15, 15) times evenly along edge of Saddle, leaving a space approximately 1 st wide after each ch. Sc in corner ch-3 sp at edge of Saddle. [15 (15, 15, 15) [21, 21, 21, 31] (31, 31, 31)]
Note: just make your sc as even as possible across the saddle. Working (sc, ch 1) rather than all sc helps to hide any uneven spacing, so don’t stress too much about it!
Row 2: Ch 1, turn. Sc across until 1 st remains, 2 sc in last. [16 (16, 16, 16) [22, 22, 22, 32] (32, 32, 32)]
Row 3: Ch 1, turn. Sc in each st across.
Row 4 – Row 21 (19, 19, 19) [21, 21, 19, 29] (29, 25, 21): Rep Rows 2-3.
Note: these row numbers are inclusive, e.g., for Size 1, you will repeat Rows 2-3 until you’ve worked Row 21.
Row x (x, x, x) [22, 22, x, 30] (30, x, x): Rep Row 2.
Sizes 1, 2, 3, 4, 7, 10, 11 do not work this row.
There are now 25 (24, 24, 24) [32, 32, 30, 46] (46, 43, 41) sts.
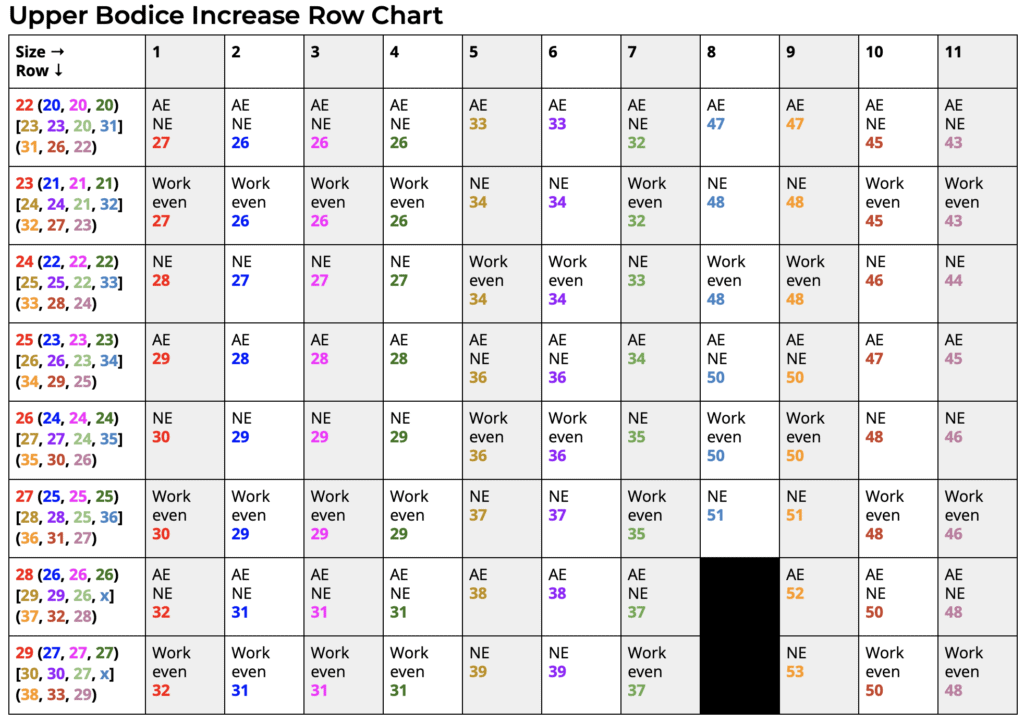
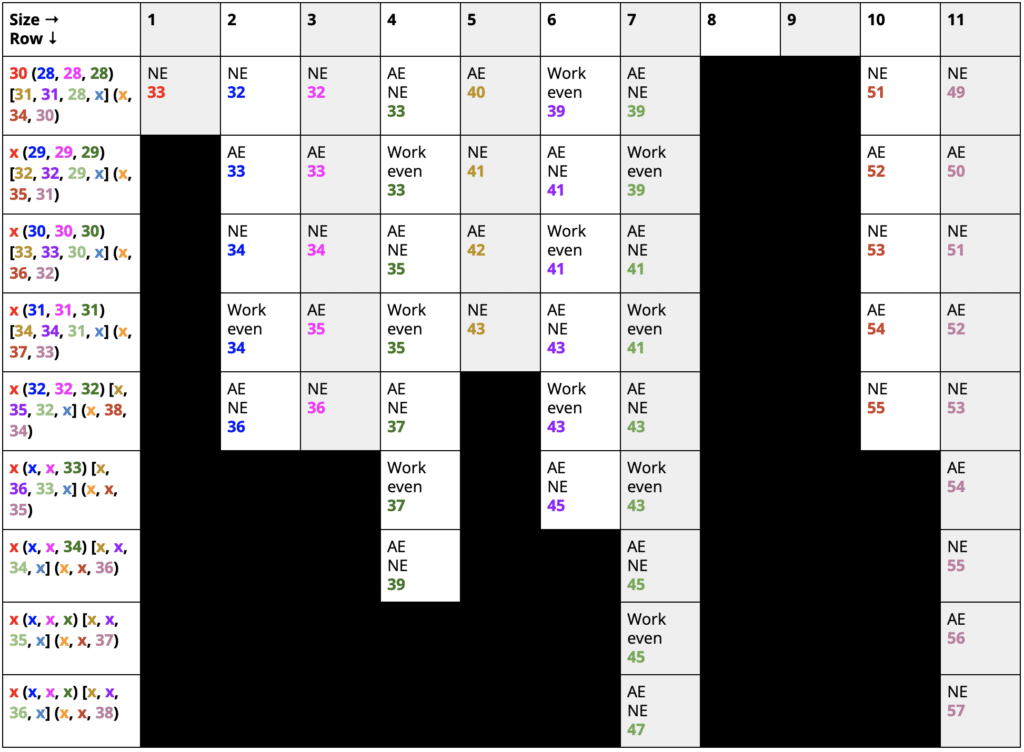
Row 22 (20, 20, 20) [23, 23, 20, 31] (31, 26, 22) – Row 30 (32, 32, 34) [34, 36, 36, 36] (38, 38, 38): Work according to Upper Bodice Increase Row Chart. FO.
Note: these row numbers are inclusive, e.g., for Size 1, you will work according to the chart until you’ve worked Row 30.
How to use Upper Bodice Increase Row Chart:
- Locate the column for your size. Each row will include neck edge increases, armhole edge increases, both, or neither.
- Neck edge increases are coded “NE” in the table. For these rows, work 2 sc in the stitch at the neck edge of the row (as indicated in the diagram).
- Armhole edge increases are coded “AE” in the table. For these rows, work 2 sc in the stitch at the armhole edge of the row (as indicated in the diagram).
- Some rows will have increases at both the neck and armhole edges. These rows will start and end with increases.
- Rows that contain no increases are marked “work even”.
- Each row has a stitch count (bolded, in the color of the size) to help you keep track of your work.
- Rows of the table that do not apply to a given size contain an “x” in the row number spot.

Second Front
Note: this will be the Left Front for lefties and the Right Front for righties.
Row 1 [Right Side]: Join yarn in a corner ch-3 space of one Saddle with Right Side facing. (Sizes 8-11: you will be working along the long edge of the saddle). [Sc, ch 1] 7 (7, 7, 7) [10, 10, 10, 15] (15, 15, 15) times evenly along edge of Saddle, leaving a space approximately 1 st wide after each ch. Sc in corner ch-3 sp at edge of Saddle. [15 (15, 15, 15) [21, 21, 21, 31] (31, 31, 31)]
Row 2: Ch 1, turn. 2 sc in first st, sc across to last. [16 (16, 16, 16) [22, 22, 22, 32] (32, 32, 32)]
Row 3: Ch 1, turn. Sc in each st across.
Row 4 – Row 21 (19, 19, 19) [21, 21, 19, 29] (29, 25, 21): Rep Rows 2-3.
Note: these row numbers are inclusive, e.g., for Size 1, you will repeat Rows 2-3 until you’ve worked Row 21.
Row x (x, x, x) [22, 22, x, 30] (30, x, x): Rep Row 2.
Sizes 1, 2, 3, 4, 7, 10, 11 do not work this row.
There are now 25 (24, 24, 24) [32, 32, 30, 46] (46, 43, 41) sts.
Row 22 (20, 20, 20) [23, 23, 20, 31] (31, 26, 22) – Row 30 (32, 32, 34) [34, 36, 36, 36] (38, 38, 38): Work according to Upper Bodice Increase Row Chart. Do not FO.
Note: these row numbers are inclusive, e.g., for Size 1, you will work according to the chart until you’ve worked Row 30.
Joining Fronts
Row 31 (33, 33, x) [35, 37, x, 37] (x, 39, 39): Ch 1, turn. 2 sc in first, sc across to end of Second Front. Hold First Front with Right Side facing and sc across sts from last row worked until 1 st remains. 2 sc in last st.
Row x (x, x, 35) [x, x, 37, x] (39, x, x): Ch 1, turn. Sc across to end of Second Front. Hold First Front with Right Side facing and sc across sts from last row worked.
There are now 68 (74, 74, 78) [88, 92, 94, 104] (106, 112, 116) sts.
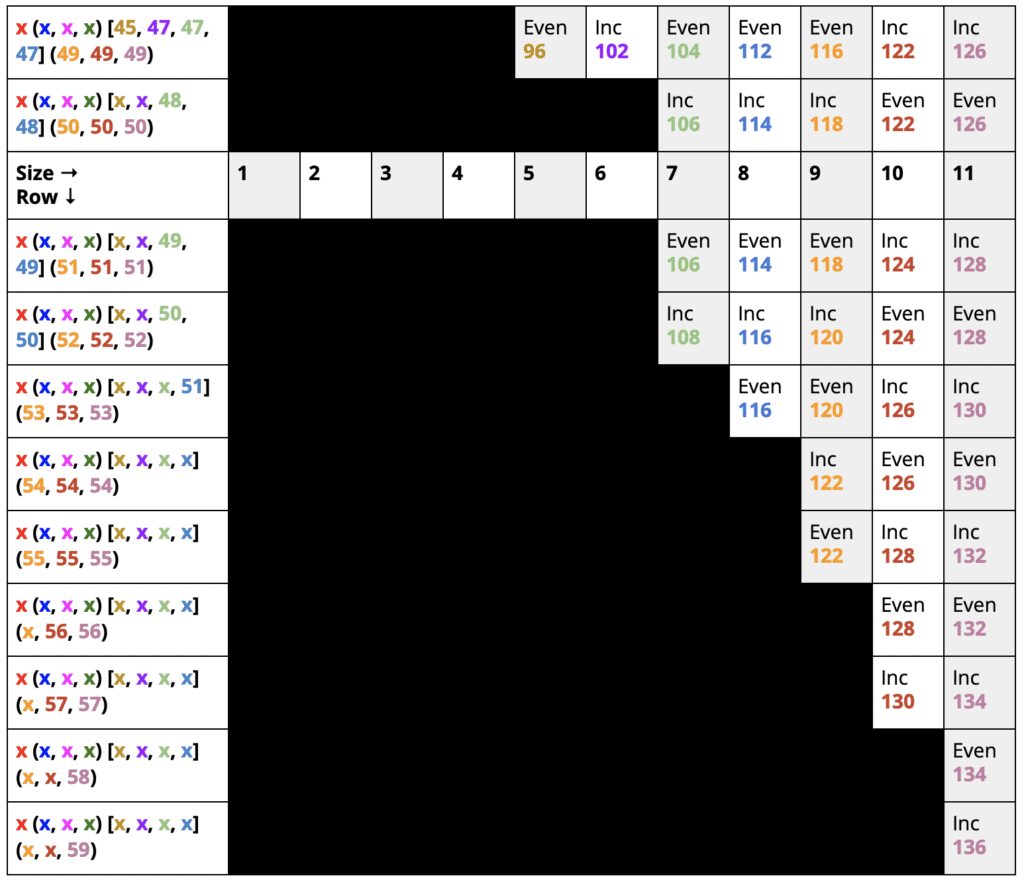
Continue working across both fronts according to the Lower Bodice Increase Row Chart. FO.
How to use the Lower Bodice Increase Row Chart:
- Locate the column for your size. Each row will specify whether to work even (labeled “even”; ch 1, turn, sc across) or to increase (labeled “inc”).
- Increase rows are worked as follows: ch 1, turn, 2 sc, sc across until 1 st remains, 2 sc.
- Each row has a stitch count (bolded, in the color of the size) to help you keep track of your work.

Back
Hold Fronts with Saddles on top and Right Sides facing you. We will now be working across the Saddles on the opposite side from where the Fronts were worked. (Sizes 8-11: you will be working along the long edge of the saddle). Join yarn in the corner ch-3 sp at the armhole edge of the First Front.
Row 1 [Right Side]: [Sc, ch 1] 7 (7, 7, 7) [10, 10, 10, 15] (15, 15, 15) times evenly along edge of Saddle, leaving a space approximately 1 st wide after each ch. Sc in corner ch-3 sp at edge of Saddle. Ch 30 (32, 32, 34) [34, 36, 36, 36] (38, 38, 38), [sc, ch 1] 7 (7, 7, 7) [10, 10, 10, 15] (15, 15, 15) times evenly along edge of Second Front Saddle, leaving a space approximately 1 st wide after each ch. Sc in corner ch-3 sp at edge of Saddle. [60 (62, 62, 64) [76, 78, 78, 98] (100, 100, 100)]
Row 2 – Row 21 (19, 19, 19) [22, 22, 19, 30] (30, 25, 21): Ch 1, turn. Sc across.
Row 22 (20, 20, 20) [23, 23, 20, 31] (31, 26, 22): Ch 1, turn. 2 sc, sc across to last st, 2 sc in last st.
Row 23 (21, 21, 21) [24, 24, 21, 32] (32, 27, 23) – Row 24 (22, 22, 22) [25, 25, 22, 33] (33, 28, 24): Ch 1, turn. Sc across.
Row 25 (23, 23, 23) [26, 26, 23, 34] (34, 29, 25) – Row 30 (28, 28, 25) [28, 28, 25, 39] (39, 34, 30): Repeat the previous three rows.
There are now 66 (68, 68, 68) [80, 82, 82, 104] (106, 106, 106) sts.
Row 31 (29, 29, 26) [29, 29, 26, 40] (40, 35, 31): Ch 1, turn. 2 sc, sc across to last st, 2 sc in last st.
Row 32 (30, 30, 27) [30, 30, 27, 41] (41, 36, 32): Ch 1, turn. Sc across.
Row 33 (31, 31, 28) [31, 31, 28, 42] (42, 37, 33) – Row 36 (38, 40, 41) [44, 46, 49, 51] (55, 56, 58): Repeat the previous two rows.
There are now 72 (78, 80, 84) [96, 100, 106, 116] (122, 128, 134) sts.
Row x (x, 41, 42) [x, 47, 50, x] (x, 57, 59): Ch 1, turn. 2 sc, sc across to last st, 2 sc in last st.
Row x (x, x, 43) [x, x, x, x] (x, x, x): Ch 1, turn. 2 sc, sc across to last st, 2 sc in last st.
Do not FO.
There are now 72 (78, 82, 88) [96, 102, 108, 116] (122, 130, 136) sts.
Lower Body
We will now join the front and back stitches in the round, working chains between them for the underarms.
Round 1: Ch 1, turn. Sc across Back sts, ch 6 (7, 10, 12) [12, 14, 14, 14] (16, 16, 16), sc across Front sts, ch 6 (7, 10, 12) [12, 14, 14, 14] (16, 16, 16), sl st to first st to join. [156 (170, 184, 200) [216, 232, 244, 260] (276, 292, 304)]
Rounds 2-19: Ch 1, turn. Sc around, sl st to first st to join.
Round 20: This is the first increase round of the lower body and is written separately for each size.
Size 1: Ch 1, turn. *Hdc 38, 2 hdc. Rep from * around. Sl st to first st to join. [160]
Size 2: Ch 1, turn. *Hdc 33, 2 hdc. Rep from * around. Sl st to first st to join. [175]
Size 3: Ch 1, turn. *[Hdc 30, 2 hdc] twice, hdc 29, 2 hdc. Rep from * once more. Sl st to first st to join. [190]
Size 4: Ch 1, turn. *Hdc 39, 2 hdc. Rep from * around. Sl st to first st to join. [205]
Size 5: Ch 1, turn. *Hdc 53, 2 hdc. Rep from * around. Sl st to first st to join. [220]
Size 6: Ch 1, turn. *Hdc 76, 2 hdc. Rep from * once more. Hdc 77, 2 hdc. Sl st to first st to join. [235]
Size 7: Ch 1, turn. *[Hdc 40, 2 hdc] twice, hdc 39, 2 hdc. Rep from * once more. Sl st to first st to join. [250]
Size 8: Ch 1, turn. *Hdc 51, 2 hdc. Rep from * around. Sl st to first st to join. [265]
Size 9: Ch 1, turn. *Hdc 68, 2 hdc. Rep from * around. Sl st to first st to join. [280]
Size 10: Ch 1, turn. *Hdc 96, 2 hdc. Rep from * once more. Hdc 97, 2 hdc. Sl st to first st to join. [295]
Size 11: Ch 1, turn. *[Hdc 50, 2 hdc] twice, hdc 49, 2 hdc. Rep from * once more. Sl st to first st to join. [310]
Rounds 21-23: Ch 1, turn. Hdc around. Sl st to first st to join.
Sizes 1 (x, 3, x) [5, x, 7, x] (9, x, 11) only:
Round 24: Ch 1, turn. *Hdc 31 (x, 37, x) [43, x, 49, x] (55, x, 61), 2 hdc. Rep from * around. Sl st to first st to join.
Sizes x (2, x, 4) [x, 6, x, 8] (x, 10, x) only:
Round 24: Ch 1, turn. Hdc x (17, x, 20) [x, 23, x, 26] (x, 29, x), 2 hdc. *Hdc x (34, x, 40) [x, 46, x, 52] (x, 58, x), 2 hdc. Rep from * three more times, hdc x (17, x, 20) [x, 23, x, 26] (x, 29, x). Sl st to first st to join.
There are now 165 (180, 195, 210) [225, 240, 255, 270] (285, 300, 315) sts.
Rounds 25-27: Ch 1, turn. Hdc around. Sl st to first st to join.
Sizes 1 (x, 3, x) [5, x, 7, x] (9, x, 11) only:
Round 28: Ch 1, turn. Hdc 16 (x, 19, x) [22, x, 25, x] (28, x, 31), 2 hdc. *Hdc 32 (x, 38, x) [44, x, 50, x] (56, x, 62), 2 hdc. Rep from * three more times, hdc 16 (x, 19, x) [22, x, 25, x] (28, x, 31). Sl st to first st to join.
Sizes x (2, x, 4) [x, 6, x, 8] (x, 10, x) only:
Round 28: Ch 1, turn. *Hdc x (35, x, 41) [x, 47, x, 53] (x, 59, x), 2 hdc. Rep from * around. Sl st to first st to join.
There are now 170 (185, 200, 215) [230, 245, 260, 275] (290, 305, 320) sts.
Rounds 29-31: Ch 1, turn. Hdc around. Sl st to first st to join.
Sizes 1 (x, 3, x) [5, x, 7, x] (9, x, 11) only:
Round 32: Ch 1, turn. *Hdc 33 (x, 39, x) [45, x, 51, x] (57, x, 63), 2 hdc. Rep from * around. Sl st to first st to join.
Sizes x (2, x, 4) [x, 6, x, 8] (x, 10, x) only:
Round 32: Ch 1, turn. Hdc x (18, x, 21) [x, 24, x, 27] (x, 30, x), 2 hdc. *Hdc x (36, x, 42) [x, 48, x, 54] (x, 60, x), 2 hdc. Rep from * three more times, hdc x (18, x, 21) [x, 24, x, 27] (x, 30, x). Sl st to first st to join.
There are now 175 (190, 205, 220) [235, 250, 265, 280] (295, 310, 325) sts.
Rounds 33-35: Ch 1, turn. Hdc around. Sl st to first st to join.
Sizes 1 (x, 3, x) [5, x, 7, x] (9, x, 11) only:
Round 36: Ch 1, turn. Hdc 17 (x, 20, x) [23, x, 26, x] (29, x, 32), 2 hdc. *Hdc 34 (x, 40, x) [46, x, 52, x] (58, x, 64), 2 hdc. Rep from * three more times, hdc 17 (x, 20, x) [23, x, 26, x] (29, x, 32). Sl st to first st to join.
Sizes x (2, x, 4) [x, 6, x, 8] (x, 10, x) only:
Round 36: Ch 1, turn. *Hdc x (37, x, 43) [x, 49, x, 55] (x, 61, x), 2 hdc. Rep from * around. Sl st to first st to join.
There are now 180 (195, 210, 225) [240, 255, 270, 285] (300, 315, 330) sts.
Rounds 37-46: Ch 1, turn. Hdc around. Sl st to first st to join.
Round 47: Ch 3, turn, sk 2 sts, *sl st to next st, ch 3, sk 2 sts. Rep from * around, sl st to previous round’s sl st to join. FO.
Hem
Squares
Step 1: Work one Granny Motif and attach it to the Lower Body using the JAYGO First Square instructions (page 6).
Step 2: Work 10 (11, 12, 13) [14, 15, 16, 17] (18, 19, 20) Granny Motifs, attaching each one to Lower Body using the JAYGO All Other Squares Except Last instructions (page 6).
Step 3: Work one Granny Motif and attach it to the Lower Body using the JAYGO Last Square instructions (page 7). Do not FO.
Picot Edging
*Sl st to next ch-3 sp, ch 1, pct, ch 1. Rep from * around, sl st to first sl st to join. FO.
Finishing Touches
Note: stitch counts are not important for the finishing rounds. Just work evenly to give your top a polished look.
Armhole Finishing
Attach yarn in back corner of one armhole with Right Side of top facing. Sc evenly around armhole, working in bottom of underarm chains and edges of upper body rows, until one row remains before Saddle. *Ch 3, pct, sl st to next ch-3 sp. Rep from * to last ch-3 sp of Saddle. Ch 3, pct, sk first row after Saddle, continue working sc around remainder of armhole. Sl st to first sto to join. FO.
Rep for second armhole.
Neckline Finishing
Attach yarn in back corner of neck with Right Side of top facing. Crab st evenly around entire neck opening. Sl st to first st to join. FO.
Blocking
Block your top, pinning out the picots and Granny Motifs to highlight all of the pretty details. Enjoy your gorgeous new summer top!
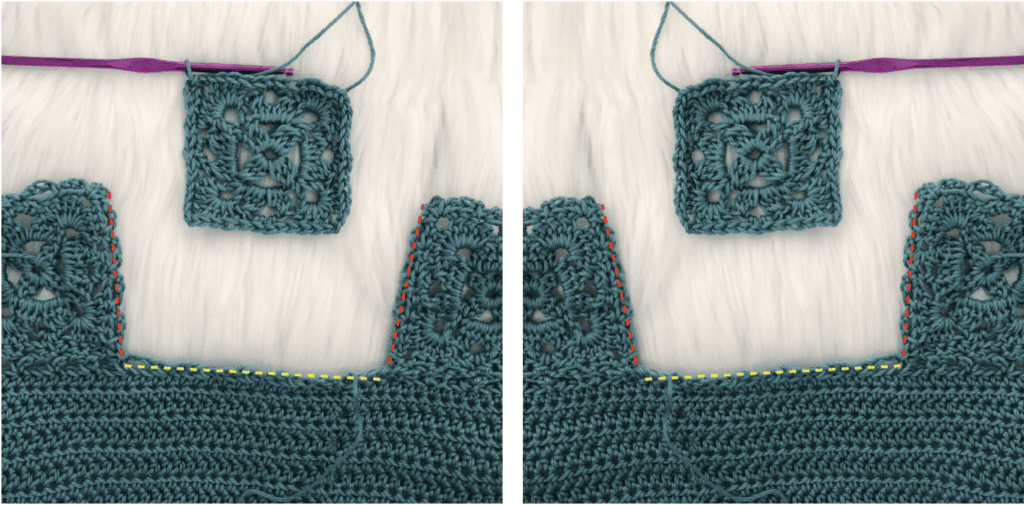
JAYGO Photo Tutorial
These steps will be taken after completing a motif (choose the step specified in the pattern).
- Photos for lefties are in the left column, righties in the right column.
- Here are a few great videos that show JAYGO techniques generally:
- This tutorial also uses ch-3 spaces, it just has single crochets instead of slip stitches.
- This tutorial uses ch-4 spaces instead of ch-3 spaces for the corners, but it uses the same ch-3 spaces for the sides of the squares. She starts joining squares around 4:00.
Saddle Squares
First Square
Sl st to next st. Ch 3, sk 2 sts, sl st to corner ch-2 sp. [Ch 3, sl st to same corner sp, *ch 3, sk 2 sts, sl st to next st. Rep from * until 2 sts remain before corner. Ch 3, sk 2 sts, sl st to corner ch-2 sp] three times. Ch 3, sl st to same corner sp, [ch 3, sk 2 sts, sl st to next st] three times, making last sl st into first st of round.
Sizes 1-4 and 8-11 only: FO.
Sizes 5-7: Sl st to next ch-3 sp. Ch 3, sl st to corner ch-3 sp. [Ch 3, sl st to same corner sp, *ch 3, sl st to next ch-3 sp. Rep from * until sl st has been worked in corner ch-3 sp.] three times. Ch 3, sl st to same corner sp, [ch 3, sl st to next ch-3 sp] four times, making last sl st into first st of round. FO.
Second Square (for Sizes 8-11 only)
Step 1: Sl st to next st. Ch 3, sk 2 sts, sl st to corner ch-2 sp.
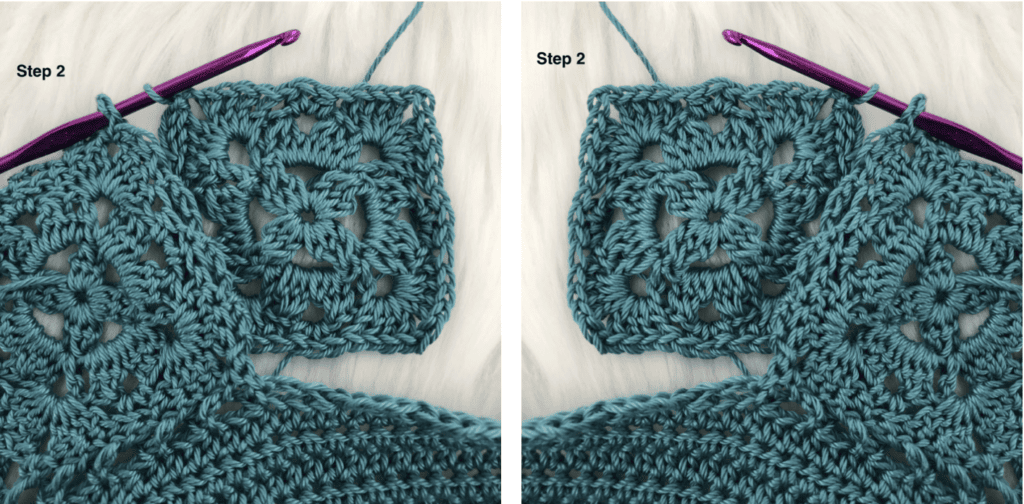
Step 2: Hold first square in front of second square so their right sides are facing. Ch 1, drop loop from hook, insert hook into corner ch-3 sp of first square and pick up dropped loop. Ch 1, sl st to same corner sp on second square.
Note: these photos show the JAYGO method for attaching squares for the hem. The first part of that process is the same as the steps described here.
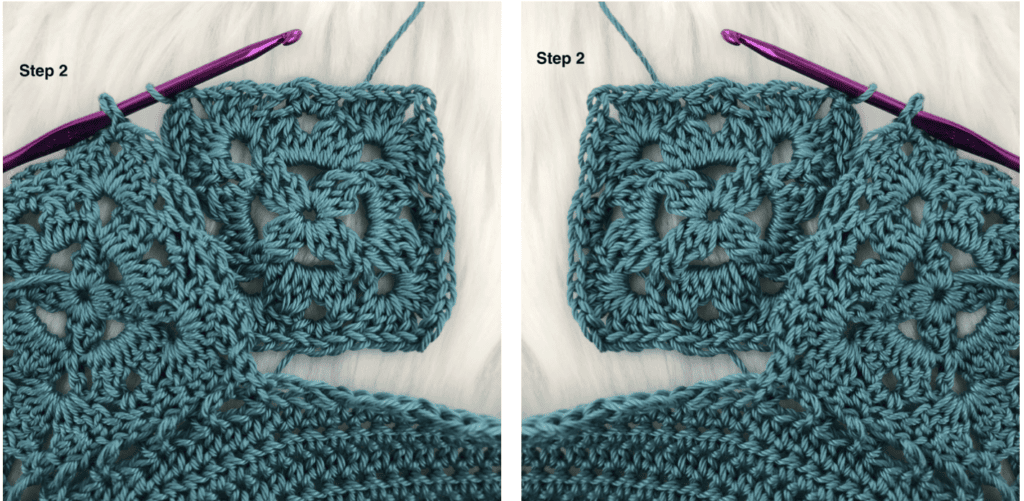
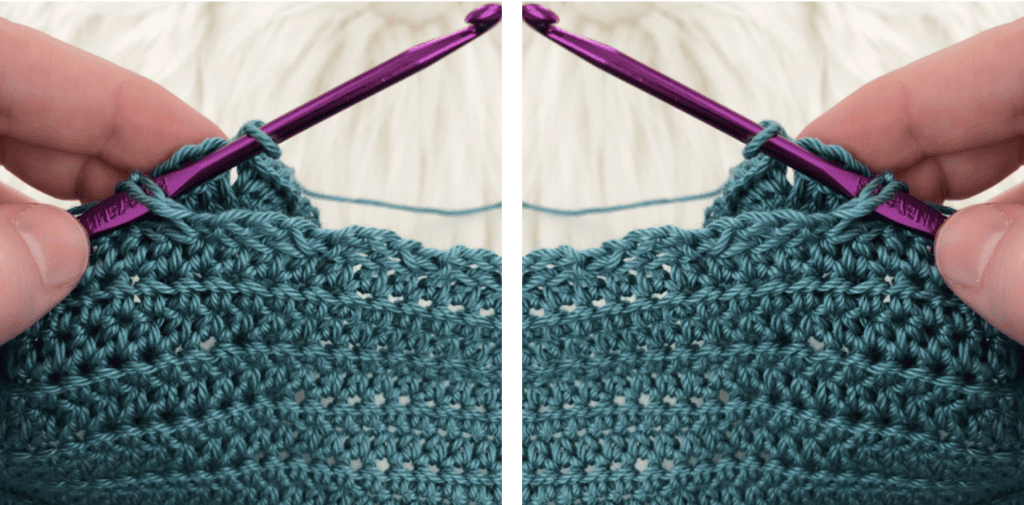
Step 3: *Ch 1, drop loop from hook, insert hook into next ch-3 sp of first square and pick up dropped loop, ch 1. Sk 2 sts on second square and sl st to next st. Rep from * until 2 sts remain before corner. Ch 1, drop loop from hook, insert hook into next ch-3 sp of first square and pick up dropped loop, ch 1. Sk 2 sts on second square and sl st to corner sp.
Step 4: Ch 1, drop loop from hook, insert hook into corner ch-3 sp of first square and pick up dropped loop, ch 1, sl st to same corner sp on second square.
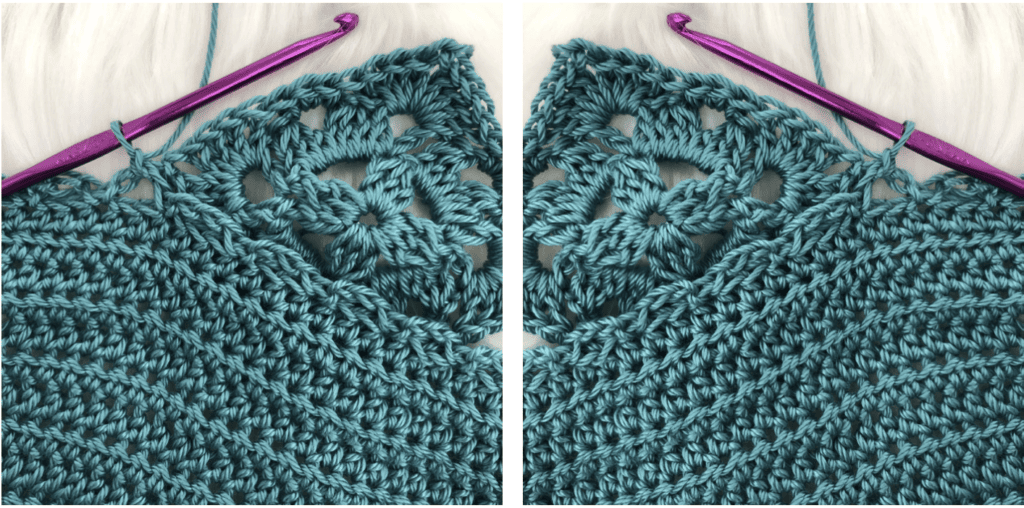
Remainder of round is worked on second square.
Step 5: [Ch 3, sk 2 sts, sl st to next st. Rep from * until 2 sts remain before corner. Ch 3, sk 2 sts, sl st to corner ch-2 sp, ch 3, sl st to same corner sp] two times. [Ch 3, sk 2 sts, sl st to next st] three times, making last sl st into first st of round. FO.
Hem Squares
First Square
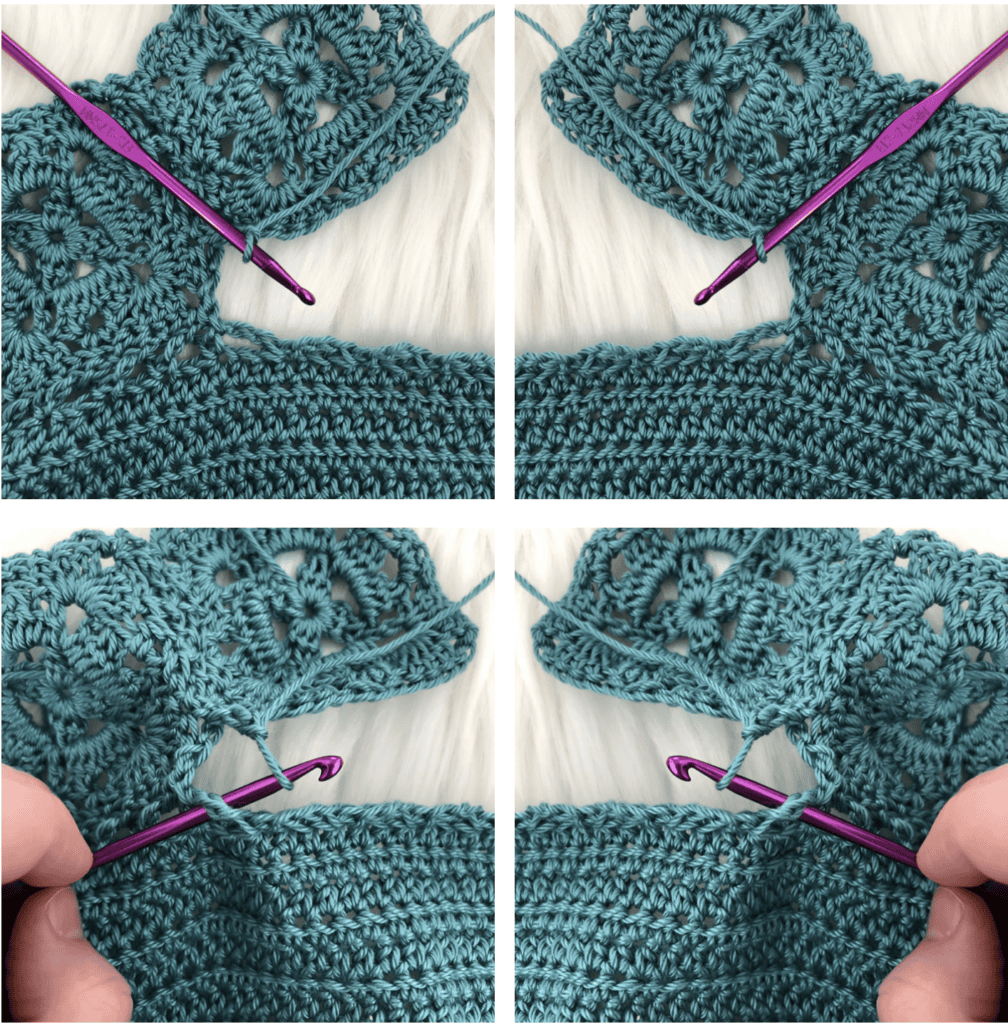
Step 1: Sl st to next st. Ch 3, sk 2 sts, sl st to corner ch-2 sp.
Step 2: Hold bottom edge of Lower Body in front of first square so their right sides are facing. Ch 1, drop loop from hook, insert hook into last ch-3 sp of Lower Body and pick up dropped loop. Ch 1, sl st to same corner sp on square.
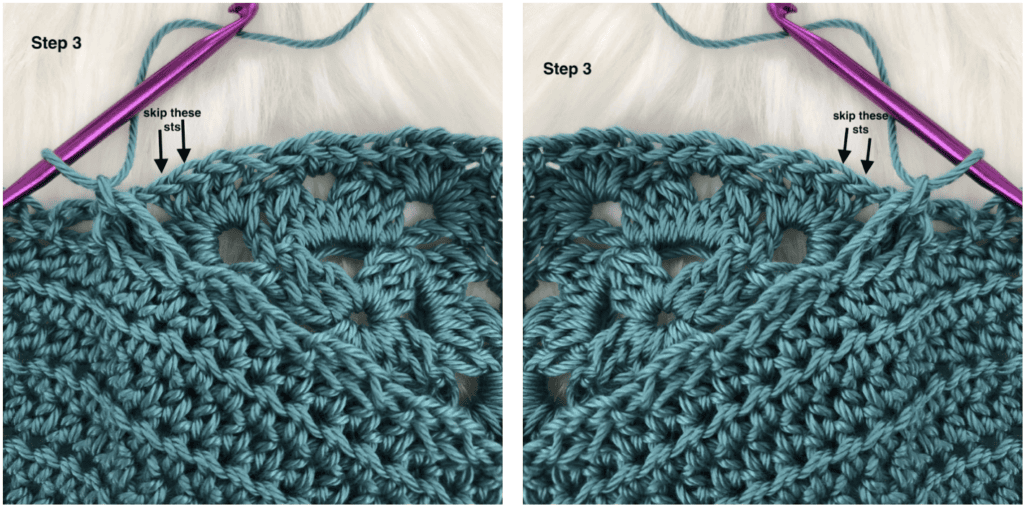
Step 3: *Ch 1, drop loop from hook, insert hook into next ch-3 sp of Lower Body and pick up dropped loop, ch 1. Sk 2 sts on square and sl st to next st. Rep from * until 2 sts remain before corner.
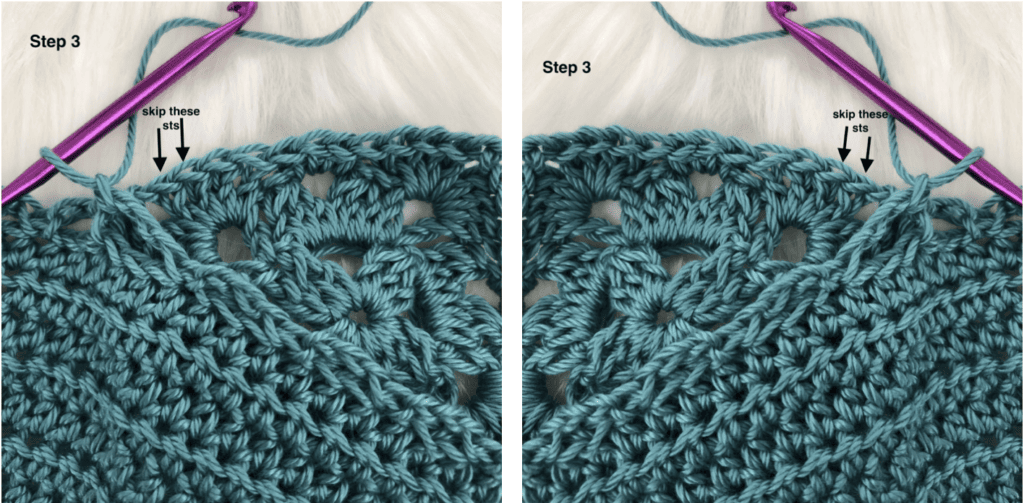
Step 4: Ch 1, drop loop from hook, insert hook into next ch-3 sp of Lower Body and pick up dropped loop, ch 1. Sk 2 sts on square and sl st to corner sp. Ch 1, drop loop from hook, insert hook into next ch-3 sp of Lower Body and pick up dropped loop, ch 1, sl st to same corner sp on square. Place marker in last ch-3 sp worked on Lower Body.
We are now working only on the square.
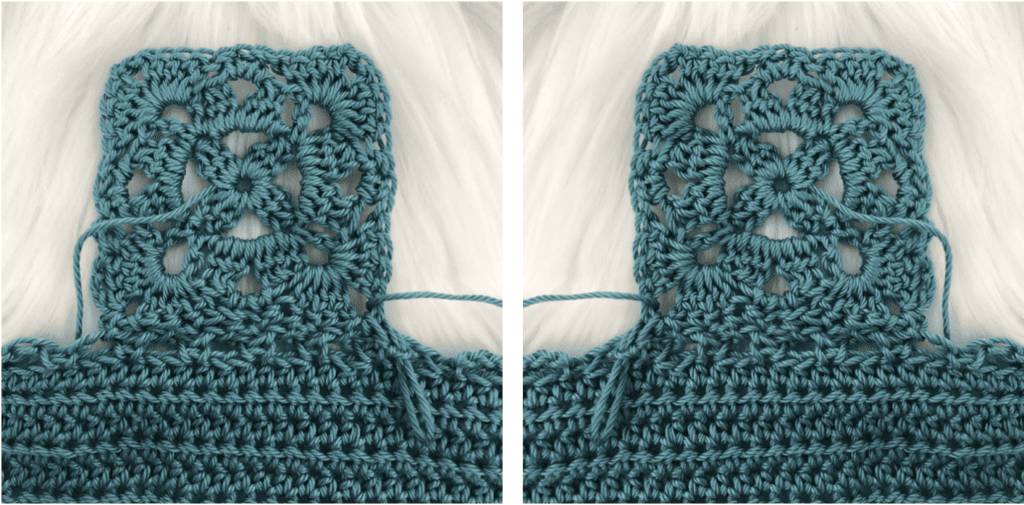
Step 5: *Ch 3, sk 2 sts on square, sl st to next st. Rep from * until 2 sts remain before corner. Ch 3, sk 2 sts, sl st to corner ch-3 sp. Ch 3, sl st to same corner sp.
Step 6: Rep Step 5.
Step 7: *Ch 3, sk 2 sts, sl st to next st. Rep from * twice more, making last sl st in first sl st of round. FO.
All other squares except last
Attach current square to previous square
Step 1: Sl st to next st. Ch 3, sk 2 sts, sl st to corner ch-2 sp.
Step 2: Hold last square attached in front of current square so their right sides are facing. Ch 1, drop loop from hook, insert hook into corner ch-3 sp of last square and pick up dropped loop. Ch 1, sl st to same corner sp on current square.
Step 3: *Ch 1, drop loop from hook, insert hook into next ch-3 sp of last square and pick up dropped loop, ch 1. Sk 2 sts on current square and sl st to next st. Rep from * until 2 sts remain before corner.
Step 4: Ch 1, drop loop from hook, insert hook into next ch-3 sp of last square and pick up dropped loop, ch 1. Sk 2 sts on current square and sl st to corner sp.
Attach current square to Lower Body
Step 5: Ch 1, drop loop from hook, insert hook into marked ch-3 sp on Lower Body and pick up dropped loop, ch 1. Sl st to same corner sp on current square.
rep 6: Rep Steps 3-4 of First Square instructions.
Finish working around square
Step 7: Rep Step 5 of First Square instructions.
Step 8: Rep Step 7 of First Square instructions. FO.
Last Square
Attach to previous square and Lower Body
Step 1: Rep Steps 1-6 of “All other squares except last” instructions, making last sl st on Lower Body into first ch-3 sp worked in hem.
Attach to first hem square to complete hem
Step 2: Hold first square of hem in front of current square so their right sides are facing. Ch 1, drop loop from hook, insert hook into first available ch-3 sp of first square and pick up dropped loop. Ch 1, sk 2 sts on current square, sl st to next st on current square.
Step 3: *Ch 1, drop loop from hook, insert hook into next ch-3 sp of first square and pick up dropped loop, ch 1. Sk 2 sts on current square and sl st to next st. Rep from * until 2 sts remain before corner.
Step 4: Ch 1, drop loop from hook, insert hook into next ch-3 sp of first square and pick up dropped loop, ch 1. Sk 2 sts on current square and sl st to corner sp.
Step 5: Ch 1, drop loop from hook, insert hook into corner ch-3 sp of first square and pick up dropped loop, ch 1, sl st to same corner sp on current square.
Finish working around square
Step 6: *Ch 3, sk 2 sts, sl st to next st. Rep from * twice more. Ch 3, sk 2 sts, sl st to first sl st to join. Do not FO.
If you have any questions, please email me at [email protected].
We would love to see your work! Tag me and Allison @clairdelunefiberart & @Twobrothersblankets and use the hashtag #clairdelunefiberart and #tidepooltank on Instagram!
Instagram:@clairdelunefiberart
If you enjoyed this pattern, check out my ever growing list of Free Crochet Patterns!
Pin it!