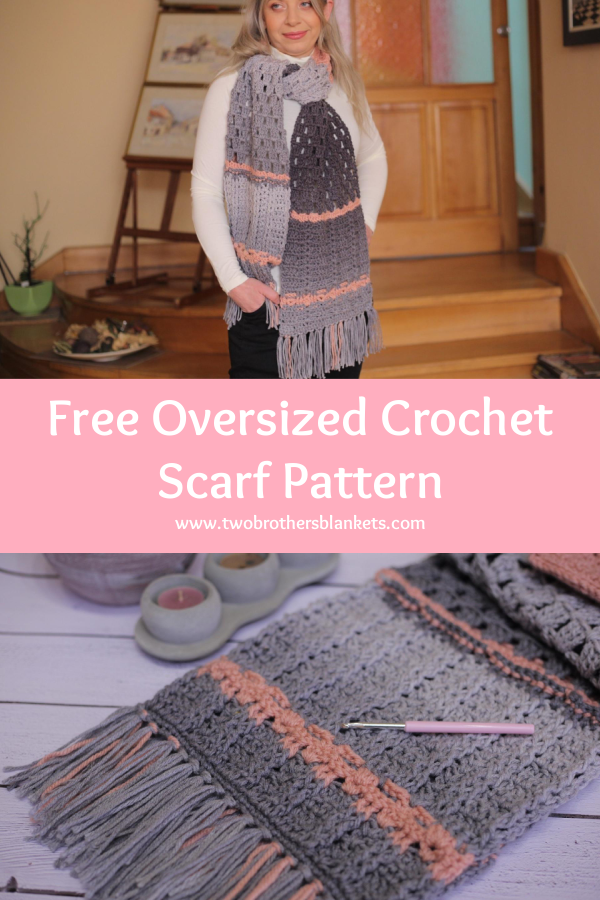
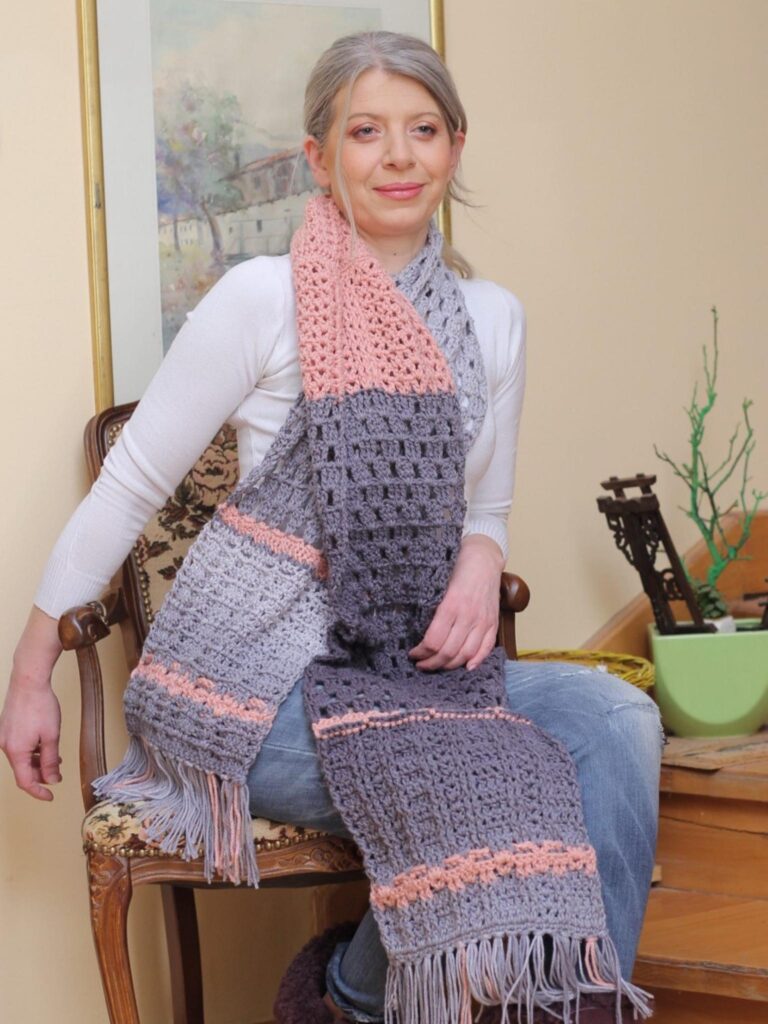
I am so excited to have Katarina of Crochet with Frankie Kate as a guest designer on the blog, sharing her Winter Cherry Scarf crochet pattern!
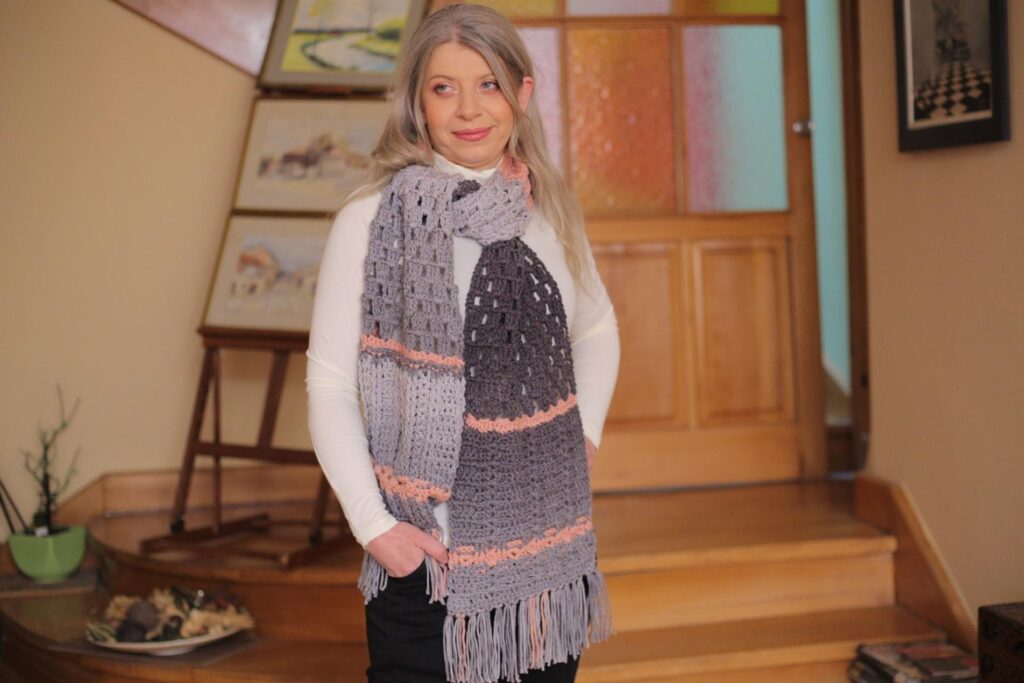
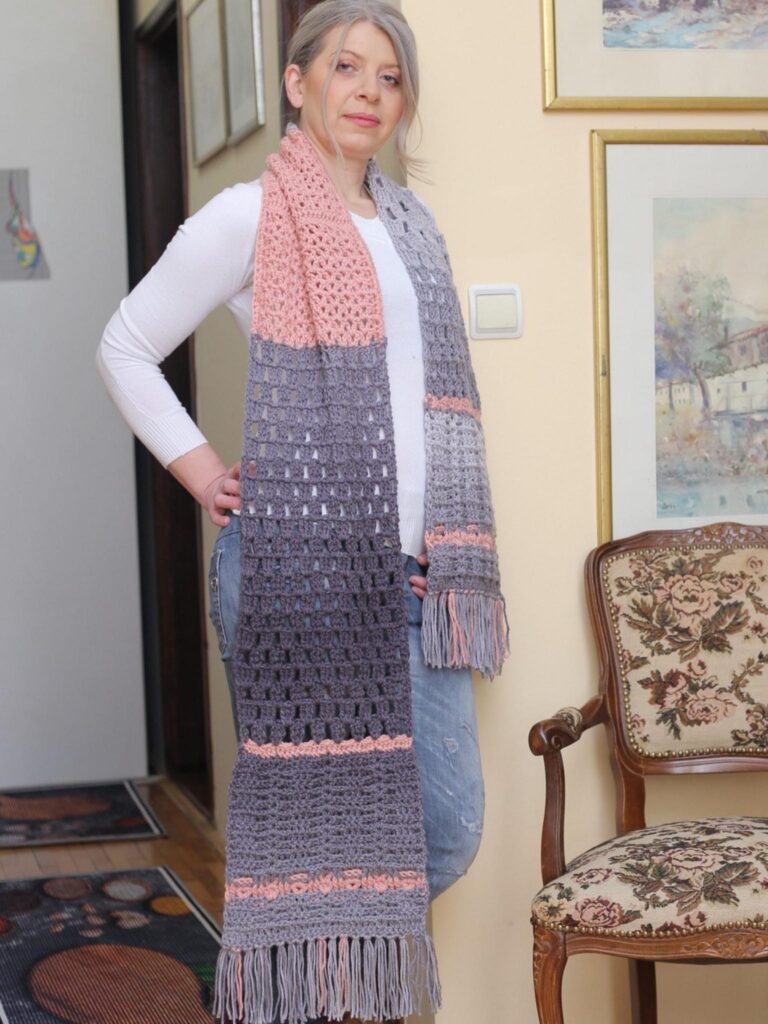
The Winter Cherry Scarf is a lovely oversized crochet scarf, perfect to keep you warm!
About the Designer
Katarina is a fellow boy mom like me who also loves coffee and the ocean, just like me! I’d venture to say we’d be instant friends! Katarina taught herself to crochet in her forties and has since started designing and publishing crochet patterns! Click the links below to give her a follow and see her other designs!
Social media:
Blog: https://www.crochetwithfrankiekate.com
Etsy: https://www.etsy.com/shop/FrankieKate
Raverly: https://www.ravelry.com/stores/frankie-kate
Facebook: https://www.facebook.com/frankie.kate.kate
Instagram: https://www.instagram.com/frankie.kate_/
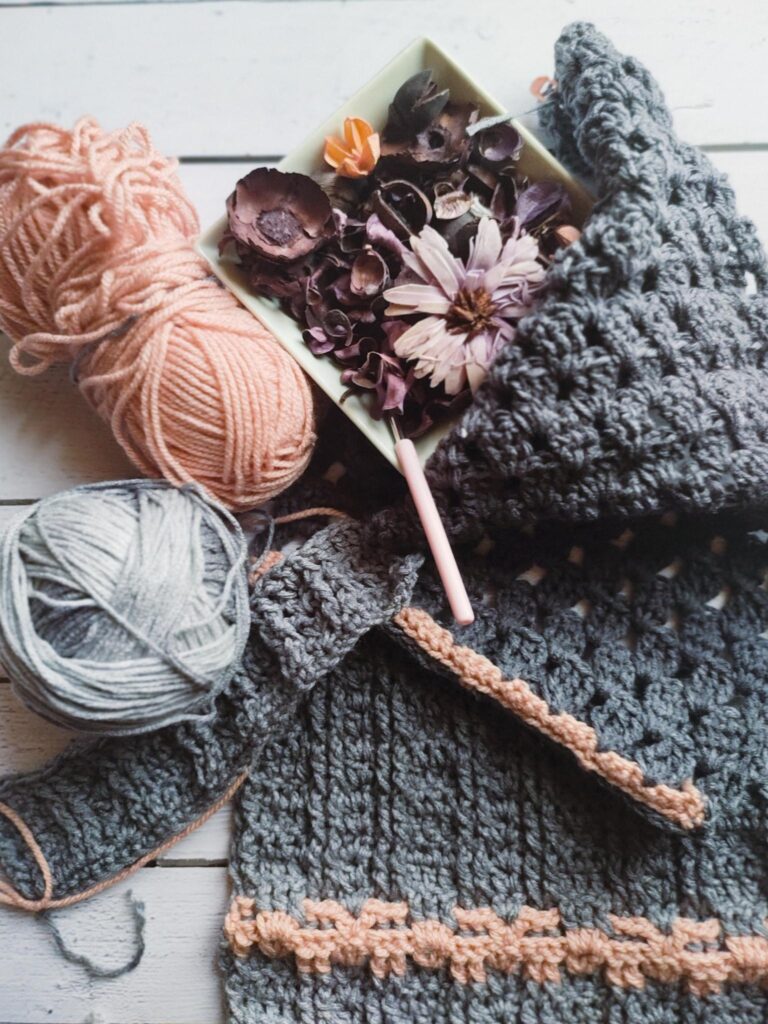
The Winter Cherry crochet scarf requires worsted weight yarn, and is worked in rows! It’s a fun project with lots of texture and color!
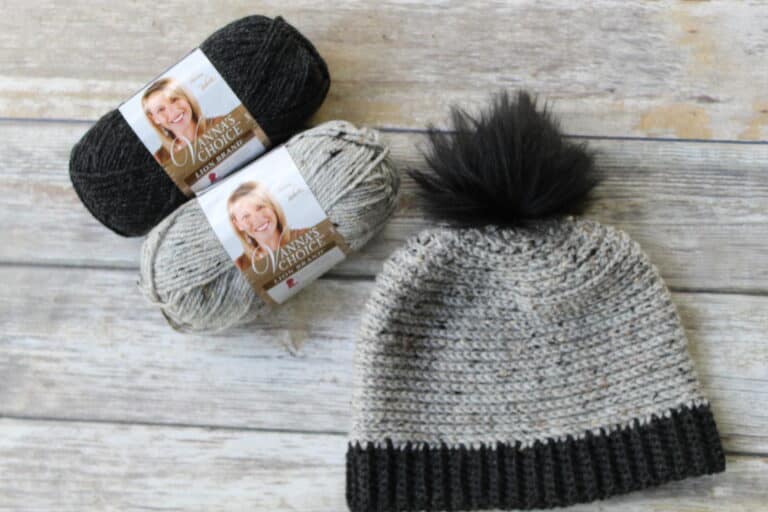
Check out the matching Messy Bun Hat!

If you love crocheting as much as I do, or want to learn more, or just want to show off your work, please join our Crochet Garments community over on Facebook! I hope you’ll share your finished crochet project with us!
You can purchase the ad-free, printable pdf on Ravelry and Etsy!
Winter Cherry Scarf
Get the PDF Pattern!
Upgrade to the ad-free, printable PDF download on Ravelry or Etsy!
Just want the free version? Scroll down below!
Winter Cherry Scarf Crochet Pattern
Items needed:
#4 Medium Worsted Weight / Aran (Red Heart Super Saver used in sample)
Yardage:
One skein of Red Heart Super Saver Ombre in lovely color Anthracite (about 440m / 482 yds) for the main color and Baby Pink for contrasting color (170 m / 155 yds).
6 mm [US J-10] hook
Yarn needle
Scissors
Tape measure
Stitch markers
Blocking Mat (optional, but it will give your scarf a perfect finish!)
Abbreviations:
ch – chain
sl st – slip stitch
sc – single crochet
sc FLO – single crochet front loop only
BPsc – back post single crochet
dc – double crochet
FPdc – front post double crochet
BPdc – back post double crochet
tr – treble crochet
V-st – V stitch
sp -space
ch-sp – chain space
sk – skip
st(s) – stitch(es)
yo – yarn over
MC – main color
CC – contrasting color
( ) – additional explanation
[ ] – work as many times as directed
Notes:
This pattern uses US Crochet Terminology.
Scarf is worked widthwise, in rows, in two identical panels, joined with sl st.
Ch1 at the beginning of row does not count as a stitch.
Ch2 at the beginning of row counts as a dc.
Ch4 at the beginning of the row counts as a tr.
Chains in V-sts count as stitches in total stitch count.
To change color at the end of the row, work to last 2 loops on hook and pull new color through last 2 loops, then proceed in new color as indicate
Special Stitches & Techniques
sc FLO – insert your hook under the front loop only of the stitch below (the loop closest to you, not under both loops), and pull up loop, yo and pull through both loops on hook.
BPsc – insert hook from front to back to front around the post of indicated stitch, yo and pull up a loop, yo and pull through both loops on hook (it’s a single crochet worked around the post, not in the indicated stitch itself).
FPdc – yo, insert hook from front to back to front around post of indicated stitch, yo and pull up loop, [yo, pull through 2 loops on hook] twice.
BPdc – yo, insert hook from back to front to back around post of indicated stitch, yo and pull up loop [yo, pull through 2 loops on hook] twice.
V-st – work (dc, ch 1, dc) in the same st/ch-sp.
Gauge:
Gauge is not critical for this project, but if you want exact measurements:
- 13 dc sts and 8 rows = 10 cm / 4 in square
Finished Measurements
The crochet scarf is 180 cm (71 in) long, and if you add fringe it’s about 205 cm (81 in). it is about 27 cm (10.6 in) wide.
Scarf Pattern:
Rectangular panel
Make 2
With MC, ch 38
Row 1: sc in 2nd ch from hook, sc in each ch across, turn – 37 sts
Row 2: ch2, dc in next 6 sts, [sk1, V-st in next st, sk1, dc in next 7 sts] 3 times, turn.
Row 3: ch2, FPdc around next st, dc in next 3 sts, FPdc around next 2 sts, [V-st in ch-sp, Fpdc around next 2 sts, dc in next 3 sts, FPdc around next 2 sts] 3 times, turn.
Row 4: ch2, BPdc around next st, dc in next 3 sts, BPdc around next 2 sts, [V-st in next ch-sp, BPdc around next 2 sts, dc in next 3 sts, BPdc around next 2 sts] 3 times, turn.
Row 5: ch2, FPdc around next st, dc in next 3 sts, FPdc around next 2 sts, [V-st in next ch-sp, FPdc around next 2 sts, dc in next 3 sts, FPdc around next 2 sts] 3 times.
Join CC at the end of row 5 and turn, without fastening off MC.
Row 6: ch2, BPdc around next st, sk1, V-st in next st, sk1, BPdc around next 2 sts, [3 dc in next ch-sp, BPdc around next 2 sts, sk1, V-st in next st, sk1, BPdc around next 2 sts] 3 times, turn.
Row 7: ch2, BPdc around next st, 3 dc in next ch-sp, BPdc around next 2 sts, [sk1, V-st in next st, sk1, BPdc around next 2 sts, 3 dc in next ch-sp, BPdc around next 2 sts] 3 times.
Fasten off CC. Pick up MC and turn.
Row 8: ch2, FPdc around next st, BPdc around next 3 sts, FPdc around next 2 sts, [V-st in next ch-sp, FPdc around next 2 sts, BPdc around next 3 sts, FPdc around next 2 sts] 3 times, turn.
Row 9: ch2, FPdc around next st, dc in next 3 sts, FPdc around next 2 sts, [V-st in ch-sp, FPdc around next 2 sts, dc in next 3 sts, FPdc around next 2 sts] 3 times, turn.
Row 10: ch2, BPdc around next st, dc in next 3 sts, BPdc around next 2 sts, [V-st in next ch-sp, BPdc around next 2 sts, dc in next 3 sts, BPdc around next 2 sts] 3 times, turn.
Rows 11 – 20: Repeat Rows 9 -10.
Join CC at the end of row 20 and turn, without fastening off MC.
Row 21: ch1, BPsc around same st, BPsc around next 7 sts (including dc sts that are part of the V-st), sc in ch-sp, [BPsc around next 9 sts, sc in ch-sp] 2 times, BPsc around next 8 sts, turn.
Row 22: ch1, sc FLO in same st, sc FLO in each st across.
Fasten off CC. Pick up MC and turn.
Row 23: ch4, tr in same st, [sk3, 3 tr in next st] 8 times, sk3, 2 tr in last st, turn – 28 sts
Row 24: ch4, [3 tr in next sp (between 3 tr groups)] 9 times, tr in last st, turn – 29 sts
Row 25: ch4, tr in same st, [3 tr in next sp] 8 times, 2 tr in last st, turn – 28 sts
Rows 26 – 43: Repeat Rows 24-25.
At the end of Row 43 join CC and fasten off MC.
Row 44: ch2, dc in next st, sk1, [V-st in next st, sk1] 5 times, dc in next st, 2 dc in next st, sk1, [V- st in next st, sk1] 5 times, dc in last 2 sts, turn. (27 dc + 10 ch1-sp)
Row 45: ch2, FPdc around next st, [V-st in next ch-sp] 5 times, FPdc around next 3 sts, [V-st in next ch-sp] 5 times, FPdc around next 2 sts, turn.
Row 46: ch2, BPdc around next st, [V-st in next ch-sp] 5 times, BPdc around next 3 sts, [V-st in next ch-sp] 5 times, BPdc around next 2 sts, turn.
Row 47: ch2, FPdc around next st, [V-st in next ch- sp] 5 times, FPdc around next 3 sts, [V-st in next ch- sp] 5 times, FPdc around next 2 sts, turn.
Rows: 48 – 53: Repeat Rows: 46 – 47.
Row 54: ch1, sc FLO in same st, sc FLO in each st across, fasten off 1st panel – 37 sts
After finishing the 2nd panel do not fasten off CC, continue to blocking and joining.
Blocking
This part is entirely optional, but it’s absolutely worth the trouble! Yes, I know it’s boring, but … I would highly recommend doing it… Ideally, you should block the two panels before joining. You can use any method you are familiar with: washing, steam or spray. Pin the panels gently into shape, making sure that both parts are equally stretched (of same length and width) and let them dry completely.
Join
Place two panels with WS facing each other and match up the stitches of their last rows. On the RS join pieces with sl st through inner loops (through the back loops of the stitches of panel closer to you, and the front loops of the stitches of the panel further away from you). Fasten off.
AND THE FINAL TOUCH
Weave in all the ends.
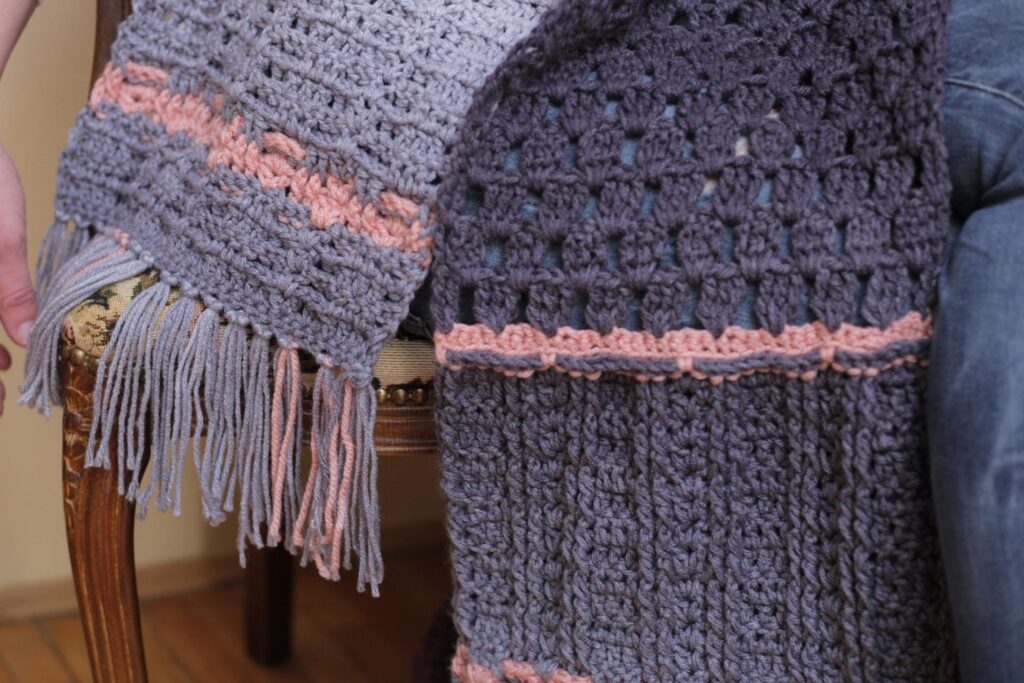
Optional: Work sc edging around the edges of the CC part in the middle, placing 3 sc sts per 2 dc sts. This will make the edges more even and texture shown.
Add fringe. The one on the original design is about 13 cm (little over 5 in). That means you need to cut the fringe about 27 cm (11 in). Each fringe was made of 3 pieces of yarn held together.
We would love to see your work! Tag me and Katarina @frankie.kate_ & @Twobrothersblankets on Instagram of your Winter Cherry Scarfs!
If you enjoyed this pattern, check out my ever growing list of Free Crochet Patterns!
Pin it!