Diamonds in Twilight Wrap Free Crochet Pattern

I am so excited to have guest designer Dianne of Same DiNamics on the blog today!
About the Designer
Dianne is the owner of Same DiNamics Crochet. Dianne has been crocheting for 8 years now and designing for 5 years and has not let the hook down ever since. Her favorite items to crochet are shawls and cowl, and her favorite crochet stitch is the HDC, half double crochet. You can find Dianne on Ravelry, her blog, or Facebook.

Pattern Details
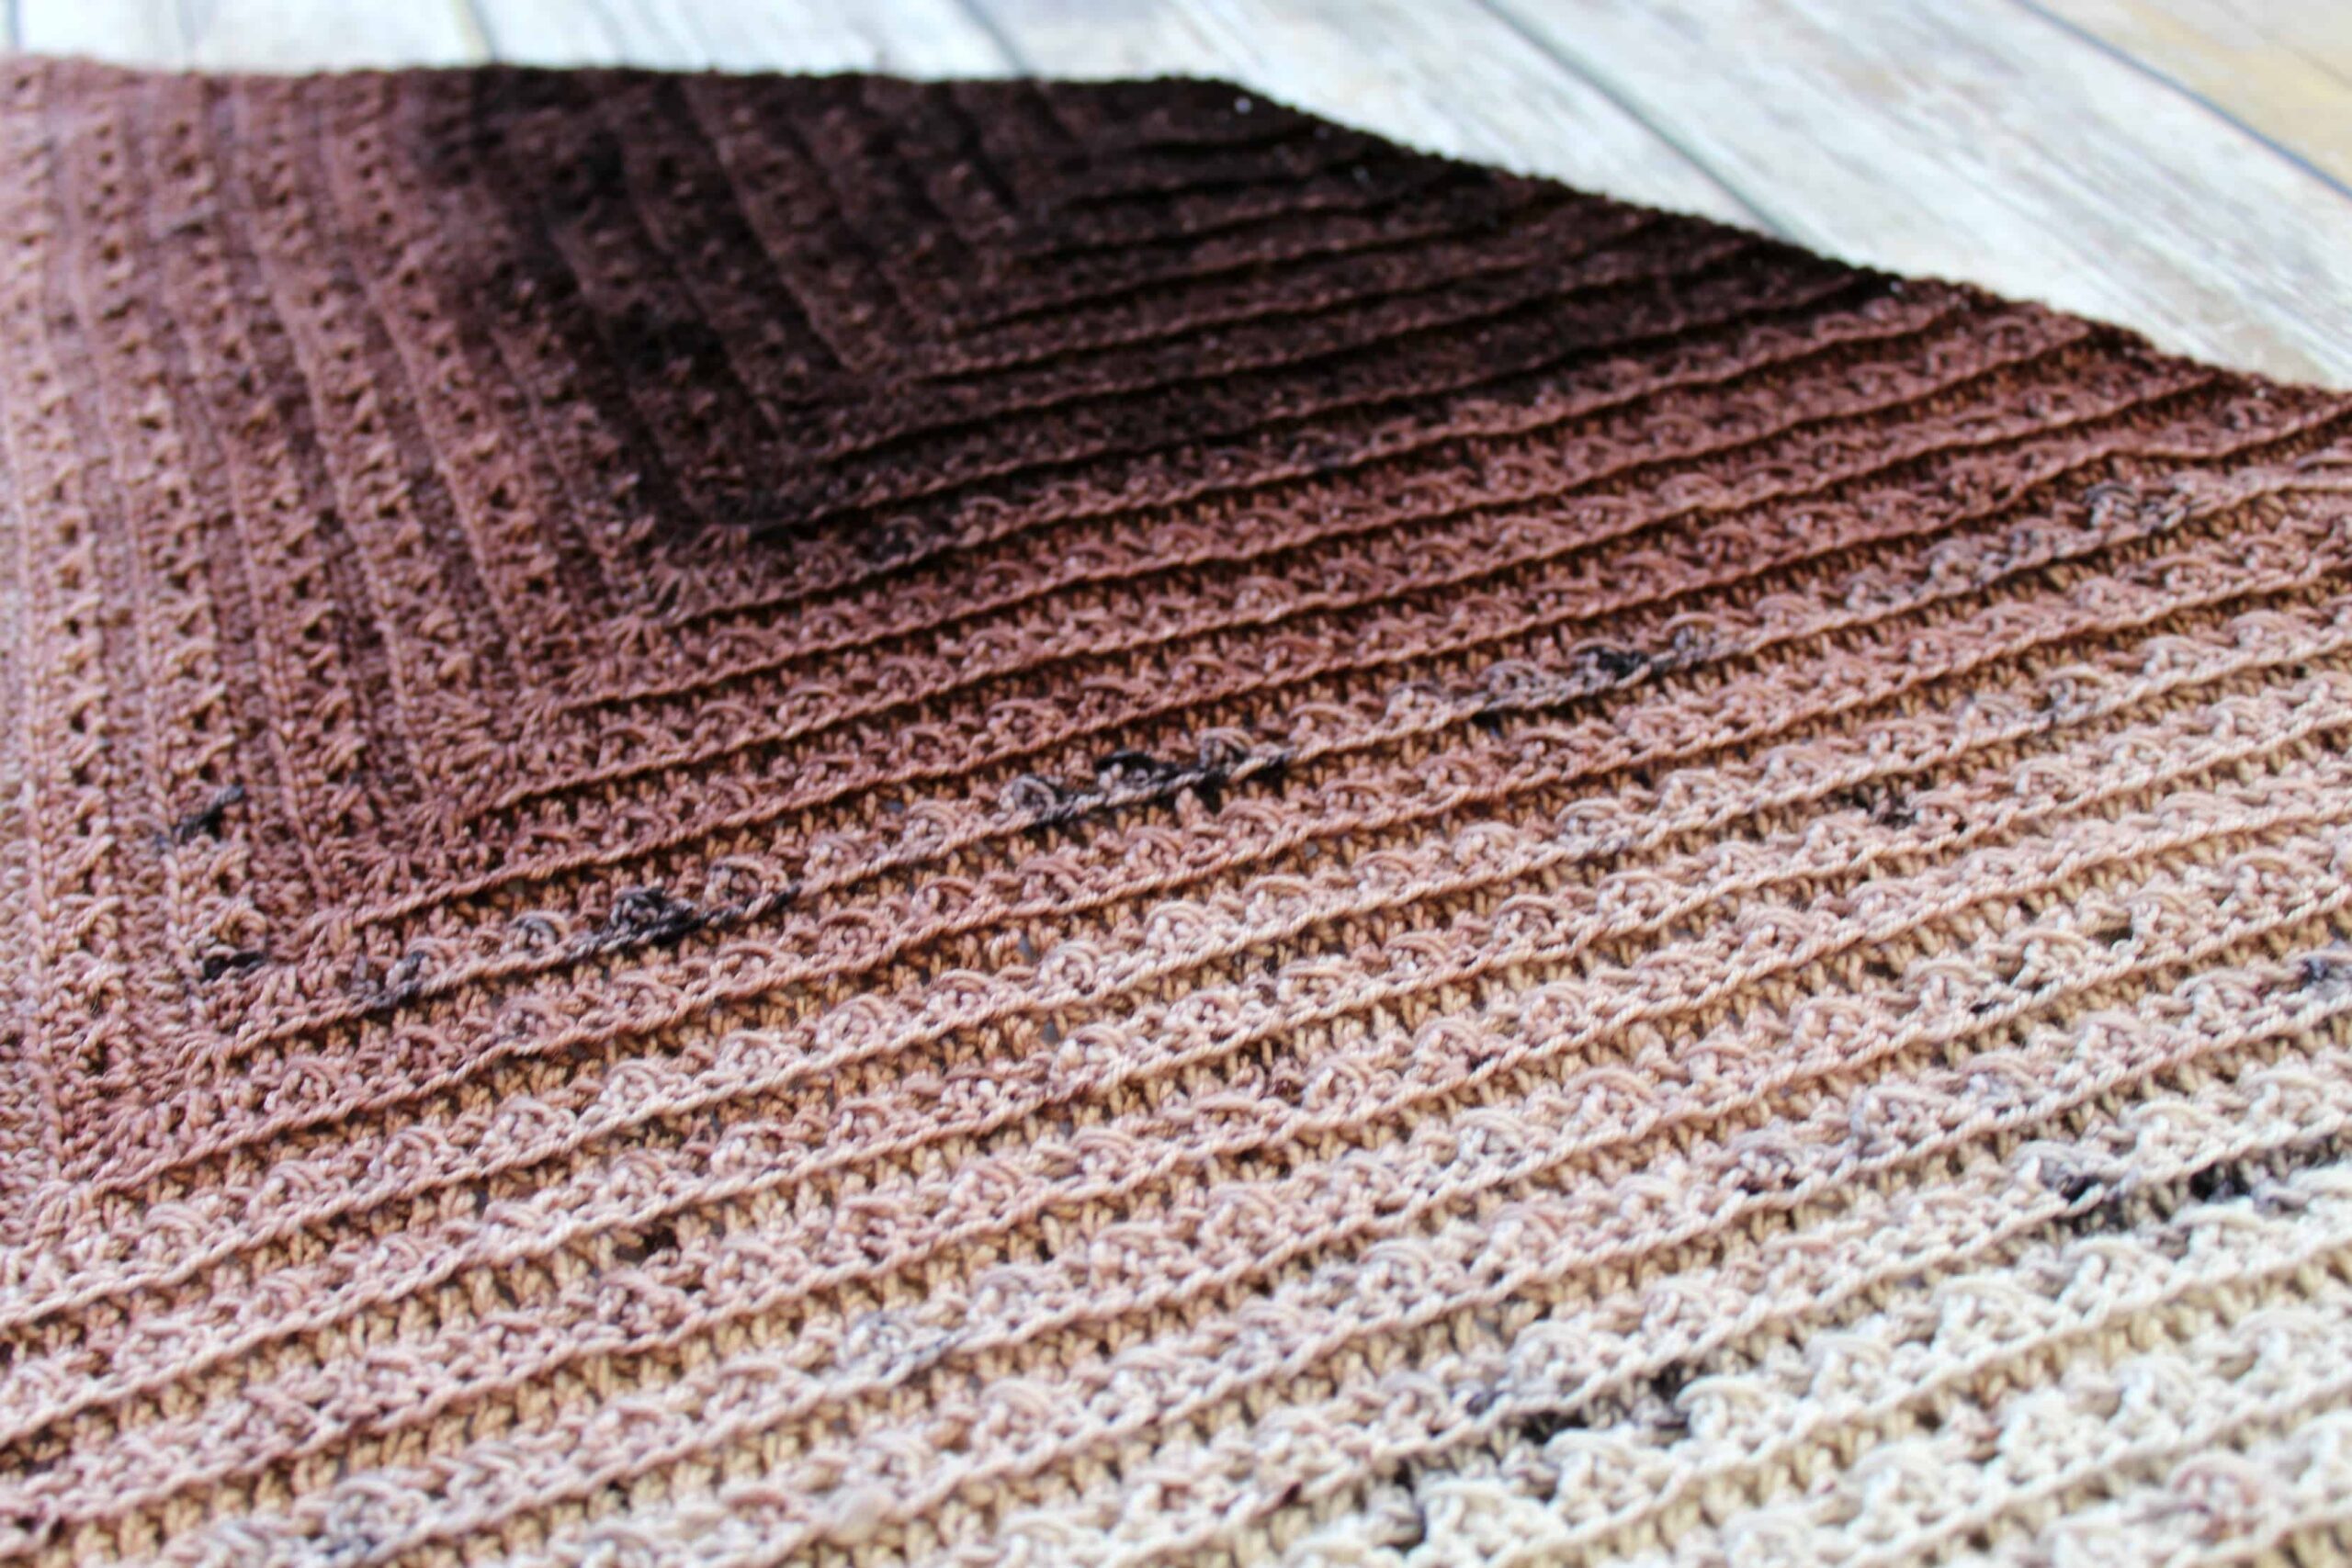
The Diamonds in Twilight Wrap is a beautiful, lightweight wrap that is great for warmer months!
You will need approximately 516 yards of sport (#2) weight yarn.
This pattern is rated intermediate in difficulty level.
There is a photo tutorial and special stitch dictionary within the pattern.
Diamonds in Twilight Crochet Pattern
You can purchase the ad-free, printable pdf pattern on Ravelry!
Materials
Yarn – WeCrochet *Hawthorne Sport #2, 80% Superwash Fine Highland Wool/20% Polymade, 258 yards. Need 516 yards
Please note: The yarn used to make the sample has been discontinued. Most #2 Sport Weight will work as a great substitute.
Hook – G/4.5mm
Notions – needle for weaving in ends
Finished Size
Approx. 75” L x 16.5” W
Gauge
not critical for this project
Stitch Abbreviation
Ch – chain; st(s) – stitch(es); sk – skip; sc – single crochet; dc – double crochet; tr – treble crochet
Special Stitches
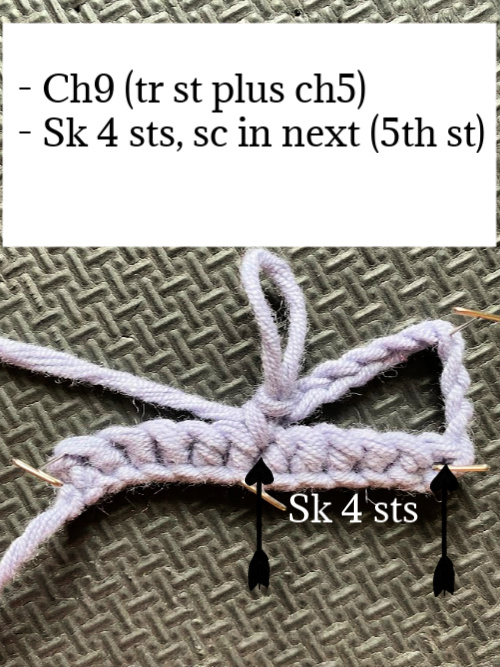
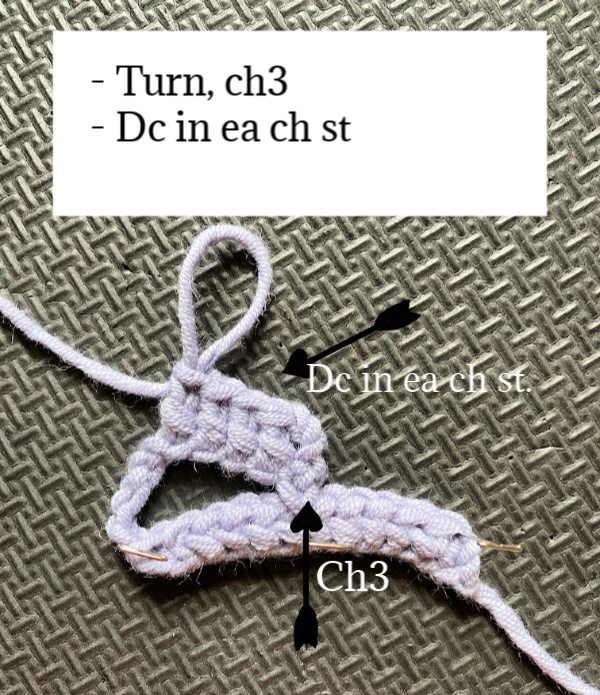
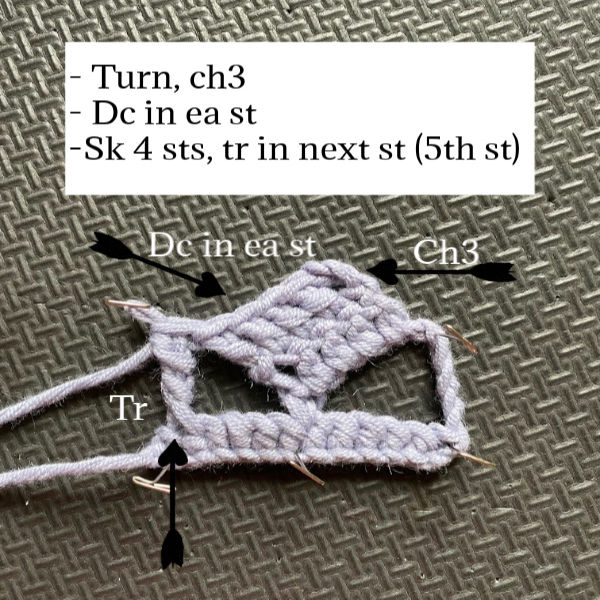
Diamond Stitch: Ch9, sk 4 sts, sc in next st, ch3 and turn, dc in next 4 sts of loops just made, ch3 and turn, dc in next 4 sts just made
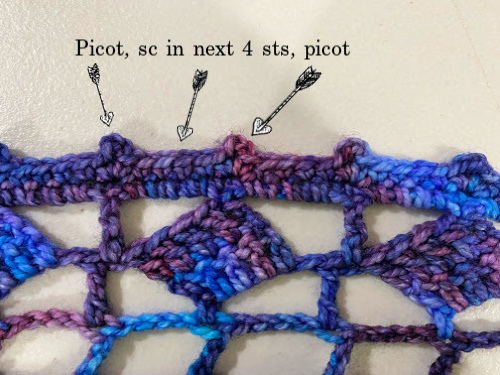
Picot: (sc, ch3, sc) in the same st.
Foundation Single Crochet – Fsc: Ch2, (does not count as st), insert hook into first ch, yo, pull up loop (2 loops on hook), yo, pull through one loop (2 loops on hook), yo, pull through both loops, one Fsc made.
Experience Level
Intermediate
Pattern Notes
Chain 3 equals a dc stitch; when placing your last dc st in a row, place on the top of the ch3 of turning chain from the row below.
Chain 4 equals as a tr stitch.
Chain 9 equals 1 tr + ch5; when placing your last tr st in a row, place in the 4th ch-st of turning chain from the row below.
When placing your dc or tr sts in the chains, be sure to work into the ch-st itself not around the chain. This gives the design a more finished and cohesive look.
Instructions in brackets [ ] are to be repeated the amount of times shown behind the brackets.
Final stitch count of each row will be indicated in < >.
When working the corners of the edging, place 3sc in the same st for the corner stitches.

Pattern
Row 1: Fsc 291, turn. <291 fsc>
Row 2: Ch9, sk 4 sts, sc in next st, ch3 and turn, 1 dc in next 4 sts of loop just made, ch3 and turn, 1 dc in next 4 sts just made, [sk 4 sts, 1 tr in the next st, ch5, sk 4 sts, 1 sc in next st, ch3 and turn, 1 dc in next 4 sts of chain, ch3 and turn, 1 dc in next 4 sts] 28x, sk 4 sts, 1 tr in the last st, turn. <29 Diamonds; 30 tr>
Row 3: Ch9, sk 4 dc, [sc in the top of ch3 (see notes), ch4, 1 tr in the next st/tr, ch 4] 28x, sc in the top of ch3, ch4, 1 tr in the 4th st of turning chain, turn. <30 tr, 29 sc>.
Row 4: Ch4, 1 tr in ea st across, turn. <291 tr>
Row 5: Ch9, sk 4sts, [1 tr in the 5th st, ch4, sk 4 sts] 59x, 1 tr in the last st, turn. <61 tr; 60 ch-4 sps>
Rows 6 – 19: Repeat Rows 2 – 5 ending on a Row 3.
Finishing – Edging around entire piece – see picture to help with picot placement
Round 1: Ch1, sc in ea st across and around the sides and bottom taking care of to place 3 sc in the first 3 corners. Your final stitch count may vary. What I did for the sides of the wrap was in ea side st, I placed 4 sc in the chains and 4 sc in the tr sts. And along the bottom of the wrap, I placed 1 sc in ea st. When you join, place 2 sc in the last corner and join to the first sc.
Round 2:
Ch1, sc in the same st and next 3 sts [picot in the next st, sc in the next 4 sts] 56x, picot in the next st, sc in the next next 7 sts, 3 sc in the corner.
Working down the side, sc all the way down until you reach the corner, place 3 sc in the corner.
On the bottom, sc in the next 5 sts, [picot in the next st, sc in the next 4 sts] 56x, picot in the next st. sc in the next 6 sts, place 3 sc in the corner.
Working up the other side, sc all the way up until you reach the last corner and place 2sc in the corner, join.
Fasten off. Weave in ends. Block your piece to open up the stitches and relax them.
Photo Tutorial
Love this pattern? Check out my growing list of Free Crochet Patterns!
Pin it!

Michelle has been crocheting since 2011 and has been designing crochet patterns since 2014! She specializes in modern garments and accessories for your handmade wardrobe. Michelle has been featured in Happily Hooked Magazine, thehooknooklife.com, wecrochet.com, ourmakerlife.com, and several other websites. She is committed to providing the highest quality crochet information and patterns that instill a true feeling of pride, enjoyment, and accomplishment when completing a project.



Thank you. A different pattern and I like the colors too.