
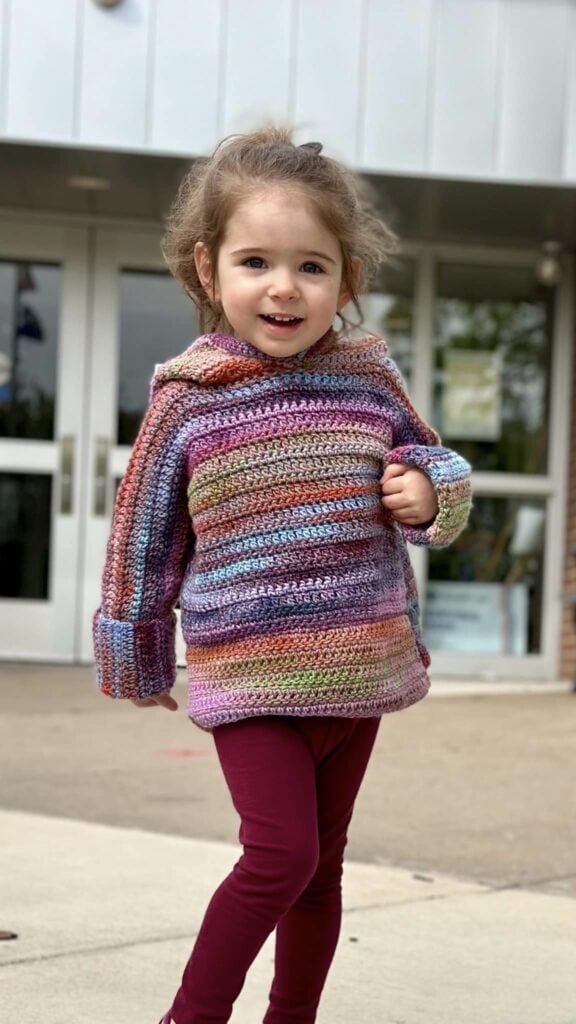
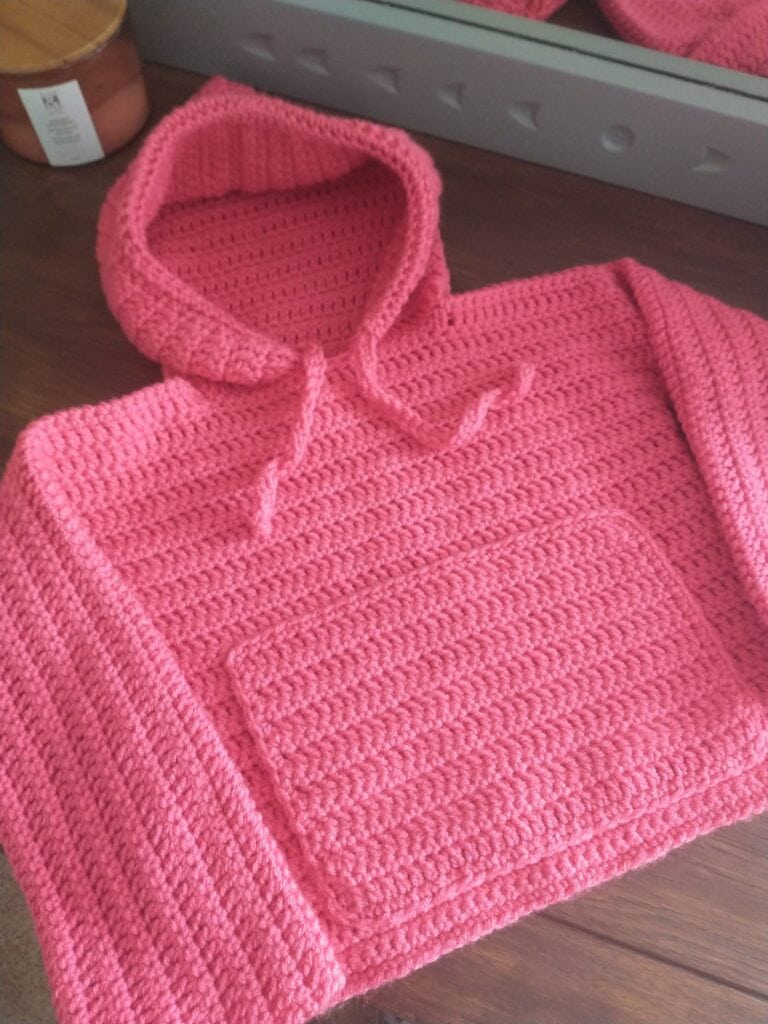
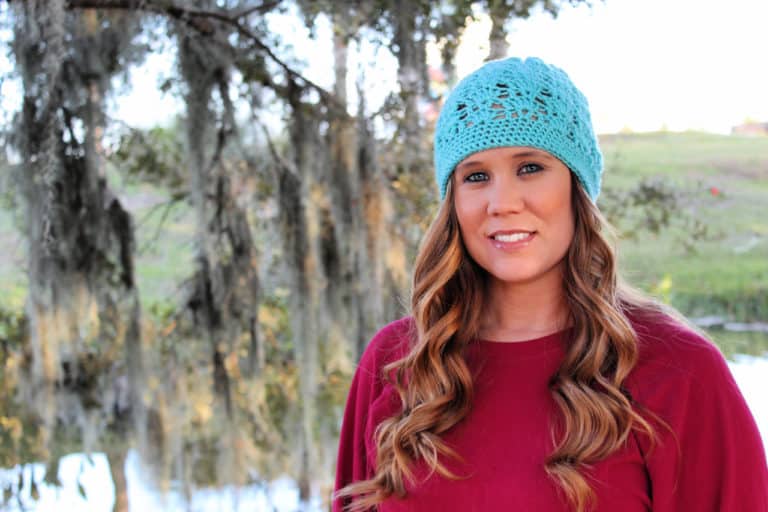
Introducing the Houston Hoodie, a cozy and whimsical crochet creation that promises warmth and style for your little ones! With its simple design and soft texture, it’s sure to become a cherished favorite in any child’s wardrobe. Get ready to embark on a crocheting adventure as you stitch this adorable garment, perfect for chilly days and imaginative play!
2024 Update!
As of April 2024, this pattern has been completely updated and revamped! The original was worked in the round, from the top down, in joined rounds. It was cute, but it had a horrible traveling seam down the bottom. That seam haunted me from the day I published it! After many attempts to fix it, I could not figure out how to keep it from traveling diagonally along the back of the sweater.
In late 2023 I learned a new way of construction a crochet sweater, and I knew that was the way this hoodie needed to be constructed to get rid of that ugly seam!
Now, the garment is constructed flat and seamed together at the sides instead of the back! It’s super simple to do and looks so much better!

If you love crocheting as much as I do, or want to learn more, or just want to show off your work, please join our Crochet Garments community over on Facebook! I hope you’ll share your finished crochet project with us!
Inspiration Behind the Design
I created the Children’s Houston Hoodie after I designed the adult Houston Hoodie. It was such a well-loved design that I was getting requests for children’s sizes and so I designed a children’s pattern!
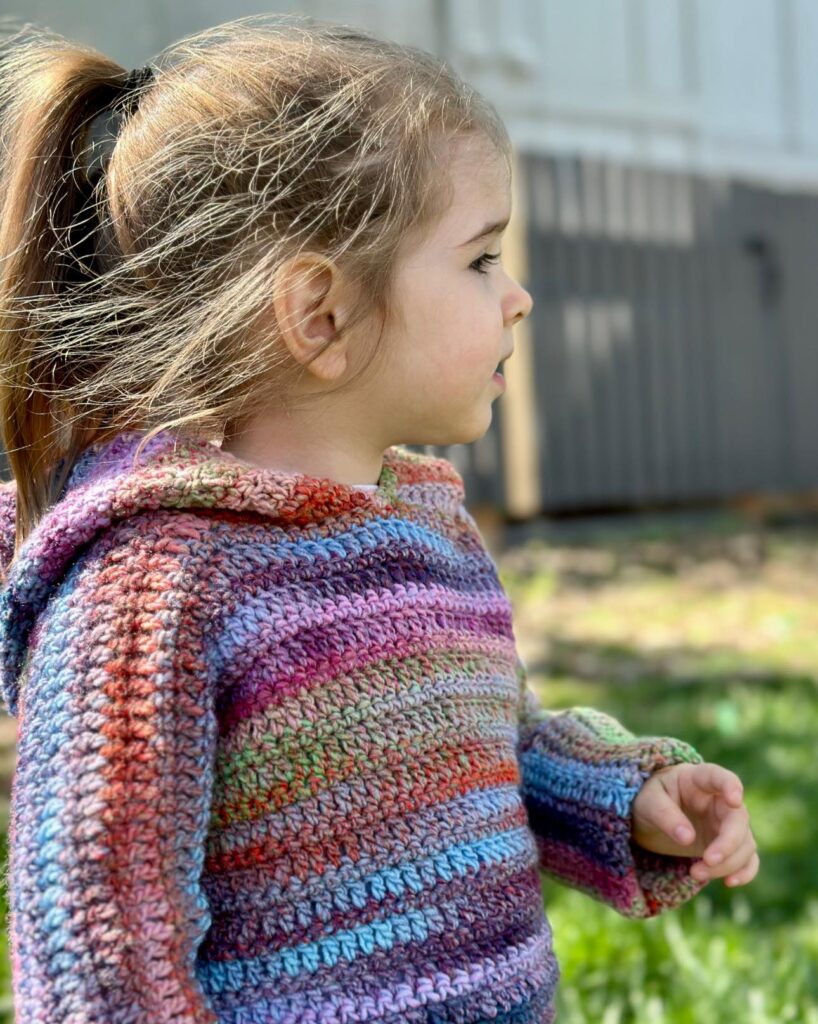
The children’s crochet hoodie comes with an optional pocket that can be added to the front!
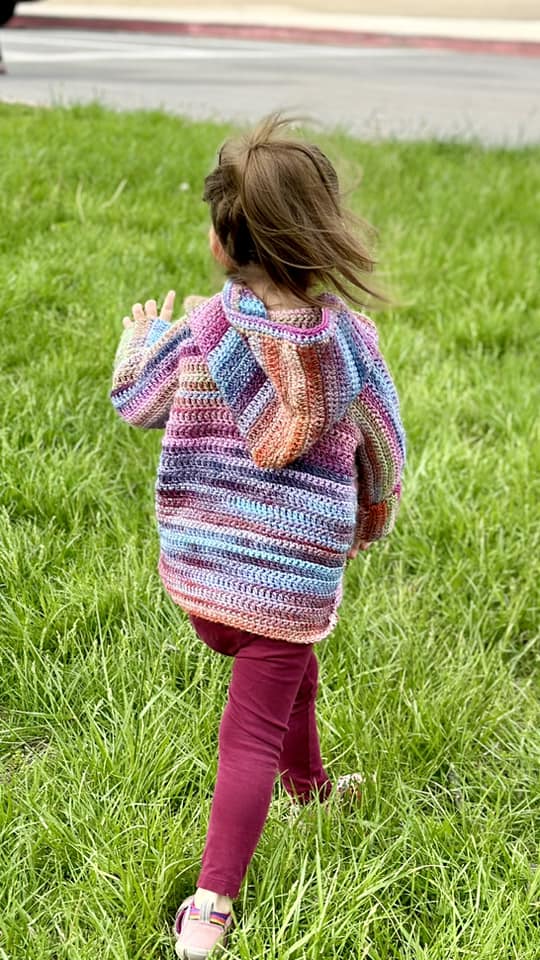
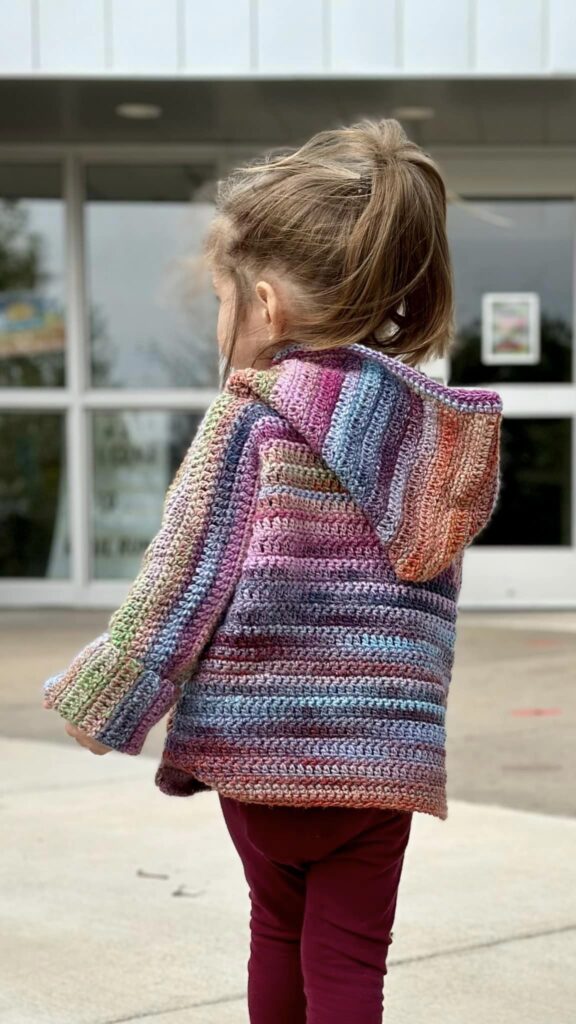
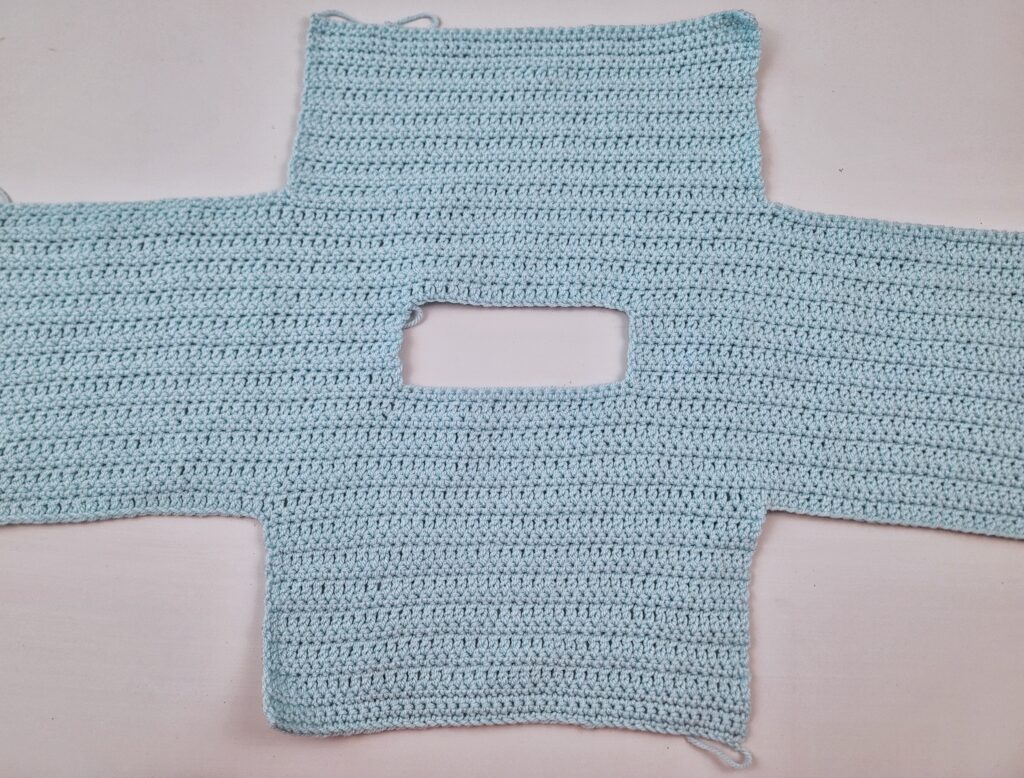
Crochet Hoodie Construction
This crochet hoodie is worked completely flat. You’ll start with the front panel, then the sleeves, and then the back panel. You’ll then fold the entire thing in half and seam the sides and bottom of the sleeves.
The hood is worked flat as well and sewn on to the sweater.
This flat construction is easy to adjust by just adding length or more/less stitches, and is so simple to do! Everything is in rows!
The Yarn
A crochet hoodie needs to be warm and cozy, easy to wash, and comfortable! So, for this project I chose to use one of my favorite worsted weight (#4) yarns, Brava Worsted from WeCrochet!
Brava is made of 100% premium acrylic and is a great choice for crochet garments. It can be machine washed and dried, and comes in a great variety of colors! It is sold at a really affordable price point also, and one skein has 218 yards.
*Note- the yarn used in the modeled children’s photos is Red Heart Roll With It Melange in the colorway Hollywood.
Some other worsted (#4) weight yarns you could use for this project are:
Lion Brand Jeans – 100% Acrylic
Paintbox Yarns Simply Aran – 100% Acrylic
WeCrochet Mighty Stitch – 80% Acrylic/20% Superwash Wool
Children’s houston hoodie
Get the PDF Pattern!
Upgrade to the ad-free, printable PDF download on Ravelry or Etsy!
Just want the free version? Scroll down below!
Or grab the beautifully curated eBook, with the adult and children’s sizes included – 17 sizes total!
Children’s Houston Hoodie Crochet Pattern
Copyright © 2024 Michelle Ferguson
All rights reserved. No part of this pattern may be reproduced, sold, or tampered with, in any form or by any means, without permission from the publisher.
Items produced from these patterns may be sold, but the patterns themselves may not be sold, shared, or altered in any way.
Yarn:
100% Premium Acrylic
100g/218yds
Hook:
H/8 (5.0mm) crochet hook
Other Materials:
2 stitch markers
Difficulty
Intermediate
Gauge
18 sts x 13 rows = 5”
Within st pattern
Sizing & Approximate Yardage
| Size | Chest Circumference | Shoulder to Shoulder | Finished Circumference | Finished Length | Yardage |
| 2 | 21” | 9.25” | 24” | 13.5” | 622 |
| 4 | 23” | 9.75” | 26” | 14.5” | 674 |
| 6 | 25” | 10.25” | 28” | 15.75” | 726 |
| 8 | 26.5” | 10.75” | 29.5” | 18.5” | 765 |
| 10 | 28” | 11.25” | 31” | 20.75” | 804 |
| 12 | 30” | 12” | 33” | 21.75” | 856 |
| 14 | 31.5” | 12.25” | 34.5” | 23” | 894 |
| 16 | 32.5” | 13” | 35.5” | 23.75” | 922 |
Stitches Needed & Abbreviations
| ch(s) – chain(s) |
| st(s) – stitch(es) |
| sc – single crochet |
| dc – double crochet |
| * – repeat from |
| Lch – long chain – draw up a loop about the height of a dc, ch 1 |
| FSC – chainless foundation single crochet |
Pattern Notes
Pattern is in US terms.
Garment is worked in one piece, folded in half, and then sewn together along the sides of the body and bottom of sleeves.
Hoodie is oversized with approximately 3-4” positive ease.
Pattern is written in smallest size, with additional sizes in parentheses as follows: 2 (4, 6, 8)(10, 12, 14, 16). Final stitch count for ALL sizes will be in parentheses at the end of each row/round.
Video walkthrough of pattern: https://youtu.be/puMDc6W7UBo
Tips for Crocheting for Kids:
Size up. Kids grow so fast that I find it’s best to size up, even if it’s a little big at first. Go off measurements in the size chart and then size up from there. Often for boys, especially pre-teen and teen boys, factor in the shoulder-to-shoulder measurements, and size up from the measurement.
You can also measure a favorite shirt or hoodie of the child to see what measurements it gets closest to on the size chart.
Try on often as you crochet the garment. Adjust where needed, like adding more rounds for length, or going up or down a hook size to slightly adjust width.

Pattern:
Front Panel
Ch 45 (49, 51, 55)(57, 61, 63, 65)
Row 1: (RS) sc in 2nd ch from hook and in each ch across. (44, 48, 50, 54)(56, 60, 62, 64)
Rows 2-4: ch 1, turn, 1 sc in each st across. (44, 48, 50, 54)(56, 60, 62, 64)
Row 5: Lch, turn, 1 dc in each st across. (44, 48, 50, 54)(56, 60, 62, 64)
Row 6: ch 1, turn, 1 sc in each st across. (44, 48, 50, 54)(56, 60, 62, 64)
Rows 7- 24(26, 28, 34)(38, 40, 42, 42): repeat rows 5 and 6.
Do not fasten off but drop working yarn.
Check fit here. Panel should lie at the hips to the armpit area where sleeves would begin. Add length if needed by continuing repeats of rows 5 and 6.
You will now create the sleeves.
Sleeves
With a second skein of yarn, join to first st of last row of front panel.
Ch 32 (40, 44, 46)(50, 56, 58, 58)
Check length of sleeve at this point. Chain should come to wrist from underarm. To adjust, ch multiple of 2+ 2. Do the same for other side.
Fasten off.
Pick up working yarn again and ch 34 (42, 46, 48)(52, 58, 60, 60)
Row 1: dc in 3rd ch from hook and each ch across, dc in next 44(48, 50, 54)(56, 60, 62, 64) sts, and in next 32 (40, 44, 46)(50, 56, 58, 58)chs. (108, 128, 138, 146)(156, 172, 178, 180)
Row 2: ch 1, turn, 1 sc in each st across. (108, 128, 138, 146)(156, 172, 178, 180)
Row 3: Lch, turn, 1 dc in each st across. (108, 128, 138, 146)(156, 172, 178, 180)
Rows 4-8 (8, 10, 10)(12, 14, 14,16) : repeat rows 2-3, ending with a repeat of row 2.
Now you will do the shaping for the neckline.
Row 9 (9, 11, 11)(13, 15, 15, 17): Lch, turn, 1 dc in each st across for 44(54, 59, 63)(67, 75, 76, 77) sts. (44, 54, 59, 63)(67, 75, 76, 77)
Rows 10 (10, 12, 12)(14, 16, 16, 18): ch 1, turn, 1 sc in each st across. (44, 54, 59, 63)(67, 75, 76, 77)
Rows 11 (11, 13, 13)(15, 17, 17, 19)-13(15, 15, 17)(19, 19, 21, 23): repeat previous 2 rows, ending with a repeat of row 9 (9, 11, 11)(13, 15, 15, 17).
Fasten off.
Place st marker in next unworked stitch. Counting that stitch, skip 20 (20, 20, 20)(22, 22, 26, 26), place st marker in last st.
Join yarn to next unworked stitch, facing RS.
Repeat rows 9 (9, 11, 11)(13, 15, 15, 17) – 13 (15, 15, 17)(19, 19, 21, 23).
Row 14 (16, 16, 18)(20, 20, 22, 24): ch 1, 1 sc in first 44(54, 59, 63)(67, 75, 76, 77) sts, ch 20 (20, 20, 20)(22, 22, 26, 26), 1 sc in next 44(54, 59, 63)(67, 75, 76, 77) sts. (108, 128, 138, 146)(156, 172, 178, 180)
Row 15 (17, 17, 19)(21, 21, 23, 25): repeat row 3.
Row 16 (18, 18, 20)(22, 22, 24, 26): repeat row 2.
Rows 17(19, 19, 21)(23, 23, 25, 27) – 22 (24, 26, 28)(32, 34, 36, 40): repeat previous 2 rows.
Fasten off.
You will now create the back panel.
Back Panel
Skip 32 (40, 44, 46)(50, 56, 58, 58) sts, join yarn to NEXT st, facing RS.
Row 1: Lch, 1 dc in each st across for 44 (48, 50, 54)(56, 60, 62, 64)sts. (44, 48, 50, 54)(56, 60, 62, 64)
Row 2: ch 1, turn, 1 sc in each st across. (44, 48, 50, 54)(56, 60, 62, 64)
Rows 3: Lch, turn, 1 dc in each st across. (44, 48, 50, 54)(56, 60, 62, 64)
Rows 4-19(21, 23, 29)(33, 35, 37, 37) : repeat rows 2 and 3.
Rows 20(22, 24, 30)(34, 36, 38, 38)-24(26, 28,34)(38, 40, 42, 42) : ch 1, turn, 1 sc in each st across. (44, 48, 50, 54)(56, 60, 62, 64)
Fasten off.
You will now fold garment in half at the neckline and sew.
Sewing
Fold garment in half at neckline with the front panel facing you. Line up the edges of the sides and bottom of sleeve so the front half is directly over the bottom half.
Using a long piece of yarn and your yarn needle, sew the front and pack panels together starting at Row 5 from the bottom. Once you get to the sleeve sew sleeve together at the bottom stitches. Fasten off and end of sleeve. Do the same on the other side.
See Supplement Video for a visual aid on how to do this.
You will now create the hood.
Hood
Ch 54 (58, 54, 58)(62, 58, 70, 70)
Row 1: dc in 3rd ch from hook and each ch across. (52, 56, 52, 56)(60, 56, 68, 68)
Row 2: ch 1, turn, 1 sc in each st across. (52, 56, 52, 56)(60, 56, 68, 68)
Row 3: Lch, turn, 1 dc in each st across. (52, 56, 52, 56)(60, 56, 68, 68)
Rows 4-25 (25, 25, 25)(29, 29, 29, 29): repeat rows 2-3.
Row 26 (26, 26, 26)(30, 30, 30 30): repeat row 2.
Fasten off, leaving long tail for sewing.
Sewing Hood
Fold rectangle in half, with WS facing you.
Sew the top of the rectangle shut. Turn RS facing you.
Mark the middle of the front neckline by skipping 10 (10, 10, 10)(11, 11, 13, 13) sts and marking the NEXT stitch with a stitch marker.
Sew bottom of hood starting at stitch marker and working all the way around neckline, ending at stitch before stitch marker.
Fasten off.
Hoodie Trim
Join yarn to front of hood, at middle of sweater where stitch marker was placed.
Row 1: ch 1, sc evenly around the front of hood, ending at middle of sweater on other side of hood.
Fasten off. Weave in ends.
Optional Trim with Drawstring:
**Please do not leave child unattended if you choose to add a drawstring.
Row 1: ch 1, evenly work 54 (54, 54, 54)(60, 60, 60, 60) sc around front of hood, finishing at middle of sweater again. (54, 54, 54, 54)(60, 60, 60, 60)
Rows 2-4: ch 1, turn, 1 sc in each st around. (54, 54, 54, 54)(60, 60, 60, 60)
Fasten off leaving very long tail for sewing.
Make drawstring:
FSC 100 or ch 101 and sc in 2nd ch from hook and across. Fasten off. Weave in ends.
Using yarn needle and yarn tail from trim, sew row 4 of trim to row 1 of trim all the way around, creating a tube. Fasten off.
Tip: put your drawstring inside the trim as you sew instead of trying to thread it through at the end.
Finishing
Weave in all ends. Block if needed.
Optional Pocket
Ch 30 (32, 34, 36, 38, 40)
Row 1: dc in 3rd ch from hook and across. (28, 30, 32, 34, 36, 38)
Row 2: Ch 1, turn, 1 hdc in each st across. (28, 30, 32, 34, 36, 38)
Row 3: Ch 2, turn, 1 dc in each st across. (28, 30, 32, 34, 36, 38)
Repeat rows 2-3 until you have a true rectangle shape.
Work one round of sc evenly around the entire rectangle, working 2 sc in each corner.
Fasten off.
Sew to bottom front of hoodie, with bottom lined up to Row 5.
Weave in all ends.
Pin it for Later:


Oh! This is adorable!
Hey.
Is there a video of you Malung this hoodie? I’m somewhat of a beginner and not really sure about all the parts, such s the hem and hood.
Maybe there’s a video I’ve missed? Love your work though. Thanks for sharing!
Unfortunately there is not a video at this time.
Hey again.
Ok too bad there’s no video.
At which point do you crochet the garment together? Before you crochet the hem?
You don’t have to crochet anything together. It’s all worked in one piece. You’ll just join yarn yarn to the body for the hood, sleeves, and hem.
Unfortunately I don’t have the kid I’m making this for available so I can measure his arm length. Do you have any general measurements for arm lengths for a size 10? Thanks, I love this pattern!!!
This is my go-to size chart: https://www.craftyarncouncil.com/standards/child-youth-sizes and according to it, it says 13.5″ for a size 10. 🙂
Perfect, thank you!
For the life of me, I can’t find the arm holes…. Where are they in the pattern?
It depends on what size you’re doing. For Size 2 it’s round 8, size 4 is round 10. It is the round that you skip stitches, which creates the armholes.
Why are we adding hem to only one side? And which side? Because it says to only do 40 then turn or 44 and turn, etc
You are doing it twice. The last line in the Hem section says: Fasten off. Repeat on other side, starting at the 2nd stitch marker.
You do it like that to create the little split on the sides.
is there a way to make this but for teens?
Hi! The pattern now goes up to size 16. If their measurements are bigger than that size, I’d recommend going up to the adult pattern.
I am attempting this pattern and was wondering if instead of doing the lch if a ch2 would work just as well?
Yes, you can do a ch 2 instead. I just find that the long chain gives it a cleaner look with no gaps or bumps along the edge.
I love this pattern ! Can’t wait to try!
I have made 4 of these on my fifth one. One size 2 and four size 8. I think I know this pattern by heart now… lol. Easy pattern and love the long chain, edges are nice and straight. Hoping all my grand babies enjoy these sweaters for Christmas.
I just finished this for my granddaughter and in the same yarn & colourway. I love it & her parents do too. Thank you so much for a lovely and well-written pattern.
Hi!
I want to make your sweater for my grandson. I want to error on the side of big. I am trying size 10. 56 stitches across seems like it would be WAY too big. It looks like width-wise, it would fit an adult. Can you help me u derstand? Thank you!
What hook size did you meet gauge with? Size 10 should measure approximately 15.5″ across if gauge is correct.
Can you explain the sleeve better please.
You wrote chain on a different skein and different count. Fasten off. Then pick up and chain again and double crochet?
Im confused.
Hi! I highly recommend you check out the video tutorial linked in the pattern notes. It will be easier to understand how that part works with the visual aid.