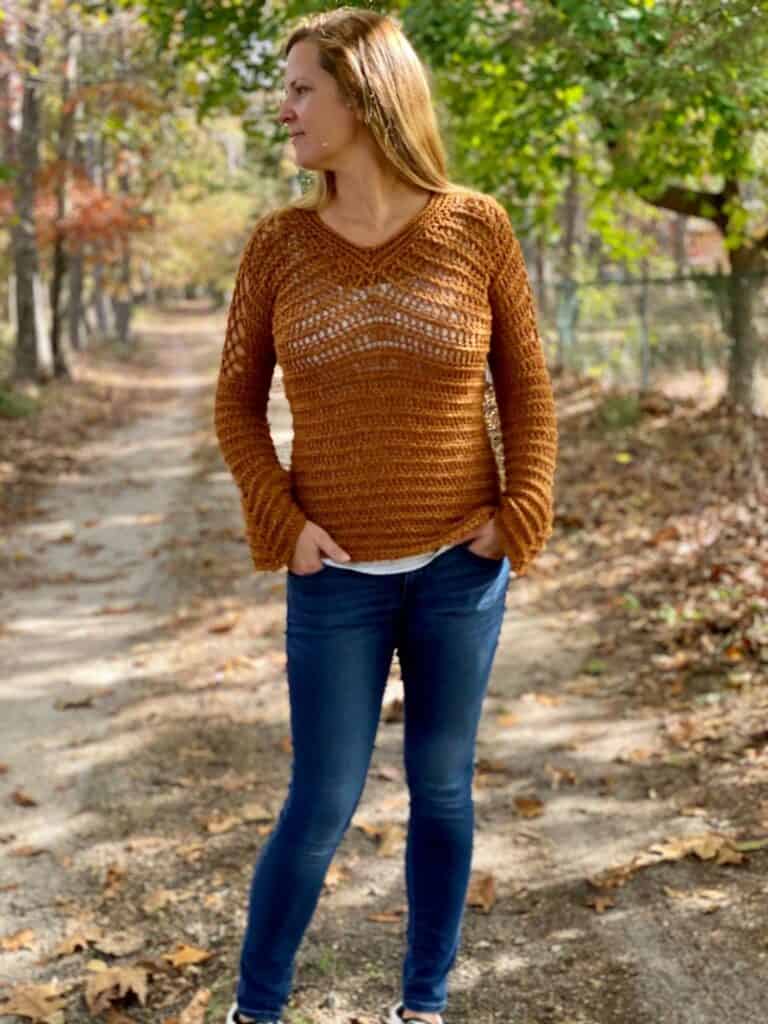
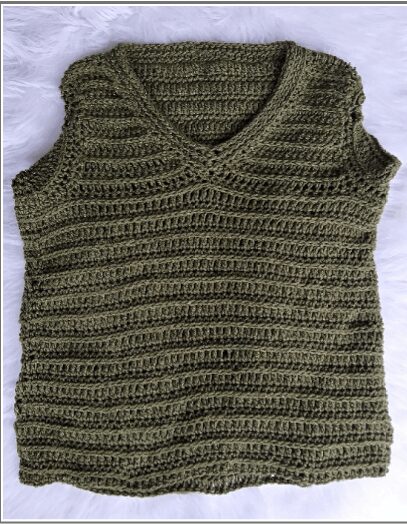
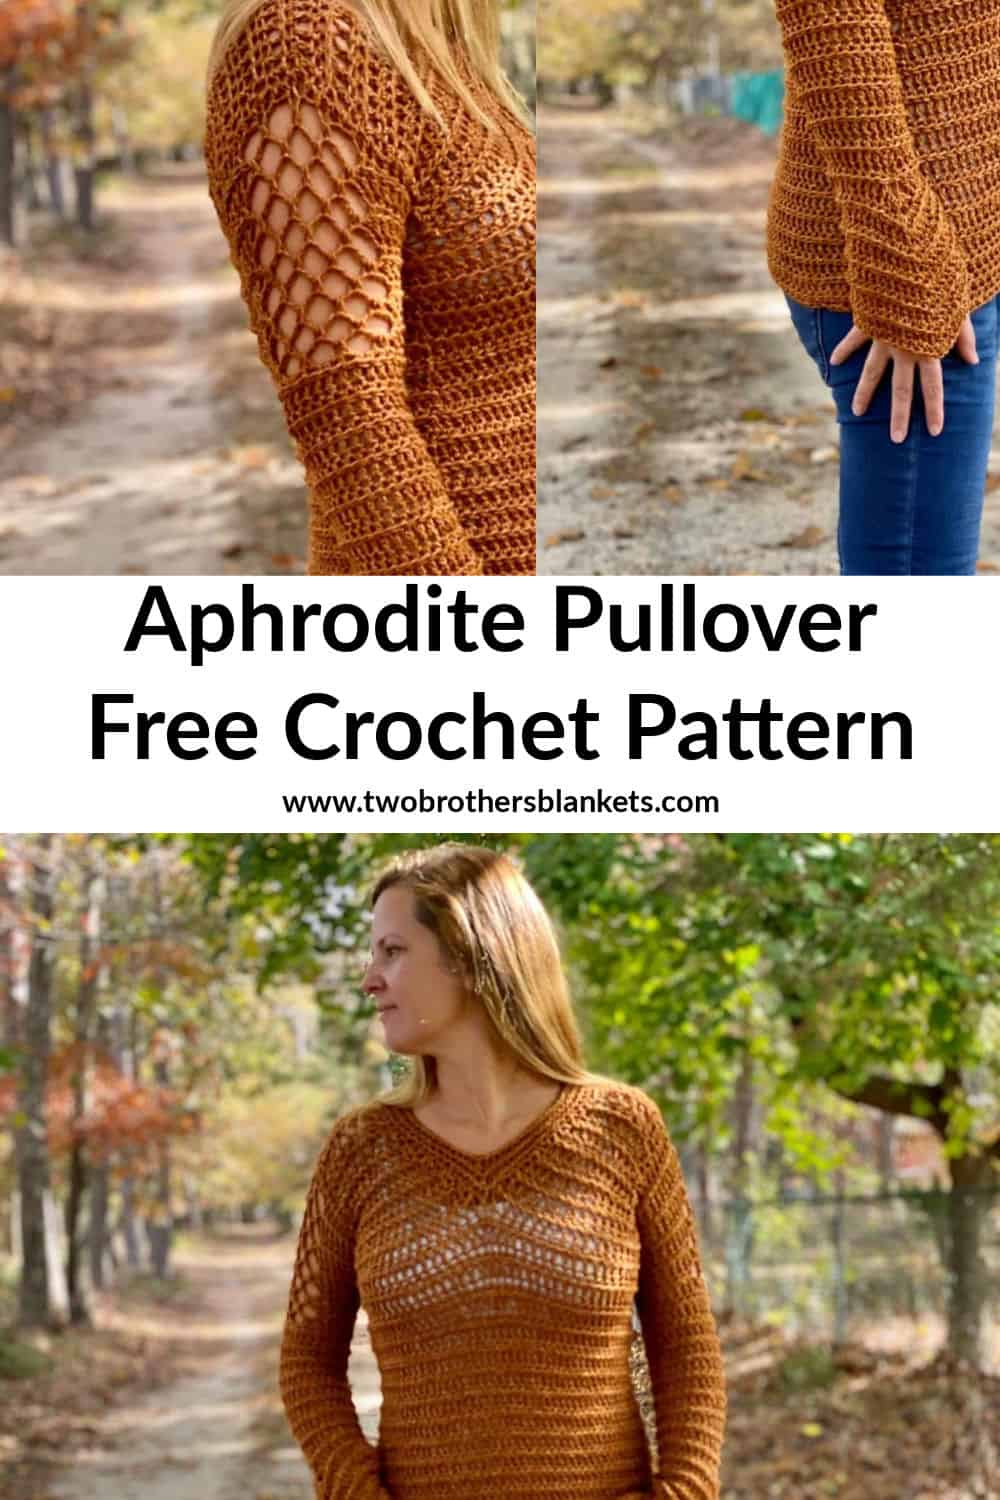
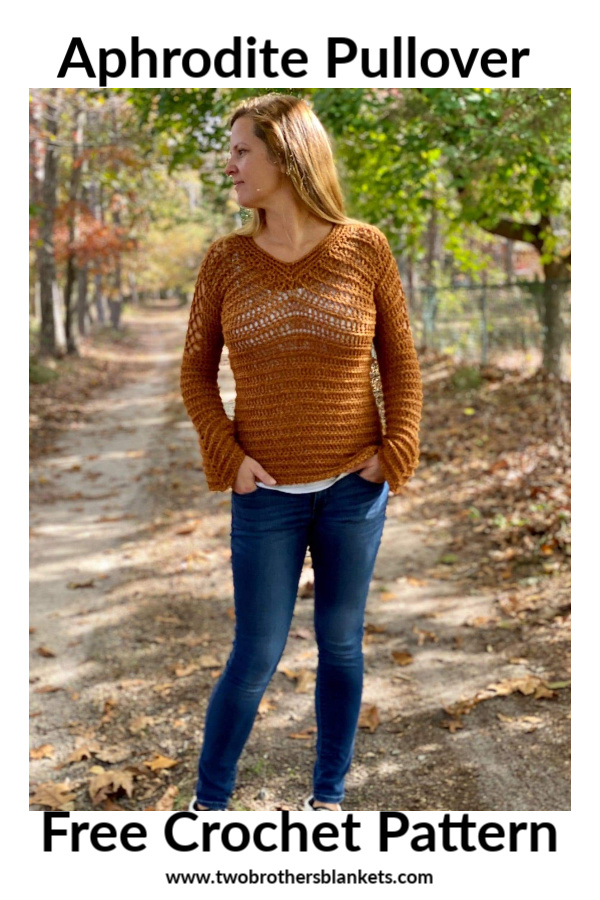
Aphrodite Pullover Free Crochet Pattern
I am so incredibly excited to have another guest designer on the blog today! Anastasia is a designer that I “met” earlier this year and I must say, her unique eye for fashion and crochet design goes beyond anything I’ve ever seen! She is so talented and I am honored to have her on the blog sharing her Aphrodite Pullover crochet pattern!
About the Designer:
Hello, I’m Anastasia of Journey Chanel Designs. I am a happily married Mommy to 4 beautiful little girls, 1 of which is named Journey Chanel. Yes… I really named my business after her. Lol. I had been crocheting on & off for 22 years, but when I got put on bed rest with Journey (Baby #3) I started making her cute little baby items just to keep my sanity. Fast forward 2 more years, I was pregnant again & put back on bed rest. So again I started making clothes for the new baby & Journey.
I got really inspired by Vanessa Montoro’s work, with how intricate & beautiful her work is. I eventually came across the Crochet Facebook Groups & Instagram, where my mind was completely blown. I found out I wasn’t alone, that crochet doesn’t have to be just a hobby, & that crochet doesn’t have to be a grandma thing, as so many people had told me back when I was younger. I had gotten so inspired by the use of textures & colors that I finally dipped my toe in the deigning pool. Now I am full blown designer that can NOT stop dreaming of more designs. I never thought I would ever be at this point in my life, but here I am making items I love & getting to see so many people love my work. There truly is nothing more satisfying than that.
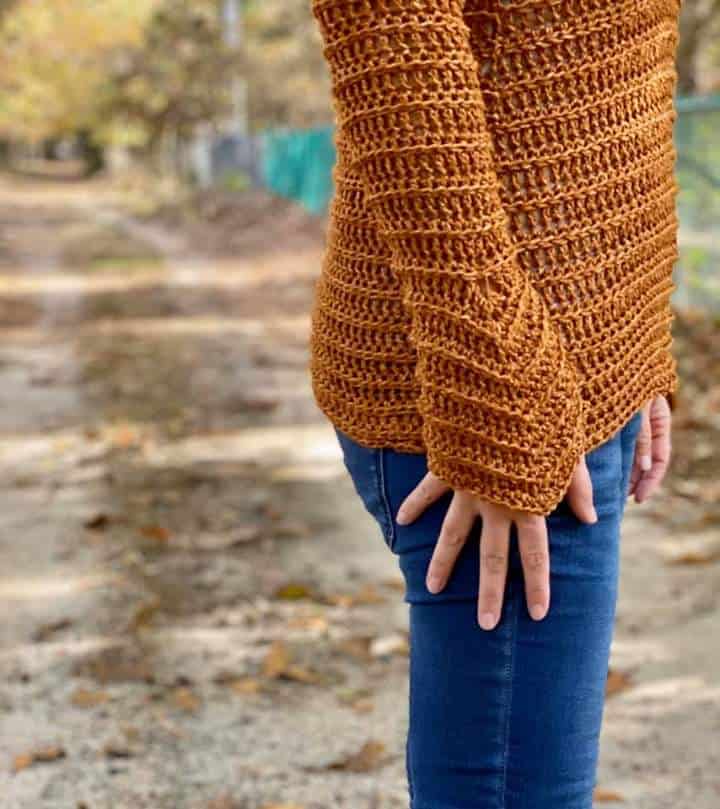
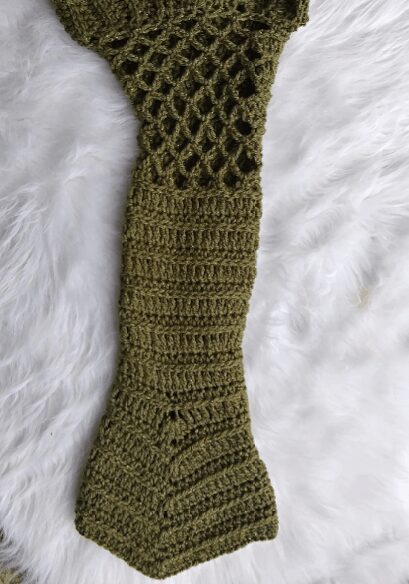
When coming up with ideas for Michelle, I knew I wanted it to represent me & my style. It had to have a LOT of texture, it had to be chic, with a whimsical look, & a little touch of lace. I knew I wanted something a little different, so I started exploring Goddesses. I got so inspired by Aphrodite’s look & story, that I created lace at the top of the sleeves with a bell sleeve at the bottom.
I want to thank Michelle for giving me this incredible opportunity & honestly couldn’t be more humbled. I hope you all enjoy making the Aphrodite Pullover as much as I did making it. This beauty was truly a labor of love, & I couldn’t be happier to share my passion with you. I am so excited to see what colors you all choose.
You can purchase the ad-free, printable pdf version of this crochet pattern on Ravelry and Etsy!
Aphrodite Pullover Crochet Pattern
Materials:
*#4 Weight / Aran/ Worsted Weight Yarn (I used Red Heart “With Love Metallic”)
*Size J/6 mm hook
*Tapestry Needle
*Scissors
*2 stitch markers. (Optional)
Gauge:
10 Sts x 6 rows = 4”
Ch 12, dc in 3rd ch & in each ch across, turn,
now rep rows 2 & 3 on straps for a total of 6 rows = 4”
Sizes:
*Sizing is based on the widest part of your body
*Small – 34”
*Medium –38”
*Large –44”
*X Large –48”
*2XL – 52”
*3XL – 56”
*4XL – 60”
*You can completely customize the length by Adding/ Subtracting the 2 Repeat Rows
*The sizes will be listed. S (M, L, XL, 2XL, 3XL, 4XL)
*Pattern has a positive ease of 2-4”
Skill level:
Advanced Beginner/Intermediate
Approximate Yardage:
Small – Approximately 740 Yards
Medium – Approximately 840 Yards
Large – Approximately 900 Yards
X Large – Approximately 1100 Yards
2X Large – Approximately 1300 Yards
3X Large – Approximately 1500 Yards
4X Large – Approximately 1700 Yards
*Please keep in mind yarn length will vary based on body & length
Abbreviations:
Repeat – rep
Slip Stitch- SL st
Chain- CH
Yarn Over- YO
Space- sp
Skip Space- sk
Single crochet- sc
Double crochet- dc
Double crochet 2 together- dc2tog
Half double crochet- hdc
Half double crochet 2 together- hdc2tog
Half double crochet 3 together- hdc3tog
Wrong side- WS
Right side- RS
Special Stitches
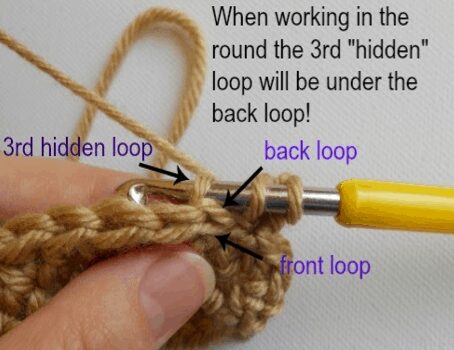
3rd Back Loop – crochet in 3rd HIDDEN loop
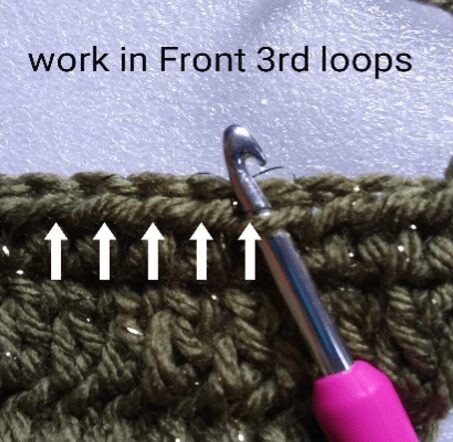
3rd Front Loop – crochet in same 3rd loop as the back 3rd loop, but when it’s facing you
Notes
* I crochet very loose, so anyone that crochets on the tighter side I would highly recommend going up a hook size or 2. Just make sure to check your gauge before starting!
* I suggest highlighting your size before starting so you don’t lose track.
*Pattern is worked from top to bottom, all in 1 piece.
* Ch 2 at beginning of hdc rows, counts as 1st stitch
*Ch2 at beginning of dc rows Does NOT count as 1st st
* If you see a specific portion of the pattern in ( ) parentheses, that means the pattern sequence is ALL in that same stitch.
* If you see a specific portion of the pattern in * *, that means the pattern sequence is to be repeated until specified to stop.
* If you see a number before a stitch, that means you make that many stitches in the same stitch.
* EXAMPLE: 3 dc = 3 dc sts in same st
*If you see a number after a stitch, that means you crochet in that many stitches.
*EXAMPLE: sc 5 = sc in next 5 sts
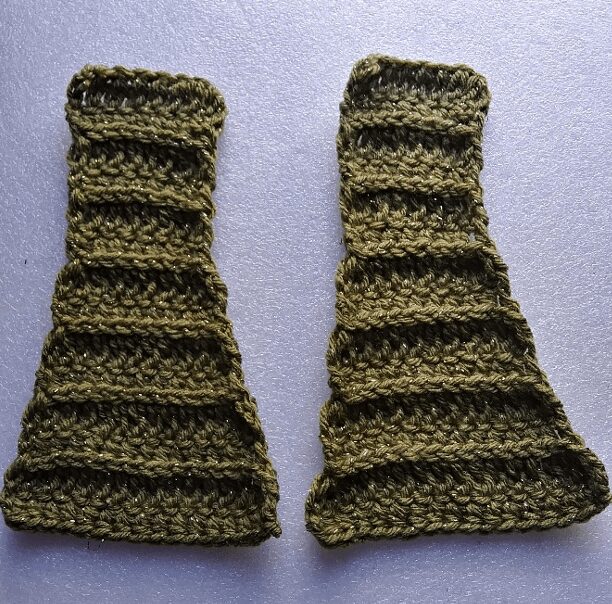
Front Straps: (Make 2)
(WS) Ch 10(10, 12, 12, 14, 14, 16), turn, dc in 3rd ch from hook & in each ch across, turn. 8(8, 10, 10, 12, 12, 14) dc
(RS) Ch 1, hdc in same st & in each st across, turn. 8(8, 10, 10, 12, 12, 14) hdc
(WS) Ch 2, dc in same st, dc in Front 3rd loop of hdc from previous row & in each 3rd loop across, dc in last st, turn. 8(8, 10, 10, 12, 12, 14) dc
(RS) Ch 1, hdc in same st & in each st across, turn. 8(8, 10, 10, 12, 12, 14) hdc
(WS) Ch 2, 2dc in same st, dc in Front 3rd loop of hdc from previous row & in each 3rd loop across, 2dc in last st, turn. 10(10, 12, 12, 14, 14, 16) dc
(RS) Ch 1, hdc in same st & in each st across, turn. 10(10, 12, 12, 14, 14, 16) hdc
Rep Rows 5 & 6 — 3(4, 5, 5, 6, 6, 7) more times. 16(18, 22, 22, 26, 26, 30) sts
Finish off, weave in ends, make 2nd Strap.
Back Panel:
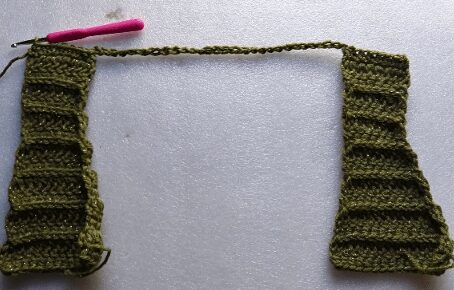
You will be working into the foundation of the chains from the straps with Right Side facing up. You will work into both front straps to create 1 piece.
The Chain you will be using to connect the straps will vary based on size.
(RS) Take your 1st strap & attach your yarn to the 1st st, Ch 1, hdc in same st & in each st across the 1st Strap, ch 20(25, 30, 35, 40, 45, 50), hdc in 1st st on 2nd strap (with Right Side Up) & in each st across the 2nd strap, turn. 36(41, 50, 55, 64, 69, 78) sts
(WS) Ch 2, dc in same st & in each st & ch across, turn. 36(41, 50, 55, 64, 69, 78) sts
Work ALL dc stitches in 3rd Front loop of hdc from prev row (except 1st & last sts)
(RS) Ch 1, hdc in same & in each st across, turn. 36(41, 50, 55, 64, 69, 78) sts
(WS) Ch 2, dc in same st, dc in 3rd Front loop of each hdc across, dc in last st, turn. 36(41, 50, 55, 64, 69, 78) sts
Rep Rows 3 & 4 – 1 time
(RS) Ch 1, hdc in same & in each st across, turn. 36(41, 50, 55, 64, 69, 78) sts
(WS) Ch 2, 2dc in same st, dc in each front 3rd loop of hdc across, 2 dc in last st, turn. 38(43, 52, 57, 66, 71, 80) sts
(RS) Ch 1, hdc in same st & in each st across, turn. 38(43, 52, 57, 66, 71, 80) sts
10- 11. Rep Rows 8 & 9 — 1(2, 3, 3, 4, 4, 5) more Times. 40(47, 58, 63, 74, 79, 90) sts
Turn, DO NOT FINISH OFF.
Body:
You will now be connecting the Back Panel to the Front Straps to create arm hole.
Beginning ch2 for hdc row counts as 1st st
(WS) Ch 2, dc in same st, dc in 3rd Front loop of hdc in each st across to last st, ch 7(8, 5, 8 , 3, 6, 2), Now take your next closest front strap & make dc in 1st st working in the 3rd Front loop of the prev hdc, dc in each 3rd front loop across to last st, dc in 1st 3rd loop on 2nd front strap, dc in each 3rd front loop across to last st, ch 7(8, 5, 8, 3, 6, 2), sl st to 1st , turn. 86 (97, 112, 123, 132, 143, 154) sts
(RS) Ch 2, hdc in next st & in each st & ch around, sl st to ch2. 86 (97, 112, 123, 132, 143, 154) sts
DO NOT TURN
YOU WILL CONTINUE THE REST OF THE BODY WORKING ONLY ON THE RIGHT SIDE
(RS) Ch2, dc in same st, dc in each 3rd Back Loop of hdc around, sl st to 1st. 86 (97, 112, 123, 132, 143, 154) sts
(RS) Sl st next 4(4, 5, 5, 6, 6, 7) sts, ch2, hdc in next st & in each st around, hdc over the beginning sl sts, sl st to ch2. 86 (97, 112, 123, 132, 143, 154) sts
(RS) Ch2, dc in same st, dc in each 3rd Back Loop of hdc around, sl st to 1st. 86 (97, 112, 123, 132, 143, 154) sts
(RS) Ch2, hdc in next st & in each st around, sl st to ch2. 86 (97, 112, 123, 132, 143, 154) sts
Rep Rows 16 & 17 — 13 more times or until desired length.
For a Shorter Length – Subtract 2 rows at a time until you have reached a comfortable length.
For a Longer Length – Add 2 rows at a time until you have reached a comfortable length.
(RS) Ch2, dc in same st, dc in each 3rd Back Loop of hdc around, sl st to 1st st. 86 (97, 112, 123, 132, 143, 154) sts
Finish off, weave in ends.
Sleeves (Make 2):
Put your garment on & find your top center stitch of your LEFT shoulder. Now count 5(6, 8, 8, 10, 10) sts to the right & place your 1st st marker.
Each row will be worked with Right Side Facing up
Beginning ch2 on hdc rows counts as 1st stitch
Each Row is also counting the amount of stitches initially skipped for the lace area
Attach yarn at the bottom center st of your arm hole, Ch1, hdc in same st & in each st around, sl st to 1st 38 (40, 44, 48, 52, 56, 66) hdc
*Note—make sure to move your st markers into row 1 so you know where to work for row 2
*Count may vary based on customizing
Ch 1, hdc2tog, hdc in each st around until you reach your 1st st marker, hdc in st marker, *ch4, sk 2, sc in next st* – rep 2(2, 3, 3, 4, 4) times, ch4, sk 2, hdc in next st, & in each st around, hdc2tog in last 2 sts, sl st to 1st 36 (38, 42, 46, 50, 54, 64) sts
Ch 2, dc2tog in same st & in next, dc in each 3rd Back Loop around until your last hdc st, ch2, *sc in next ch4 sp, ch4* – rep across, sc in last ch4 sp, ch2, dc in next 3rd Back Loop of hdc st & in each st around, dc2tog in last 2 sts, sl st to 1st st 34 (36, 40, 44, 48, 52, 62) sts
Ch 1, hdc2tog, hdc in each dc st around until last dc st, *ch4, sc in next ch 4 sp* – rep 2(2, 4, 4, 5, 5) times, hdc in next dc, & in each st around, hdc2tog in last 2 sts, sl st to 1st 32(34, 38, 42, 46, 50, 60) sts
Rep Rows 3 & 4 – 1 more time. 28(30, 34, 38, 42, 46, 56) sts
7.Ch 2, dc2tog in same st & in next, dc in each 3rd Back Loop around until your last hdc st, ch2, *sc in next ch4 sp, ch4* – rep across, sc in last ch4 sp, ch2, dc in next 3rd Back Loop of hdc st & in each st around, dc2tog in last 2 sts, sl st to 1 st 26(28, 32, 36, 40, 44, 54) sts
Ch 2, hdc in next st & in each st around, *ch4, sc in next ch4 sp* – rep across, ch1 4, hdc in next dc st & in each st around, sl st to ch2. 26(28, 32, 36, 40, 44, 54) sts
Ch 2, dc in same st, dc in next 3rd Back Loop & in each 3rd loop around until your last hdc st, ch2, *sc in next ch4 sp, ch4* – rep across, sc in last ch4 sp, ch2, dc in next 3rd Back Loop of hdc st & in each st around, sl st to 1st st 26(28, 32, 36, 40, 44, 54) sts
Rep Rows 8 & 9 – 1 time. 26(28, 32, 36, 40, 44, 54) sts
Ch 2, hdc in next st & in each st around, hdc in ch2 sp, *hdc in sc, 2 hdc in ch4 sp*-rep across, hdc in last sc sp, hdc in ch2 sp, hdc in next st & in each st around, sl st to ch2. 26(28, 32, 36, 40, 44, 54) sts
Ch 2, dc in same st, dc in next 3rd Back Loop & in each 3rd loop around, sl st to 1st st. 26(28, 32, 36, 40, 44, 54) sts
Ch 2, hdc in next st & in each st around, sl st to ch2. 26(28, 32, 36, 40, 44, 54) sts
Rep Rows 13 & 14 — 7 more times or until you reach the middle of your forearm.
For a shorter/longer length – Subtract/add to row 15. (working in multiples of 2 rows)
Find your very center st (on the top of your arm) & place a st marker, Ch 2, dc in same st, dc in each 3rd Back Loop around, (2dc, ch1, 2dc) in st marker st, dc in 3rd Back Loop in each st around, sl st to 1st . 29(31, 35, 39, 43, 47, 57) sts
Ch 2, hdc in next st & in each st across, (2 hdc, ch1, 2 hdc) in ch1 sp, hdc in each st around, sl st to ch2. 33(35, 39, 43, 47, 51, 61) sts
Ch 2, dc in same st, dc in each 3rd Back Loop across, (dc, ch1, dc) in ch1 sp, dc in each 3rd back loop around, sl st to 1st st. 35(37, 41, 45, 49, 53, 63)sts
Ch 2, hdc in next st & in each st across, (hdc, ch1, hdc) in ch1 sp, hdc in each st around, sl st to ch2. 37(39, 43, 47, 51, 55, 65) sts
Rep Rows 31 & 32 — until you reach a comfortable length.
Ending stitch count will vary based on how many repeats you do.
Finish off, weave in ends.
Rep Rows 1-34 for RIGHT Sleeve, making sure to line up your last (BACK) lace stitch on LEFT Side to the 1st (BACK) lace stitch on the RIGHT Side.
Collar:
(RS) Attach yarn in the back of the collar, ch1, hdc in same st & in each st around until you get to 1 st before the point (center front) st, hdc3tog, hdc in each st across, sl st to 1st st.
(RS) (Working in the Back 3rd Loop) Ch 1, hdc in same st and in each across until 1 st before hdc3tog from prev row, hdc3tog, hdc in each st across, sl st to 1st st.
Rep Row 2 – 1 more time or until you have reached a comfortable coverage.
Sl st in each 3rd Back Loop around, sl st to base of 1st st.
Finish off, weave in ends.

You are now finished with the Aphrodite Pullover!! I hope you enjoyed this pattern as much as I have creating it. Don’t forget to tag me when showing off your work by tagging me on Instagram or Facebook…using @journeychaneldesigns with #aphroditepullover & #journeychaneldesigns , for your chance to be featured in my Stories & Possibly My Feed!! I just love seeing people in my designs.
Love this pattern? Check out my every growing list of Free Crochet Patterns!
Follow Anastasia on Social Media:
https://www.instagram.com/journeychaneldesigns/
www.facebook.com/journeychaneldesigns
https://www.pinterest.com/JourneyCDesigns/
https://www.youtube.com/channel/UCVHl9waFc0fbHESvQyc2EMA
Pin it for later:

Michelle has been crocheting since 2011 and has been designing crochet patterns since 2014! She specializes in modern garments and accessories for your handmade wardrobe. Michelle has been featured in Happily Hooked Magazine, thehooknooklife.com, wecrochet.com, ourmakerlife.com, and several other websites. She is committed to providing the highest quality crochet information and patterns that instill a true feeling of pride, enjoyment, and accomplishment when completing a project.

Hi. I love the pattern but have a question. In row 2 of the collar, it says to ch1, Hdc in same st j in each stitch across until 1 st before hdc3tog from previous row, hdc3tog, HRV in each stitch across, slip Stitch to 1 st.
What does j mean?
That was a typo. I’ve fixed it. Thanks!
I love this! Thank u for sharing. I know I crochet tight but idk how tight , I had to go to an L/8mm to get the gauge. That’s how much I love this sweater I never do gauge swatches but u said u might need to go up so I thought I better do it glad I did lol ???? but thank u
Hi, loving the pattern so far! I am a little unsure though how the stitch count goes from 99 to 97 for rows 1 and 2 of the body? (Size medium).
Thanks ????
Hi! That is a typo. Thanks for pointing it out! I’ll get it fixed.
Ok, no problems! I’ll stick with 99 and continue on!
Thanks ????
I’m unsure about the sleeves. It says to chain 4 and skip 2, yet it still goes down in count as if just from the hdc2tog