
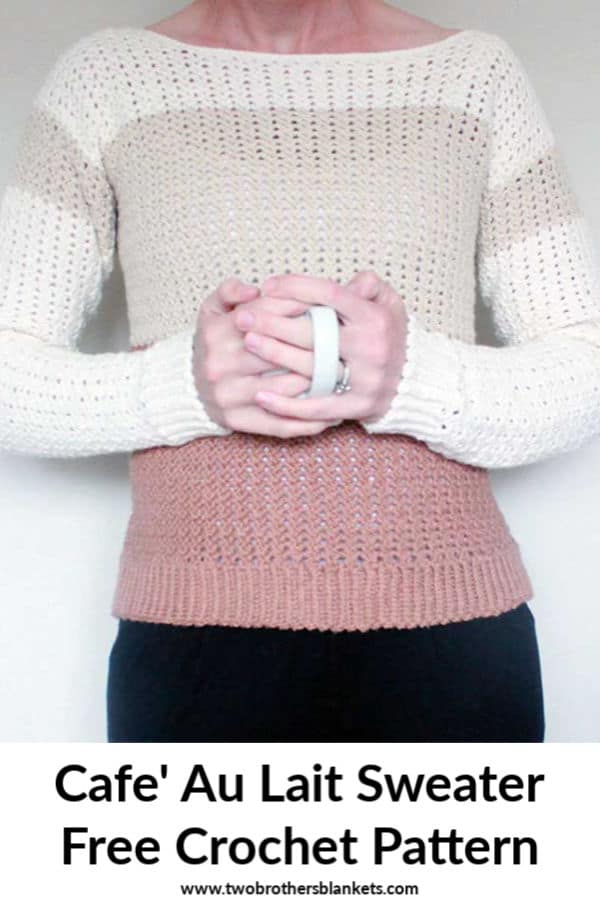
I am so excited to have Sarah of Ned and Mimi on the blog today sharing her brand new Cafe’ au Lait Sweater crochet pattern! Ya’ll know how much I love sweater patterns, and I am so in love with this one!
About Me
Hello my crocheting friends! I’m Sarah, crochet designer and blogger over at Ned & Mimi.
I am thrilled to be doing a guest post here on Two Brother’s Blankets, and so grateful to Michelle for giving me the opportunity. I have to say, however, that designing a sweater for the queen of crochet sweaters (don’t delete this Michelle, it’s true!) has been more than a little daunting!
My mom taught me to crochet as a child but I promptly forgot everything I had learned until I picked up my crochet hook again to make a blanket for my first baby. And since then, I haven’t been able to put the hook down. When I’m not working in my day job as a software developer, or running around after my young family, you can pretty much guarantee that I’m thinking about crochet!
Until I started crocheting, I always thought that I was too left-brained to be creative. Now I think crochet is the perfect mix of art and logic. I love to combine design with function and I try my best to be intentional about what I create and design – it must be going to a good home, or fulfilling a purpose in my own home!
I live in Ireland (where the unpredictable weather ensures ample time for crocheting), with my husband and three children.
Where to find me
Website: https://nedandmimi.com
Pinterest: https://pinterest.com/nedandmimi
Facebook: https://facebook.com/nedandmimi
Instagram: https://instagram.com/nedandmimi
Ravelry: https://www.ravelry.com/designers/sarah-ruane

About the Café au Lait Crochet Sweater
This lightweight crochet sweater has been quite a while in the making!
I first started it while on a family holiday in the South of France, where I had many a ‘café au lait’ to try to keep up with my three small children. I’m not sure why, but I had visions of myself lounging by the pool crocheting while the kids splashed happily at my feet.
“You just sit and relax mommy, we’ll amuse ourselves over here, it’s your holiday too after all.” Am, nope!
Needless to say, I got very little crochet done on that holiday and so the sweater ribbing (yes, that’s all I got done) came back home with me again.
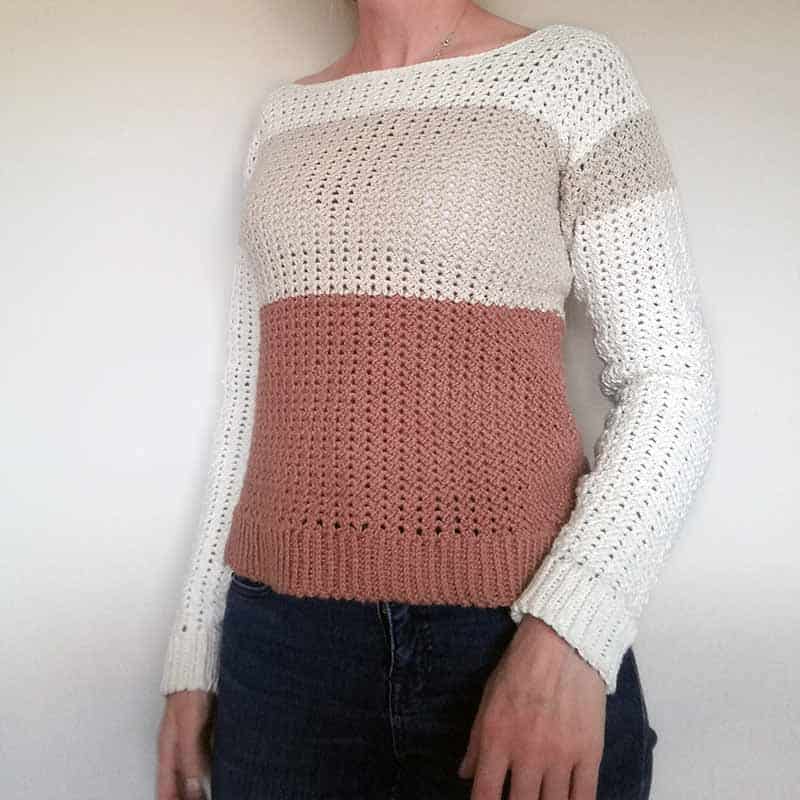
And now it’s done and I am thrilled – both that it’s finally finished, and how it turned out!
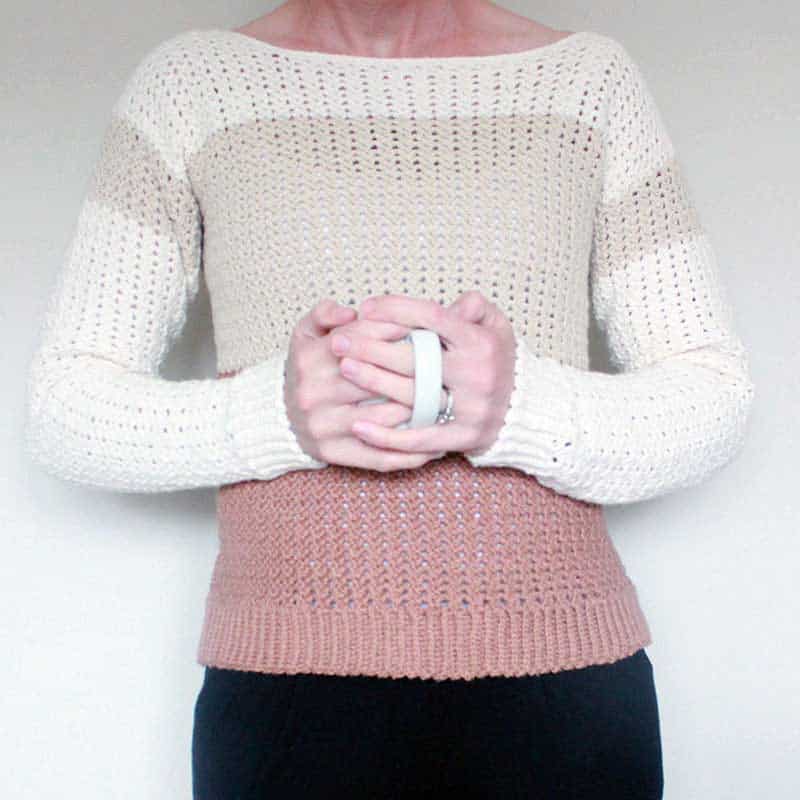
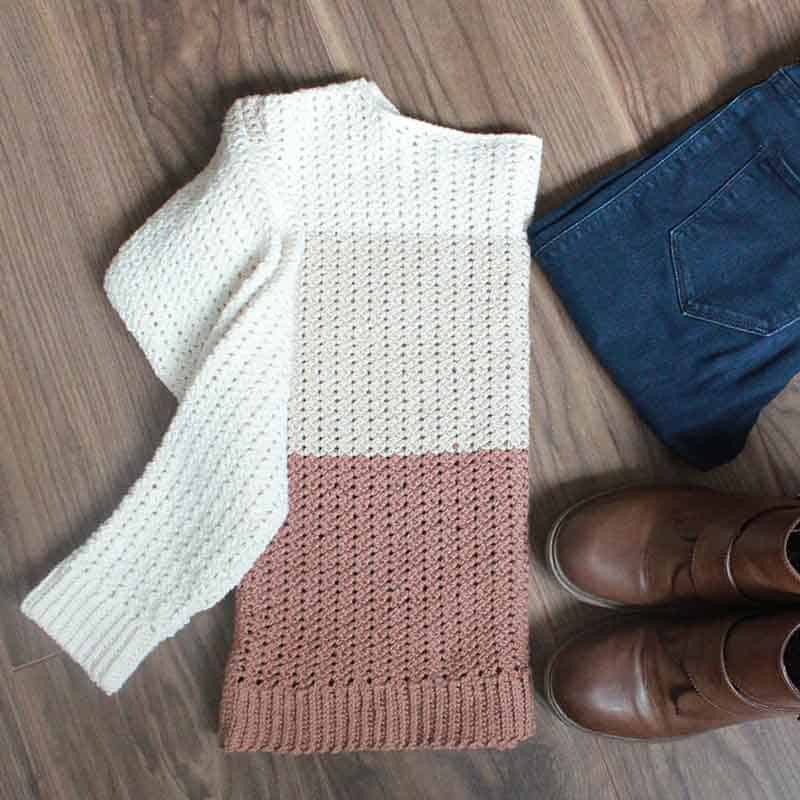
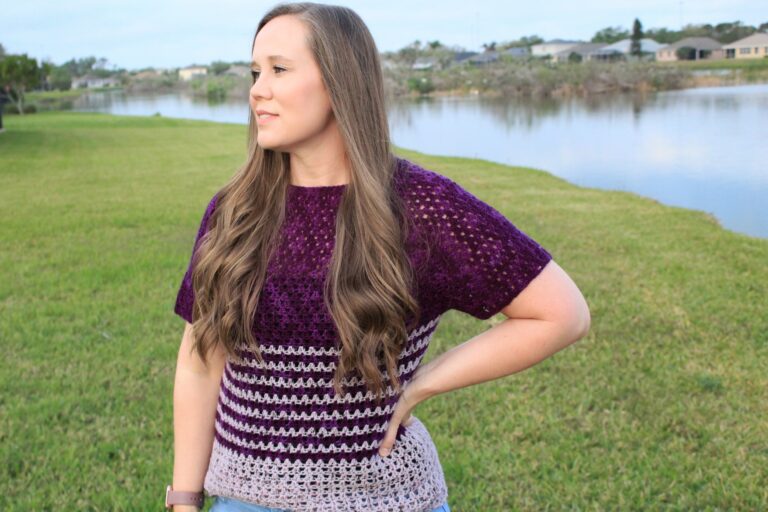
This sweater is a perfect layering piece for fall. The open picot pattern has tiny little gaps to let air in; you could easily wear it with a tank underneath for more moderate temps or with a couple of extra layers for cooler weather. My favourite way to wear it is with jeans and ankle boots (mom uniform anyone!?).
The color blocks are completely customizable to let you inject some of your own style into the design.
If you would like to purchase an ad-free pdf pattern (which includes a full schematic and stitch charts for the sleeve increases) you can get it through Ravelry.
Cafe’ au Lait Sweater
Get the PDF Pattern!
Upgrade to the ad-free, printable PDF download on Ravelry!
Just want the free version? Scroll down below!
Cafe’ au Lait Sweater Crochet Pattern
NOTES (please read these first!)
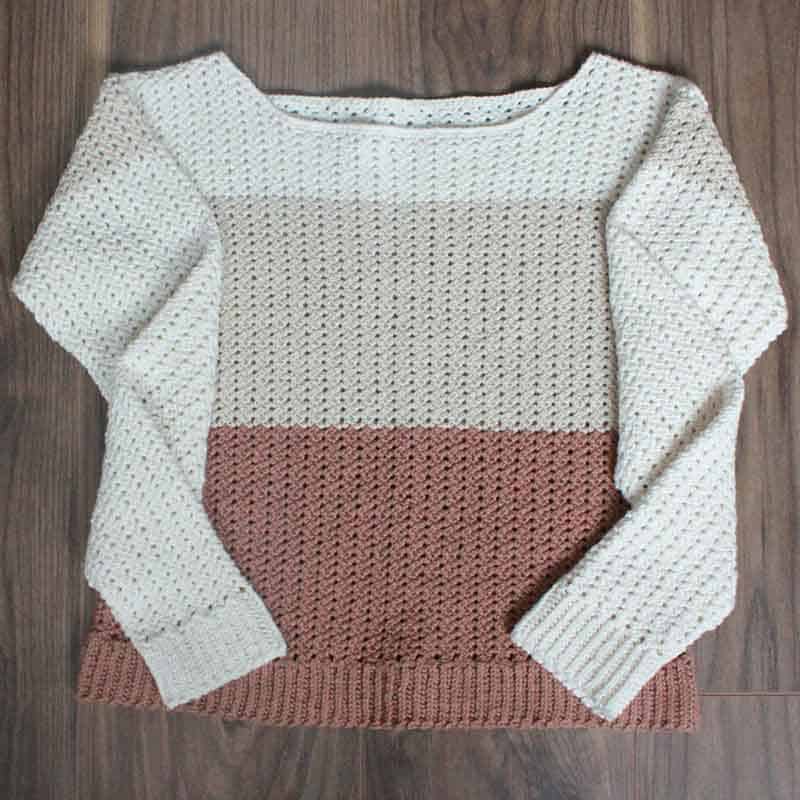
Construction
The sweater is worked flat, from the bottom up, in three parts:
1) Front
2) Back
3) Sleeves x 2
Shoulders, sides and sleeves are all seamed at the end
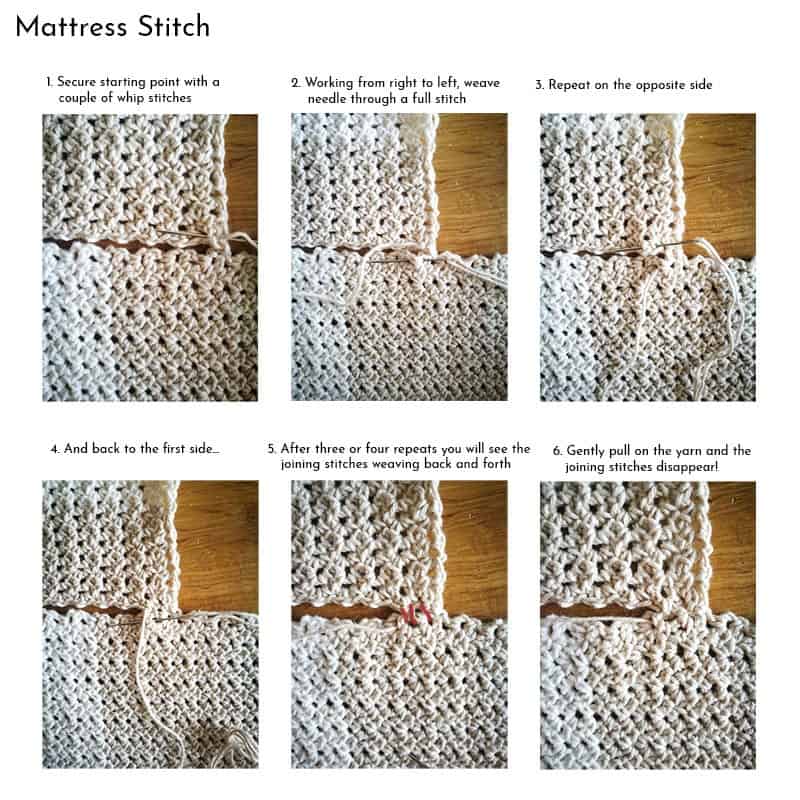
I used the whip stitch method to seam the shoulders, and mattress stitch for the sides and sleeves.
Size & Fit
The sizes in this pattern are based on the body measurements as laid out by the Craft Yarn Council (https://www.craftyarncouncil.com/standards/woman-size). Please see Finished Measurements above for all details.
This sweater is designed to have a loose (but not oversized) fit, with 4” of positive ease on the bust and upper arms. For each of the CYC sizes, I used the larger measurement as the starting point for that size e.g. Size XS is bust size 28”-30” – I used 30” as the starting point. Adding 4” of ease to this measurement gives a sweater circumference of 34”.
If you are between sizes you could probably consider sizing down (this is completely at your own discretion of course)
Adjustments
If you wish to add/subtract length to/from the body panel, the best place to do this is before starting the “Neckline Shaping” section. Simply crochet nore/less rows depending on the length you would like. Make sure to end on a RS row before starting the Neckline shaping.
Written Pattern Notes
Before you start, go through the pattern and highlight/mark the stitch and row counts that correspond to the size you are making. (This will make your life much easier!)
Instructions are given for the smallest size; larger sizes given in ()
Ch 2 at the start of each row counts as one stitch (unless otherwise indicated)
Stitch counts (NB):
For the ribbing, the stitch count for each row is given in []
For the main pattern (see Special Stitches below) it is easier to count picots rather than stitches.. At the end of each row I will indicate X picots. + 2 half picots. This ‘X’ includes the number of full picots in the row, not including the half picot at the start and end of the row.
If no stitch or picot count is indicated, then the count is the same as the previous row.
FINISHED MEASUREMENTS (all measurements in inches)
Size XS (to fit 30” bust)
Body width (one panel): 17”
Body Length (incl. ribbing): 20.5”
Neckline Width: 10”
Sleeve circumference at shoulder: 14.75”
Sleeve Circumference at wrist: 7”
Sleeve length (incl. ribbing): 19.5”
Size S (to fit 34” bust)
Body width (one panel): 19”
Body Length (incl. ribbing): 21”
Neckline Width: 11.5”
Sleeve circumference at shoulder: 15.25”
Sleeve Circumference at wrist: 7”
Sleeve length (incl. ribbing): 20”
Size M (to fit 38″ bust)
Body width (one panel): 21″
Body length (incl ribbing): 21.25″
Neckline width: 12.5″
Sleeve circumference (at shoulder): 16″
Sleeve circumference (at wrist): 7.5″
Sleeve length (incl. ribbing): 20″
Size L (to fit 42″ bust)
Body width (one panel): 23″
Body length (incl ribbing): 21.5″
Neckline width: 14″
Sleeve circumference (at shoulder): 17″
Sleeve circumference (at wrist): 7.5″
Sleeve length (incl. ribbing): 20.5″
Size XL (to fit 46″ bust)
Body width (one panel): 25″
Body length (incl ribbing): 21.75″
Neckline width: 15″
Sleeve circumference (at shoulder): 18.5″
Sleeve circumference (at wrist): 8″
Sleeve length (incl. ribbing): 20.5″
Size 2XL (to fit 50″ bust)
Body width (one panel): 27″
Body length (incl ribbing): 22″
Neckline width: 16″
Sleeve circumference (at shoulder): 20.5″
Sleeve circumference (at wrist): 8″
Sleeve length (incl. ribbing): 21″
GAUGE
8 Pattern Repeats (see Special Stitches below) x 14 rows = 4” x 4”
MATERIALS
Hook: 4mm/G-6 crochet hook (or hook required to meet gauge) – I tend to crochet a bit tightly so you may need to go down to a 3.5mm right from the start
Yarn: Any DK weight/3/Light yarn
The amounts given here are for Paintbox Yarns Cotton DK (137m/125yds per 50g skein; Size 3/DK/Light; 100% Cotton)
Size XS
COLOR A: 255 yds/230m
COLOR B: 190 yds/175m
COLOR C: 760 yds/695m
TOTAL: 1205 yds/1100m
Size S
COLOR A: 275 yds/250m
COLOR B: 205 yds/190m
COLOR C: 820 yds/750m
TOTAL: 1300 yds/1190m
Size M
COLOR A: 300 yds/275m
COLOR B: 225 yds/205m
COLOR C: 905 yds/830m
TOTAL: 1430 yds/1310m
Size L
COLOR A: 330 yds/300m
COLOR B: 250 yds/225m
COLOR C: 995 yds/905m
TOTAL: 1575 yds/1430m
Size XL
COLOR A: 370 yds/335m
COLOR B: 275 yds/250m
COLOR C: 1105 yds/1010m
TOTAL: 1750 yds/1595m
Size 2XL
COLOR A: 410 yds/380m
COLOR B: 310 yds/285m
COLOR C: 1235 yds/1135m
TOTAL: 1955 yds/1800m
Misc: Yarn Needle and stitch markers
SPECIAL STITCHES
Pattern Repeat
The main stitch pattern used in this sweater is a simple open picot with a single crochet on either side. (I tend to crochet a bit on the tight side so you might find that you need to go down a hook size to get gauge)
Open Picot Pattern
Make a gauge swatch for the open picot stitch pattern as follows:
Multiple: 3 + 2 (+ 4 for base chain)
The following swatch gives 8 full picots + 2 half picots and 16 rows.
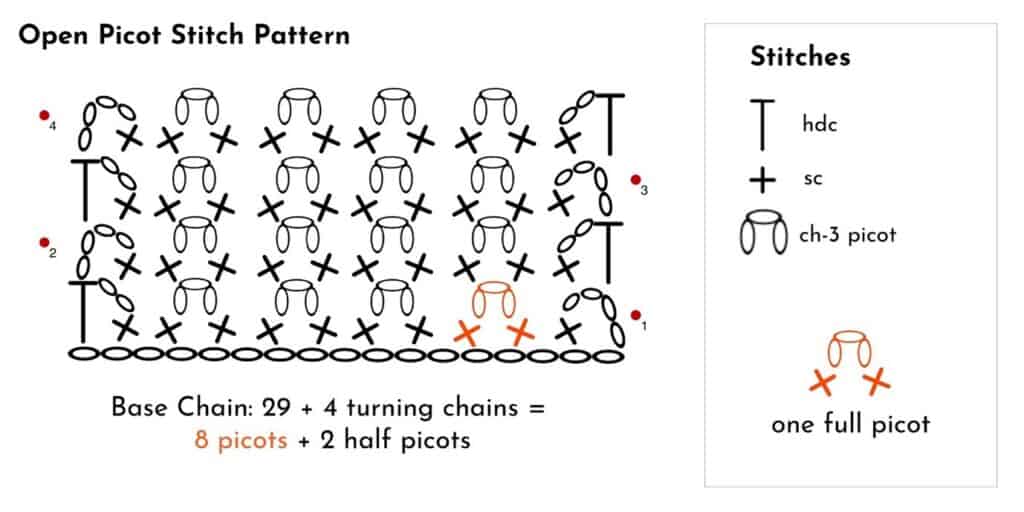
Foundation Chain: Ch 33 (29 base chains + 4 turning chains)
Row 1: sc into 6th ch from hook, *skip 1 ch, sc in next ch, ch 3, sc into next ch; repeat from * until 3 ch remain, sk 1 ch, sc into second last ch, ch 2, hdc into very last ch, turn
Row 2: ch 4, sc into next ch-2 sp, *[sc, ch 3, sc] into next ch-3 sp; repeat from * until you reach the ch-4 sp from the previous row, [sc, ch 2, hdc] into last ch-4 sp, turn [8 picots + 2 half picots]
Rows 3-16: Repeat Row 2
WRITTEN PATTERN
Abbreviations ( US Terms)
sp = space
st = stitch
sc = single crochet
ch = chain
sl st = slip stitch
hdc = half double crochet
hd sl st = half double slip stitch
blo = back loop only
inc = increase
RS = right side
WS = wrong side
C1 = Color 1
C2 = Color 2
C3 = Color 3
BODY: FRONT
RIBBING
There are two ribbing options:
- hd sl st in blo
This gives a nice thick, ‘knit-look’ ribbing but it is slow to crochet and pretty tricky with a small hook
- hdc in blo
This option is much easier and faster to crochet but doesn’t look as much like knit ribbing. It is still lovely though!
The method for both options is the same – simply crochet the ribbing to your required length (in inches), and start working along the long edge for the body section
All sizes: XS (S, M, L, XL, 2XL)
Foundation Chain: Using C1, ch 13
RIBBING OPTION 1: hd sl st ribbing
ROW 1:
Yarn over, insert hook into the back loop only of second chain from hook and pull up a loop. DO NOT yarn over, continue to pull the hook through the bottom two loops on the hook (hd sl st made). Continue to hd sl st in the blo of each chain, turn [12]
ROW 2:
Ch 1 (does not count as a st), hd sl st in the blo of each st across, turn [12]
ROWS 3 – N:
Repeat Row 2 until you have achieve a length of 17″ (19″, 21″, 23″, 25″, 27″)
Do not fasten off.
RIBBING OPTION 2: hdc ribbing
ROW 1:
hdc into the back loop only of second chain from hook. Repeat for each ch across, turn [12]
ROW 2:
Ch 1 (does not count as a st), hdc blo of each st across, turn [12]
ROWS 3 – N:
Repeat Row 2 until you have achieve a length of 17″ (19″, 21″, 23″, 25″, 27″)
Do not fasten off.
MAIN BODY
You will now continue working lengthways along the edge of the ribbing.
Don’t worry too much about where you position your scs as you crochet along the edge.. Just try to do 8 picots for every 4 inches of ribbing and you should easily reach your target picots for the row.
ROW 1 (RS):
Ch 4, sk a small space (about the width of one sc), sc, *sk another small space, [sc, ch 3, sc (beside the first sc)]; repeat from * along the edge of the ribbing until only the very first row remains i.e. space for another two sts, sc, ch 2, hdc, turn
[32 (36, 40, 44, 48, 52) picots + 2 half picots]
If you would like to count all your stitches for this row, the total stitch count (including all chains) is [169 (189, 209, 229, 249, 269)]
ROW 2 (WS):
Still using C1, [ch 4, sc] in ch-2 sp, *[sc, ch 3, sc] in next ch-3 sp; repeat from * across until you reach the ch-4 sp, [sc, ch 2, hdc] in last ch-4 sp, turn
ROWS 3 – 26 (26, 28, 29, 30, 31):
Repeat Row 2 [24 (24, 26, 27, 28, 29) times]
On the last hdc of the last row, change to COLOR 2 for the last yarn over so that you are starting your next row with C2.
ROWS 27 – 52 (27 – 52, 29 – 56, 30 – 58, 31 – 60, 32 – 62) (RS -> WS):
Using C2, repeat Row 2 [26 (26, 28, 29, 30, 31) times]
ROWS 53 – 59 (53 – 59, 57 – 63, 59 – 67, 61 – 67, 63 – 69): (WS -> RS)
Using C3, repeat Row 2 [7 (7, 7, 9, 7, 7) times]
BEGIN NECKLINE SHAPING
All sizes: XS (S, M, L, XL, 2XL)
ROW 60 (60, 64, 68, 68, 70) (WS):
[Ch 4, sc] in ch-2 sp,
*[sc, ch 3, sc] in next ch-3 sp; repeat from * [8 (9, 11, 12, 13, 14) times],
**[sc, ch 1, sc] in next ch-3 sp; repeat from ** [13 (15, 15, 17, 19, 21) times],
***[sc, ch 3, sc] in next ch-3 sp; repeat from *** [8 (9, 11, 12, 13, 14) times],
[sc, ch 2, hdc] in last ch-4 sp, turn
[32 (36, 40, 44, 48, 52) picots + 2 half picots]
NECKLINE (RHS)
ROW 61 (61, 65, 69, 69, 71) (RS):
[Ch 4, sc] in ch-2 sp, *[sc, ch 3, sc] in next ch-3 sp; repeat from * [7 (8, 10, 11, 12, 13) times], sc in next ch 3 sp, turn
[1 half picot + 8 (9, 11, 12, 13, 14) picots + 1 sc]
ROW 62 (62, 66, 70, 70, 72) (WS):
Ch 1, *[sc, ch 3, sc] in next ch-3 sp; repeat from * [7 (8, 10, 11, 12, 13) times], [sc, ch 2, hdc] in last ch-4 sp, turn
[1 ch + 8 (9, 11, 12, 13, 14) picots + 1 half picot]
ROW 63 (63, 67, 71, 71, 73) (RS):
[Ch 4, sc] in ch-2 sp, *[sc, ch 3, sc] in next ch-3 sp; repeat from * [6 (7, 9, 10, 11, 12) times], sc in next ch 3 sp, turn
[1 half picot + 7 (8, 10, 11, 12, 13) picots + 1 sc]
ROW 64 (64, 68, 72, 72, 74) (WS):
Ch 1, *[sc, ch 3, sc] in next ch-3 sp; repeat from * [6 (7, 9, 10, 11, 12) times], [sc, ch 2, hdc] in last ch-4 sp, turn
[1 ch + 7 (8, 10, 11, 12, 13) picots + 1 half picot]
ROW 65 (65, 69, 73, 73, 75) (RS):
[Ch 4, sc] in ch-2 sp, *[sc, ch 3, sc] in next ch-3 sp; repeat from * [5 (6, 8, 9, 10, 11) times], sc in next ch 3 sp, turn
[1 half picot + 6 (7, 9, 10, 11, 12) picots + 1 sc]
Sizes XS (S, M, L) only
ROW 66 (66, 70, 74) (WS):
Ch 1, *[sc, ch 1, sc] in next ch-3 sp; repeat from * [5 (6, 8, 9) times], [sc, hdc] in last ch-4 sp, turn [21 (24, 30, 33) sts]
Fasten off.
Sizes XL (2XL) only
ROW 74 (76) (WS):
Ch 1, *[sc, ch 3, sc] in next ch-3 sp; repeat from * [(10, 11) times], [sc, ch 2, hdc] in last ch-4 sp, turn [1 ch + 11 (12) picots + 1 half picot]
ROW 75 (77) (RS):
[Ch 4, sc] in ch-2 sp, *[sc, ch 3, sc] in next ch-3 sp; repeat from * [(9, 10) times], sc in next ch 3 sp, turn [1 half picot + 10 (11) picots + 1 sc]
ROW 76 (78) (WS):
Ch 1, *[sc, ch 1, sc] in next ch-3 sp; repeat from * [(9, 10) times], [sc, hdc] in last ch-4 sp, turn [33 (36) sts]
Fasten off.
NECKLINE (LHS)
ROW 61 (61, 65, 69, 69, 71) (RS):
With RS facing, count 9 (10, 12, 13, 14, 15) full picots from the left edge {do not include the half picot when counting}, insert hook and pull up a loop.
Ch 1, *[sc, ch 3, sc] in next ch-3 sp; repeat from * [7 (8, 10, 11, 12, 13) times], [sc, ch 2, hdc] in last ch-4 sp, turn
[1 ch + 8 (9, 11, 12, 13, 14) picots + 1 half picot]
ROW 62 (62, 66, 70, 70, 72) (WS):
[Ch 4, sc] in ch-2 sp, *[sc, ch 3, sc] in next ch-3 sp; repeat from * [6 (7, 9, 10, 11, 12) times], sc in next ch 3 sp, turn
[1 half picot + 7 (8, 10, 11, 12, 13) picots + 1 sc]
ROW 63 (63, 67, 71, 71, 73) (RS):
Ch 1, *[sc, ch 3, sc] in next ch-3 sp; repeat from * [6 (7, 9, 10, 11, 12) times], [sc, ch 2, hdc] in last ch-4 sp, turn
[1 ch + 7 (8, 10, 11, 12, 13) picots + 1 half picot]
ROW 64 (64, 68, 72, 72, 74) (WS):
[Ch 4, sc] in ch-2 sp, *[sc, ch 3, sc] in next ch-3 sp; repeat from * [5 (6, 8, 9, 10, 11) times], sc in next ch-3 sp, turn
[1 half picot + 6 (7, 9, 10, 11, 12) picots + 1 sc]
ROW 65 (65, 69, 73, 73, 75) (RS):
Ch 1, *[sc, ch 3, sc] in next ch-3 sp; repeat from *[5 (6, 8, 9, 10, 11) times], [sc, ch 2, hdc] in last ch-4 sp, turn
[1 ch + 6 (7, 9, 10, 11, 12) picots + 1 half picot]
Sizes XS (S, M, L) only
ROW 66 (66, 70, 74) (WS):
[Ch 2 (counts as 1 hdc), sc] in ch-2 sp, *[sc, ch 1, sc] in next ch-3 sp; repeat from *[5 (6, 8, 9) times], sc in top of turning ch-1
[21 (24, 30, 33) sts]
Fasten off.
Sizes XL (2XL) only
ROW 74 (76) (WS):
[Ch 4, sc] in ch-2 sp, *[sc, ch 3, sc] in next ch-3 sp; repeat from * [(9, 10) times], sc in next ch-3 sp, turn [1 half picot + 10 (11) picots + 1 sc]
ROW 75 (77) (RS):
Ch 1, *[sc, ch 3, sc] in next ch-3 sp; repeat from * [(9, 10) times], [sc, ch 2, hdc] in last ch-4 sp, turn [1 ch + 10 (11) picots + 1 half picot]
ROW 76 (78) (WS):
[Ch 2 (counts as 1 hdc), sc] in ch-2 sp, *[sc, ch 1, sc] in next ch-3 sp; repeat from *[(9, 10) times], sc in top of turning ch-1 [33 (36) sts]
Fasten off.
BODY: BACK
All sizes: XS (S, M, L, XL, 2XL)
Repeat as for FRONT as far as ROW 52 (52, 56, 58, 60, 62) i.e. until you are finished with COLOR 2
ROWS 53 – 63 (53 – 63, 57 – 67, 59 – 71, 61 – 73, 63 – 75):
Using C3, repeat Row 2 [11 (11, 11, 13, 13, 13) times]
(End on RS)
BEGIN NECKLINE SHAPING
ROW 64 (64, 68, 72, 74, 76) (WS):
[Ch 4, sc] in ch-2 sp,
*[sc, ch 3, sc] in next ch-3 sp; repeat from * [6 (7, 9, 10, 10, 11) times],
**[sc, ch 1, sc] in next ch-3 sp; repeat from * [17 (19, 19, 21, 25, 27) times],
***[sc, ch 3, sc] in next ch-3 sp; repeat from *** [6 (7, 9, 10, 10, 11) times],
[sc, ch 2, hdc] in last ch-4 sp, turn
[32 (36, 40, 44, 48, 52) picots + 2 half picots]
NECKLINE (RHS)
ROW 65 (65, 69, 73, 75, 77) (RS):
[Ch 4, sc] in ch-2 sp, *[sc, ch 3, sc] in next ch-3 sp; repeat from * [5 (6, 8, 9, 9, 10) times], sc in next ch 3 sp, turn
[1 half picot + 6 (7, 9, 10, 10, 11) picots + 1 sc]
ROW 66 (66, 70, 74, 76, 78) (WS):
Ch 1, *[sc, ch 1, sc] in next ch-3 sp; repeat from * [5 (6, 8, 9, 9, 10) times], [sc, hdc] in last ch-4 sp
[21 (24, 30, 33, 33, 36) sts]
Fasten off and leave a long tail.
NECKLINE (LHS)
ROW 64 (64, 68, 72, 74, 76) (RS):
With RS facing, count 7 (8, 10, 11, 11, 12) full picots from the left edge {do not include the half picot when counting}, insert hook and pull up a loop. Ch 1, *[sc, ch 3, sc] in next ch-3 sp; repeat from * [5 (6, 8, 9, 9, 10) times], [sc, ch 2, hdc] in last ch-4 sp, turn
[1 ch + 6 (7, 9, 10, 10, 11) picots + 1 half picot]
ROW 66 (66, 70, 74, 76, 78) (WS):
[Ch 2 (counts as 1 hdc), sc] in ch-2 sp, *[sc, ch 1, sc] in next ch-3 sp; repeat from *[5 (6, 8, 9, 9, 10) times], sc in top of turning ch-1 [21 (24, 30, 33, 33, 36) sts]
Fasten off and leave a long tail.
SLEEVES (MAKE 2)
Sleeves are crocheted from the bottom up.
After crocheting the ribbing, the sleeve width increases gradually. The increase rate is slightly different for each size.
All sizes: XS (S, M, L, XL, 2XL)
RIBBING
Foundation Chain: Using C3, ch 13
Using the same option as you selected for the BODY RIBBING, crochet the number of ribbing rows required to achieve a length of 7” (7”, 7.5”, 7.5”, 8”, 8”)
For both Option 1 and Option 2, the number of rows is not important, just keep going until you reach the required inches for your size.
If you would like to cuffs to be a little looser, feel free to add an extra 0.5-1” of ribbing and then continue on with the sleeve body below.
Do not fasten off.
SLEEVE BODY
Sleeve increases are done gradually over a number of rows (the number differs across sizes).
Each increase row adds TWO STITCHES ONLY to the row (one at each side). After 5 increases TWO FULL PICOTS will have been added.
All sizes: XS (S, M, L, XL, 2XL)
ROW 1 (RS):
Note: The picots for this row will be a little closer together than for the body ribbing. Aim for 8 picots in every 3.5 inches.
Ch 4, sk a small space (about the width of one sc), sc, *sk another small space, [sc, ch 3, sc (beside the first sc)];
repeat from * along the edge of the ribbing until only the very first row remains i.e. space for another two sts, sc, ch 2, hdc, turn
[14 (14, 15, 15, 16, 16) picots + 2 half picots] OR [79 (79, 84, 84, 89, 89)] stitches (including chs)
XS ONLY
TWO FULL PICOTS ADDED EVERY 9 ROWS
ROW 2 (WS):
[Ch 4, sc] in ch-2 sp, *[sc, ch 3, sc] in next ch-3 sp; repeat from *[sc, ch 2, hdc] in last ch-4 sp, turn
[14 picots + 2 half picots] OR [79 sts (incl. chs)]
ROW 3 (RS – Increase Row):
[Ch 2, sc, ch 2, sc] in ch-2 sp, *[sc, ch 3, sc] in next ch-3 sp; repeat from * until you reach the ch-4 sp, [sc, ch 2, sc, hdc] in ch-4 sp, turn
[14 picots + 2 half picots + 2 extra sts] OR [81 sts (incl. chs)]
ROW 4 (WS):
[Ch 2, sc, ch 2, sc] in ch-2 sp, *[sc, ch 3, sc] in next ch-3 sp; repeat from * until you reach the ch-2 sp, [sc, ch 2, sc] in ch-2 sp, hdc in top of turning ch-2, turn
[14 picots + 2 half picots + 2 extra sts] OR [81 sts (incl. chs)]
ROW 5 (RS – Increase Row):
[Ch 3, sc, ch 2, sc] in ch-2 sp, *[sc, ch 3, sc] in next ch-3 sp; repeat from * until you reach the ch-2 sp, [sc, ch 2, sc] in ch-2 sp, ch 1, hdc in top of turning ch-2, turn
[14 picots + 2 half picots + 4 extra sts] OR [83 sts (incl. chs)]
ROW 6 (WS):
Repeat Row 5
[14 picots + 2 half picots + 4 extra sts] OR [83 sts (incl. chs)]
ROW 7 (RS):
[Ch 3, sc] in ch-1 sp, [sc, ch 2, sc] in ch-2 sp, *[sc, ch 3, sc] in next ch-3 sp; repeat from * until you reach the ch-2 sp, [sc, ch 2, sc] in ch-2 sp, [sc, ch 1, hdc] in last ch-3 sp, turn
[14 picots + 2 half picots + 6 extra sts] OR [85 sts (incl. chs)]
ROW 8 (WS):
Repeat Row 7
[14 picots + 2 half picots + 6 extra sts] OR [85 sts (incl. chs)]
ROW 9 (RS – Increase Row):
[Ch 4, sc] in ch-1 sp, [sc, ch 2, sc] in ch-2 sp, *[sc, ch 3, sc] in next ch-3 sp; repeat from * until you reach the ch-2 sp, [sc ch 2, sc] in ch-2 sp, [sc ch 2, hdc] in ch-3 sp, turn
[14 picots + 2 half picots + 8 extra sts] OR [87 sts (incl. chs)]
ROW 10 (RS – Increase Row):
This row completes the first full increase – at the end of this row you will have increased by 2 full picots (one at each side)
[Ch 4, sc] in ch-2 sp, [sc ch 3, sc] in ch-2 sp, *[sc, ch 3, sc] in next ch-3 sp; repeat from * until you reach the ch-2 sp, [sc ch 3, sc] in ch-2 sp, [sc, ch 2, hdc] in ch-4 sp, turn
[16 picots + 2 half picots] OR [89 sts (incl. chs)]
ROWS 11 – 55 (End on WS):
Repeat Rows 2 – 10 [5 times]
ROW 55 will have: [26 picots + 2 half picots]
(If you would to have a stripe at the top of the sleeve, change to C2 now. Otherwise continue on with C1)
ROWS 56 – 63
Repeat Rows 2-9 [1 time]
ROW 63 will have: [26 picots + 2 half picots + 8 extra sts]
ROW 64:
[Ch 2 (counts as 1 hdc), sc] in ch-2 sp, *[sc, ch 1, sc] in next ch-3 sp; repeat from * until you reach the last ch-4 sp, [sc, hdc] in last ch-4 sp [89 sts]
Fasten off.
S (M) ONLY
TWO FULL PICOTS ADDED EVERY 8 ROWS
ROW 2 (WS):
[Ch 4, sc] in ch-2 sp, *[sc, ch 3, sc] in next ch-3 sp; repeat from *[sc, ch 2, hdc] in last ch-4 sp, turn
[14 (15) picots + 2 half picots] OR [79 (84) sts (incl. chs)]
ROW 3 (RS – Increase Row):
[Ch 2, sc, ch 2, sc] in ch-2 sp, *[sc, ch 3, sc] in next ch-3 sp; repeat from *until you reach the last ch-4 sp, [sc, ch 2, sc, hdc] in last ch-4 sp, turn
[14 (15) picots + 2 half picots + 2 extra sts] OR [81 (86) sts (incl. chs)]
ROW 4 (WS):
[Ch 2, sc, ch 2, sc] in ch-2 sp, *[sc, ch 3, sc] in next ch-3 sp; repeat from * until you reach the last ch-2 sp, [sc, ch 2, sc] in last ch-2 sp, hdc in top of turning ch-2, turn
[14 (15) picots + 2 half picots + 2 extra sts] OR [81 (86) sts (incl. chs)]
ROW 5 (RS – Increase Row):
[Ch 3, sc, ch 2, sc] in ch-2 sp, *[sc, ch 3, sc] in next ch-3 sp; repeat from * until you reach the last ch-2 sp, [sc, ch 2, sc] in last ch-2 sp, ch 1, hdc in top of turning ch-2, turn
[14 (15) picots + 2 half picots + 4 extra sts] OR [83 (88) sts (incl. chs)]
ROW 6 (WS):
Repeat Row 5
[14 (15) picots + 2 half picots + 4 extra sts] OR [83 (88) sts (incl. chs)]
ROW 7 (RS – Increase Row):
[Ch 3, sc] in ch-1 sp, [sc, ch 2, sc] in ch-2 sp, *[sc, ch 3, sc] in next ch-3 sp;
repeat from * until you reach the ch-2 sp, [sc, ch 2, sc] in ch-2 sp, [sc, ch 1, hdc] in last ch-3 sp, turn
[14 (15) picots + 2 half picots + 6 extra sts] OR [85 (90) sts (incl. chs)]
ROW 8 (WS – Increase Row):
[Ch 4, sc] in ch-1 sp, [sc, ch 2, sc] in ch-2 sp, *[sc, ch 3, sc] in next ch-3 sp;
repeat from * until you reach the ch-2 sp, [sc ch 2, sc] in ch-2 sp, [sc ch 2, hdc] in ch-3 sp, turn
[14 (15) picots + 2 half picots + 8 extra sts] OR [87 (92) sts (incl. chs)]
ROW 9 (RS – Increase Row):
This row completes the first full increase – at the end of this row you will have increased by 2 full picots (one at each side)
[Ch 4, sc] in ch-2 sp, [sc ch 3, sc] in ch-2 sp, *[sc, ch 3, sc] in next ch-3 sp;
repeat from * until you reach the ch-2 sp, [sc ch 3, sc] in ch-2 sp, [sc, ch 2, hdc] in ch-4 sp, turn
[16 (17) picots + 2 half picots] OR [89 (94) sts (incl. chs)]
ROWS 10 – 57 (57): (WS -> RS):
Repeat Rows 2 – 9 [6 (6) times]
ROW 57 will have: [28 (29) picots + 2 half picots]
(If you would to have a stripe at the top of the sleeve, change to C2 now. Otherwise continue on with C1)
ROWS 58 – 64:
Repeat Rows 2 – 8 [1 time]
ROW 64 will have: [28 (29) picots + 2 half picots + 8 extra sts]
ROW 65:
[Ch 2 (counts as 1 hdc), sc] in ch-2 sp, *[sc, ch 1, sc] in next ch-3 sp; repeat from * until you reach the ch-4 sp, [sc, hdc] in ch-4 sp
[95 (98) sts]
Fasten off.
L ONLY
TWO FULL PICOTS ADDED EVERY 7 ROWS
ROW 2 (WS):
[Ch 4, sc] in ch-2 sp, *[sc, ch 3, sc] in next ch-3 sp; repeat from *[sc, ch 2, hdc] in last ch-4 sp, turn
[15 picots + 2 half picots] OR [84 sts (incl. chs)]
ROW 3 (RS – Increase Row):
[Ch 2, sc, ch 2, sc] in ch-2 sp, *[sc, ch 3, sc] in next ch-3 sp; repeat from * until you reach the ch-4 sp, [sc, ch 2, sc, hdc] in last ch-4 sp, turn
[15 picots + 2 half picots + 2 extra sts] OR [86 sts (incl. chs)]
ROW 4 (WS):
[Ch 2, sc, ch 2, sc] in ch-2 sp, *[sc, ch 3, sc] in next ch-3 sp; repeat from * until you reach the ch-2 sp, [sc, ch 2, sc] in last ch-2 sp, hdc in top of turning ch-2, turn
[15 picots + 2 half picots + 2 extra sts] OR [86 sts (incl. chs)]
ROW 5 (RS – Increase Row):
[Ch 3, sc, ch 2, sc] in ch-2 sp, *[sc, ch 3, sc] in next ch-3 sp; repeat from * until you reach the ch-2 sp, [sc, ch 2, sc] in last ch-2 sp, ch 1, hdc in top of turning ch-2, turn
[15 picots + 2 half picots + 4 extra sts] OR [78 sts (incl. chs)]
ROW 6 (WS – Increase Row):
[Ch 3, sc] in ch-1 sp, [sc, ch 2, sc] in ch-2 sp, *[sc, ch 3, sc] in next ch-3 sp;
repeat from * until you reach the ch-2 sp, [sc, ch 2, sc] in ch-2 sp, [sc, ch 1, hdc] in last ch-3 sp, turn
[15 picots + 2 half picots + 6 extra sts] OR [90 sts (incl. chs)]
ROW 7 (RS – Increase Row):
[Ch 4, sc] in ch-1 sp, [sc, ch 2, sc] in ch-2 sp, *[sc, ch 3, sc] in next ch-3 sp;
repeat from * until you reach the ch-2 sp, [sc ch 2, sc] in ch-2 sp, [sc ch 2, hdc] in ch-3 sp, turn
[15 picots + 2 half picots + 8 extra sts] OR [92 sts (incl. chs)]
ROW 8 (WS – Increase Row):
This row completes the first full increase – at the end of this row you will have increased by 2 full picots (one at each side)
[Ch 4, sc] in ch-2 sp, [sc ch 3, sc] in ch-2 sp, *[sc, ch 3, sc] in next ch-3 sp; repeat from * until you reach the ch-2 sp, [sc ch 3, sc] in ch-2 sp, [sc, ch 2, hdc] in ch-4 sp, turn
[17 picots + 2 half picots] OR [94 sts (incl. chs)]
ROWS 9 – 64 (RS -> WS):
Repeat Rows 2 – 8 [8 times]
(If you would to have a stripe at the top of the sleeve, change to C2 at Row 56. Otherwise continue on with C1)
ROW 64 will have: [33 picots + 2 half picots]
ROW 65:
[Ch 2 (counts as 1 hdc), sc] in ch-2 sp, *[sc, ch 1, sc] in next ch-3 sp; repeat from * until you reach the last ch-4 sp, [sc, hdc] in last ch-4 sp [104 sts]
Fasten off.
XL ONLY
TWO FULL PICOTS ADDED EVERY 6 ROWS
ROW 2 (WS):
[Ch 4, sc] in ch-2 sp, *[sc, ch 3, sc] in next ch-3 sp; repeat from * until you reach the ch-4 sp, [sc, ch 2, hdc] in ch-4 sp, turn
[16 picots + 2 half picots] OR [89 sts (incl. chs)]
ROW 3 (RS – Increase Row):
[Ch 2, sc, ch 2, sc] in ch-2 sp, *[sc, ch 3, sc] in next ch-3 sp; repeat from * until you reach the ch-4 sp, [sc, ch 2, sc, hdc] in ch-4 sp, turn
[16 picots + 2 half picots + 2 extra sts] OR [91 sts (incl. chs)]
ROW 4 (RS – Increase Row):
[Ch 3, sc, ch 2, sc] in ch-2 sp, *[sc, ch 3, sc] in next ch-3 sp; repeat from * until you reach the ch-2 sp, [sc, ch 2, sc] in last ch-2 sp, ch 1, hdc in top of turning ch-2, turn
[16 picots + 2 half picots + 4 extra sts] OR [93 sts (incl. chs)]
ROW 5 (RS – Increase Row):
[Ch 3, sc] in ch-1 sp, [sc, ch 2, sc] in ch-2 sp, *[sc, ch 3, sc] in next ch-3 sp; repeat from * until you reach the ch-2 sp, [sc, ch 2, sc] in ch-2 sp, [sc, ch 1, hdc] in last ch-3 sp, turn
[16 picots + 2 half picots + 6 extra sts] OR [95 sts (incl. chs)]
ROW 6 (RS – Increase Row):
[Ch 4, sc] in ch-1 sp, [sc, ch 2, sc] in ch-2 sp, *[sc, ch 3, sc] in next ch-3 sp; repeat from * until you reach the ch-2 sp, [sc ch 2, sc] in ch-2 sp, [sc ch 2, hdc] in ch-3 sp, turn
[16 picots + 2 half picots + 8 extra sts] OR [97 sts (incl. chs)]
ROW 7 (RS – Increase Row):
This row completes the first full increase – at the end of this row you will have increased by 2 full picots (one at each side)
[Ch 4, sc] in ch-2 sp, [sc ch 3, sc] in ch-2 sp, *[sc, ch 3, sc] in next ch-3 sp; repeat from *[sc ch 3, sc] in ch-2 sp, [sc, ch 2, hdc] in ch-4 sp, turn
[18 picots + 2 half picots] OR [99 sts (incl. chs)]
ROWS 8 – 61 (WS -> RS):
Repeat Rows 2 – 7 [9 times]
(If you would to have a stripe at the top of the sleeve, change to C2 at Row 56. Otherwise continue on with C1)
ROW 61 will have: [36 picots + 2 half picots]
ROW 62 (WS):
[Ch 4, sc] in ch-2 sp, *[sc, ch 3, sc] in next ch-3 sp; repeat from * until you reach the ch-4 sp, [sc, ch 2, hdc] in ch-4 sp, turn
[36 picots + 2 half picots]
ROWS 63 – 65 (RS -> RS):
Repeat Row 62 [4 times]
ROW 66:
[Ch 2 (counts as 1 hdc), sc] in ch-2 sp, *[sc, ch 1, sc] in next ch-3 sp; repeat from * until you reach the ch-4 sp, [sc, hdc] in ch-4 sp [113 sts]
Fasten off.
2XL ONLY
TWO FULL PICOTS ADDED EVERY 5 ROWS
ROW 2 (WS – Increase Row):
[Ch 2, sc, ch 2, sc] in ch-2 sp, *[sc, ch 3, sc] in next ch-3 sp; repeat from *[sc, ch 2, sc, hdc] in last ch-4 sp, turn
[16 picots + 2 half picots + 2 extra sts] OR [91 sts (incl. chs)]
ROW 3 (RS – Increase Row):
[Ch 3, sc, ch 2, sc] in ch-2 sp, *[sc, ch 3, sc] in next ch-3 sp; repeat from * until you reach the ch-2 sp, [sc, ch 2, sc] in last ch-2 sp, ch 1, hdc in top of turning ch-2, turn
[16 picots + 2 half picots + 4 extra sts] OR [93 sts (incl. chs)]
ROW 4 (WS – Increase Row):
[Ch 3, sc] in ch-1 sp, [sc, ch 2, sc] in ch-2 sp, *[sc, ch 3, sc] in next ch-3 sp; repeat from * until you reach the ch-2 sp, [sc, ch 2, sc] in ch-2 sp, [sc, ch 1, hdc] in last ch-3 sp, turn
[16 picots + 2 half picots + 6 extra sts] OR [95 sts (incl. chs)]
ROW 5 (RS – Increase Row):
[Ch 4, sc] in ch-1 sp, [sc, ch 2, sc] in ch-2 sp, *[sc, ch 3, sc] in next ch-3 sp; repeat from * until you reach the ch-2 sp, [sc ch 2, sc] in ch-2 sp, [sc ch 2, hdc] in ch-3 sp, turn
[16 picots + 2 half picots + 8 extra sts] OR [97 sts (incl. chs)]
ROW 6 (WS – Increase Row):
This row completes the first full increase – at the end of this row you will have increased by 2 full picots (one at each side)
[Ch 4, sc] in ch-2 sp, [sc ch 3, sc] in ch-2 sp, *[sc, ch 3, sc] in next ch-3 sp; repeat from * until you reach the ch-2 sp, [sc ch 3, sc] in ch-2 sp, [sc, ch 2, hdc] in ch-4 sp, turn
[18 picots + 2 half picots]
ROWS 7 – 66 (RS -> WS):
Repeat Rows 2 – 6 [11 times]
(If you would to have a stripe at the top of the sleeve, change to C2 at Row 60. Otherwise continue on with C1)
ROW 66 will have: [40 picots + 2 half picots]
ROW 67 (RS):
[Ch 4, sc] in ch-2 sp, *[sc, ch 3, sc] in next ch-3 sp; repeat from * until you reach the ch-4 sp, [sc, ch 2, hdc] in ch-4 sp, turn
[40 picots + 2 half picots]
ROW 68 (WS):
[Ch 2 (counts as 1 hdc), sc] in ch-2 sp, *[sc, ch 1, sc] in next ch-3 sp; repeat from * until you reach the ch-4 sp, [sc, hdc] in ch-4 sp [125 sts]
Fasten off.
FINISHING
1) Seam Shoulders
Lay the front and back panels together with the Right Sides touching (so that you are looking at the Wrong Side)
Using the long tail left at each side, seam the shoulder straps together using the whip stitch.

2) Sew sleeves to body
Lay one sleeve and the top of the body panels (that have just been seamed) flat with the Right Sides facing up
Align the sleeve so that it’s center point is exactly in line with the shoulder seam. Pin in place at the seam.
Starting at the seam, count an equal number of rows on both the front and back panels until you reach the edge of the sleeve. Join the panels to the sleeve with a pin or stitch marker.
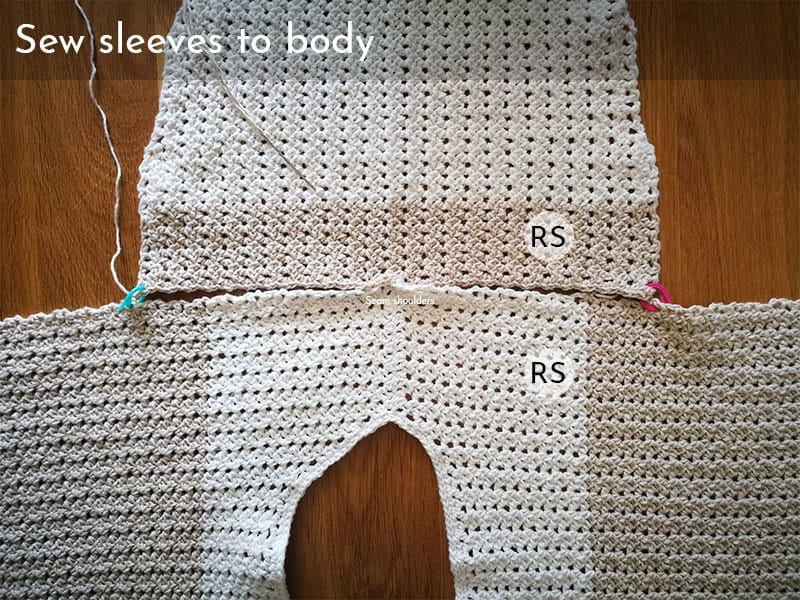
Next, sew the sleeve to the body using the mattress stitch. This stitch will blend into the fabric, making the seamline barely noticeable.
Repeat for the other sleeve
1) Seam sides
Once the sleeves have been attached, fold the front panel on top of the back panel, and line up the sleeve edges
With the Right Side facing you, seam the front and back panels together at both sides, again using the mattress stitch.
Seam the sleeve edges together using the mattress stitch. Add a couple of reinforcing stitches at the armhole.
2) Neckline
Starting at either the left or right shoulder of the back panel, insert hook into any stitch, pull up a loop and ch 1.
Finish the neckline as follows:
ROW 1:
sc evenly all around the neckline, join the round with a sl st to the top of the first sc
(You don’t need to be too concerned about stitch count, just make it as neat as you can)
ROW 2:
sl st in each sc all around the neckline, join the round with a sl st
Fasten off.
3) Weave in ends
All done!
I hope you have enjoyed this pattern, if you have questions at all, please don’t hesitate to contact me. And be sure to tag your finished hat on Instagram or Facebook using @nedandmimi or #nedandmimi!
Happy crocheting,
Sarah
Love the Cafe’ au Lait Sweater? Check out my ever growing list of Free Crochet Patterns!
Pin it for Later:


Cafe’ Au Lait sweater love the simple design but elegant
I am in late 60’s have crocheted since I was 4 years old people bought my finished goods from about 8 years old, I live in Wales as you know rainy days out number sunny ones
I crochet every day for about 4 to8 hours dependant of what I am making
before the C-19 thing locked us all in our homes I had a pitch 4 times a year with Made It Market held in doors and last year I my application for causal pitch in Swansea Market as granted where I sold my work every 4 weeks this year I planed every 6 weeks